Meatless Monday – Tom Kha Tofu & Spicy Thai Salad

2

Tom Kha Tofu and Spicy Thai Salad

Tom Kha Tofu & Spicy Thai Salad

Tom Kha Gai, or Thai Coconut Chicken soup is a very flavorful soup usually made with coconut milk, galangal and lemongrass.   I had it the first time in the 80’s at San Francisco’s Thep Lela Restaurant and fell in love.  I wanted to try a vegetarian version so opted for Tom Kha Teohu (tofu). Tofu works really well in this dish, which as a main course is a nice but light dinner. I paired it with a Thai inspired salad featuring napa cabbage and other julienned veggies tossed in a spicy Asian style vinaigrette.

I tried to include many substitutions for hard to find ingredients.  I don’t think you should have to restock your pantry for one meal, however, if you like Thai or Asian food, many of these ingredients are worth having on hand. I’m sure purists wouldn’t agree with me but I would rather make a great meal with what I have on hand and not worry if it’s not perfect or authentic.  I figure my only truly authentic Thai meals will be consumed while on vacation in Thailand surrounded by all the beauty and color of the country.  Lime zest and juice can be substituted for kaffir and ginger root or paste for galangal root. Several options are listed for red chili peppers which are fairly seasonal. I would not recommend using lite coconut milk unless you reduce the volume of broth which also reduced your yield. Vegans can use 1 teaspoon salt instead of fish sauce. To make this a more filling dish add more vegetables (snow peas and red bell pepper are good choices). Enjoy!

Tom Kha Tofu

1 can coconut milk

3  cups vegetable broth

6 kaffir lime leaves (or 1 T lime zest and1/8 cup lime juice

4-5 quarter-size slices, peeled fresh galangal or ginger

1 stalk fresh lemongrass or lemongrass paste

1 container extra firm tofu

2 cups shitake, button or crimini mushrooms

1  zucchini, halved lengthwise and thinly sliced into half circles

1 tablespoon Thai or Vietnamese fish sauce (Optional)

1 teaspoon sugar

1 red chili pepper, sliced into thin rings, 8-10 dried Thai birds eye peppers or 1 teaspoon Thai chili paste

small bunch fresh basil, leaves only or 1 T dried Thai basil

Thai veggies

  • Drain the tofu and slice it lengthwise into 8 equal pieces. Place the pieces on a couple of layers of papertowels and cover with a couple more.  Press gently to get out water.  Set aside.
  • Cut the lemongrass into a 6 inch piece, using only the bottom white part. Pound it with the side of a cleaver or mallot to release the flavor. You should be able to smell the lemongrass.   Cut into 2 inch pieces and pull apart
  • Bring the broth to a boil in a medium stockpot.  Add the galangal, lemongrass, sugar and lime.  Simmer 10 to 15 minutes.
  • Taste the broth.  If it has enough flavor, you can remove the solids with a slotted spoon.  Or you can leave them in for added flavor but you will have to warm your guests which items aren’t edible.
  • Add the coconut milk, chilies, fish sauce and simmer for another 5 minutes or so.
  • Taste your broth.  If it is too sour, add a bit more sugar.  Or you can add salt to taste.
  • Add the tofu. Turn down or off until shortly before you are ready to serve.
  • Turn the heat to medium, add mushrooms,zucchini and fresh basil leaves and cook about 5 minutes.  Serve hot.
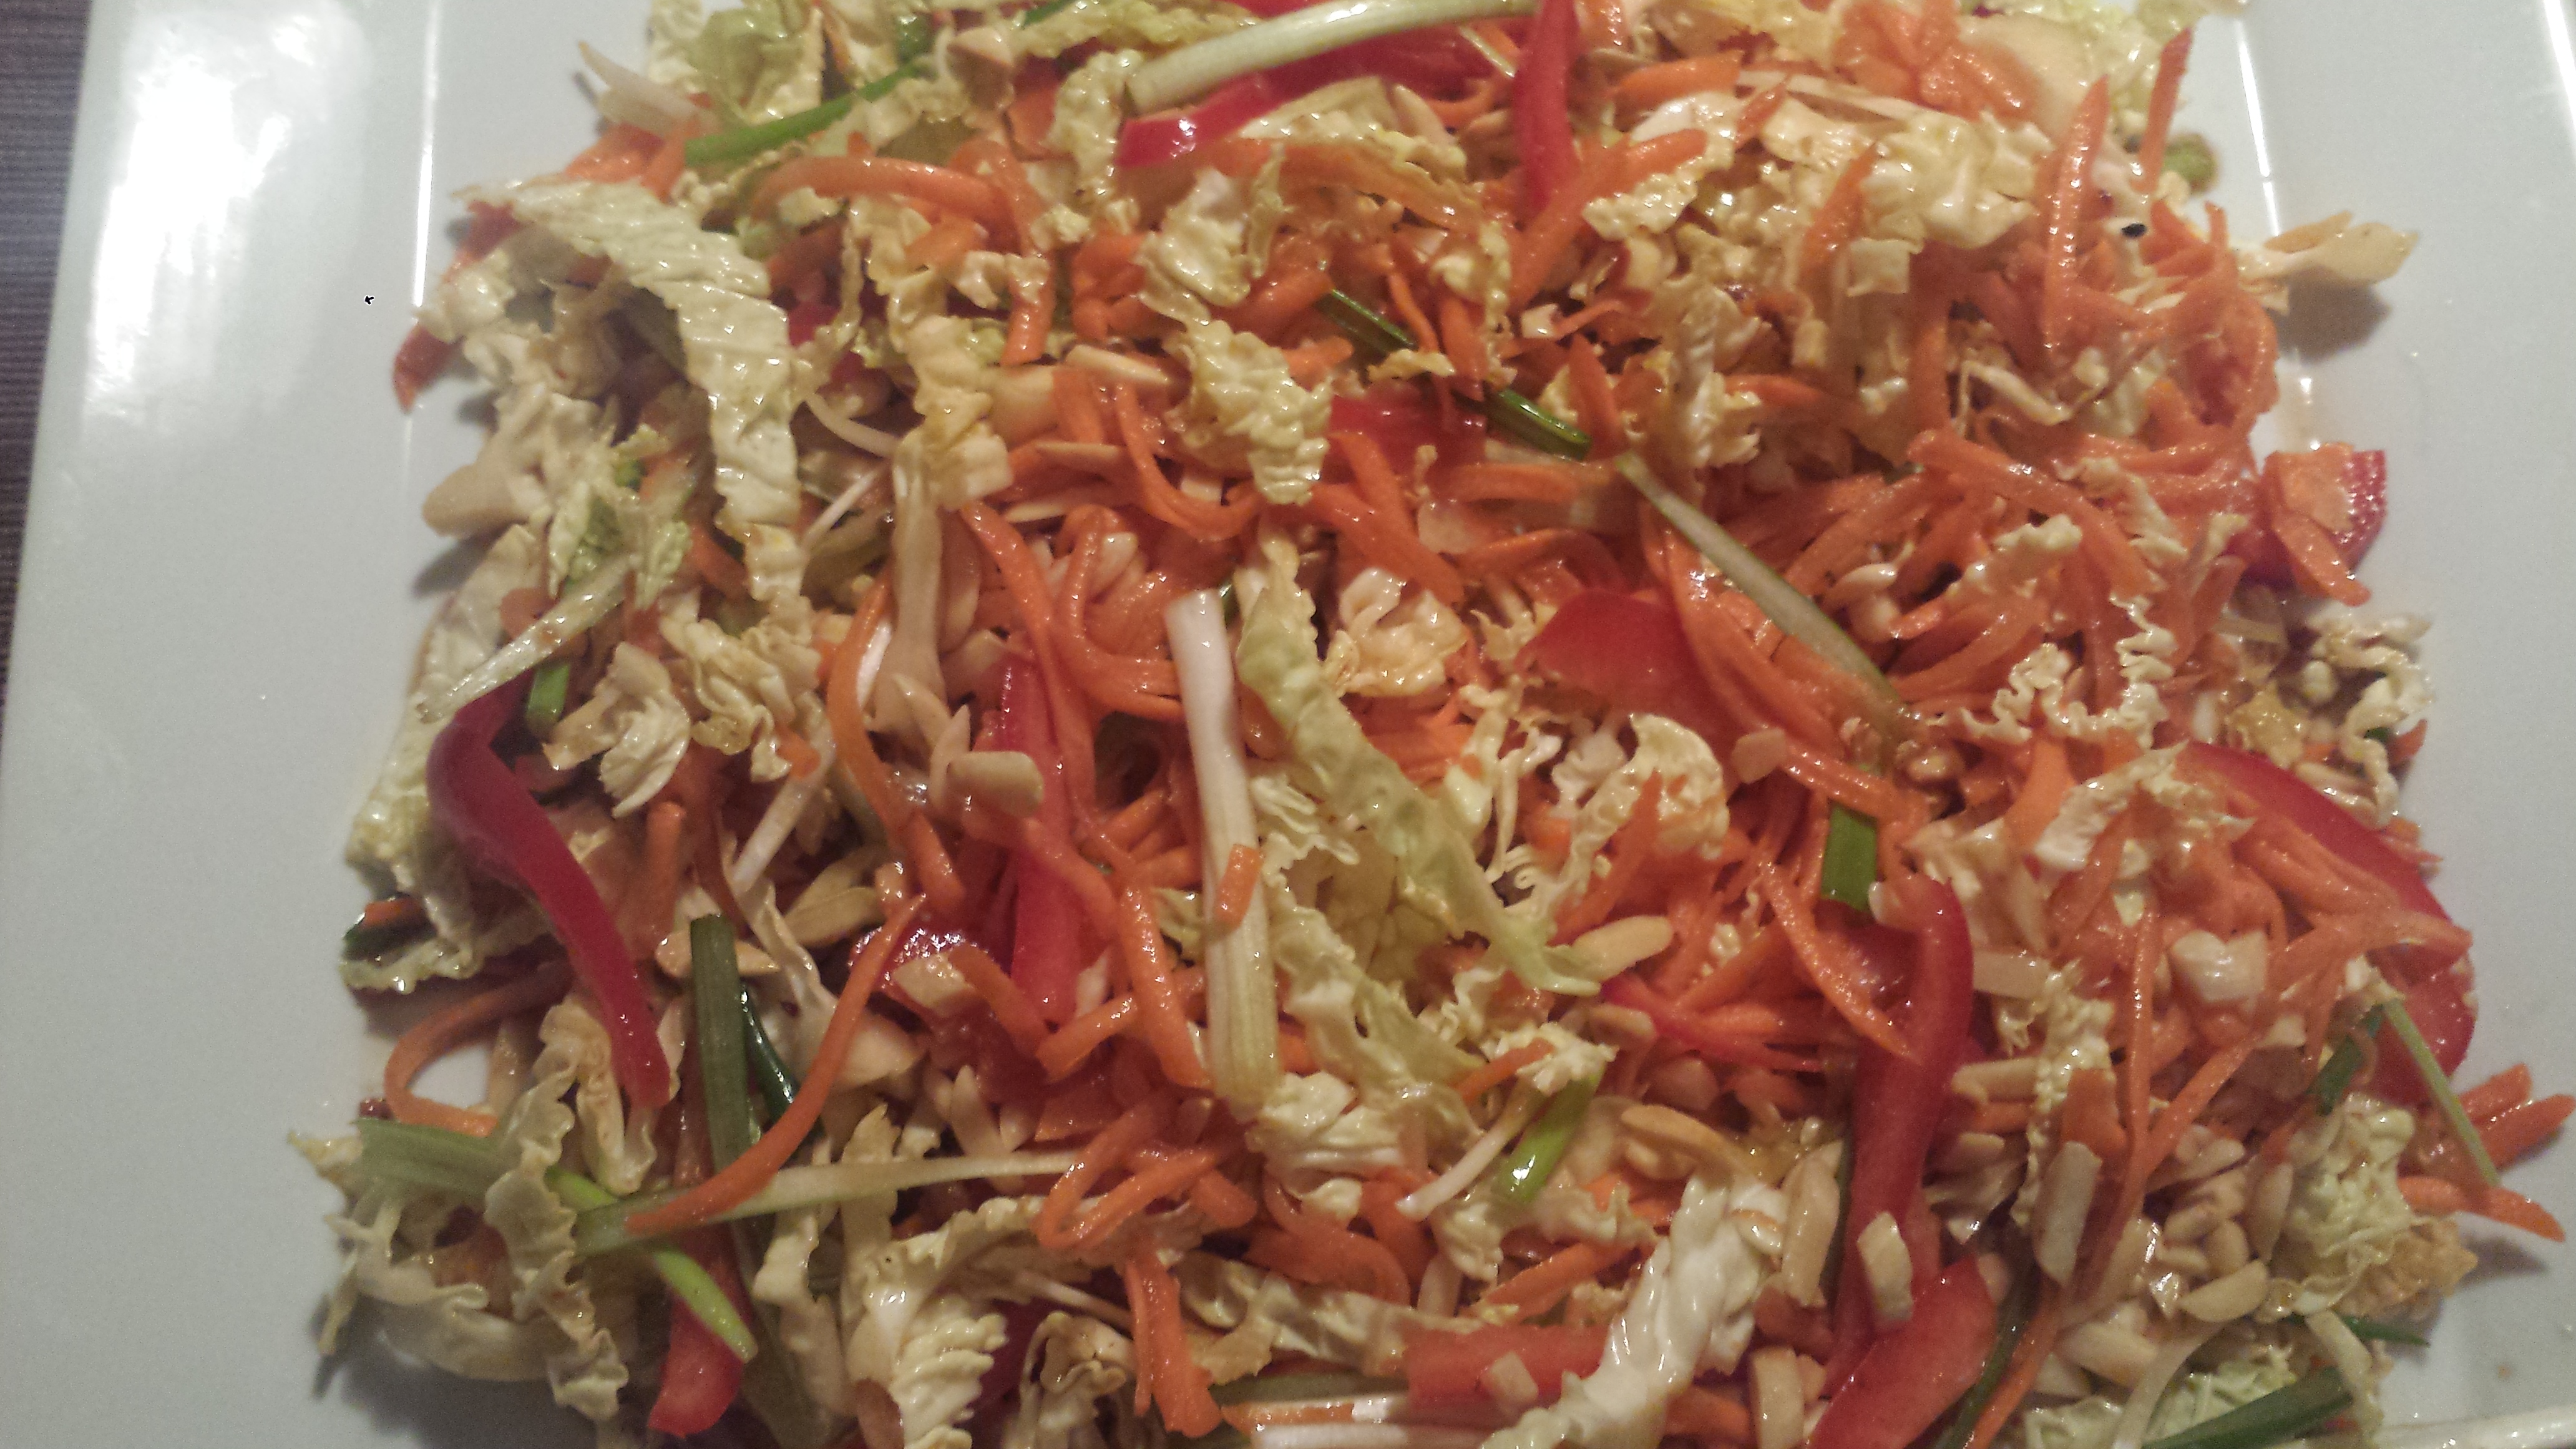
Spicy Asian Salad

1/2 red bell pepper

3 Green Onions

1/2 Napa cabbage

1 large carrot

1/2 cup slivered almonds toasted in a dry skillet for about 5 minutes or until slightly golden

Slice red pepper and napa cabbage thinly and separate.  Julienne carrot(a Cuisinart or mandolin makes it easy).  Cut scallions into 2 or 3 inch sections and sliver.  Combine all ingredients.

Dressing:

1/4 cup white vinegar

1/4 cup vegetable oil

1/8 cup rice vinegar

dash sesame oil

1T Soy Sauce

1 tsp .Chili Paste (Optional)

1 Garlic Clove (minced)

1/2 tsp sugar

Combine vinaigrette ingredients and toss with veggies.

Spicy Thai Salad

Wheatless Wednesday – Singapore Chili Crab

2

Twenty Five years ago, today, at 8:39pm, we welcomed our first child into the world, an entire month early.  What a Christmas miracle!  Little did we know how our lives were about to change.  Now he is a grown man, college graduate and out in the working world. For this special “25 on the 25th” birthday/Christmas dinner I want to serve a memorable feast worthy of the occasion.  I have made Singapore Crab one time before and it was really tasty, a bit messy but fun to eat – a real crowd pleaser.  It sounds perfect! Traditionally, Singapore Chili Crab is made with live crab but that is not my style.  You can buy crab already cracked and cleaned which will save some time (and mess) but it’s not that difficult to do yourself.  I have included directions below.  I couldn’t find red chili peppers since they are out of season, so I used chili pepper paste.  If you are using fresh chili peppers, make sure you wear gloves to protect your hands from the chili oil, which is almost impossible to remove from your skin.  Singapore Chili Crab is a pretty spicy dish, so you may need to cut down on the chili peppers or use a less hot variety.  Serve over rice or rice noodles and pair with a tossed green salad to offset the heat. Merry Christmas!

Singapore Chili CrabMe and Eric 25th

 Singapore Chili Crab

Serves 4-6

2 whole Dungeness crab (cooked)

¾ cup ketchup

2 cups water

¼ cup cornstarch

1 Tbsn soy sauce

¾ cup vegetable oil

14 cloves garlic, minced

½  cup minced shallots

20 red chili peppers, minced with seeds (or chili pepper paste)

2 tsp lemon juice

2 eggs, beaten

6-8 scallions, minced

Crack and clean the crab. Make sure you make several cracks in each leg to allow the sauce to get inside.  Directions below.

  • In a large bowl, mix the ketchup, water, cornstarch and soy sauce.
  • Heat a pan (large enough to fit the crab) and saute the garlic and shallots in the oil for a few minutes.  Add chili peppers and saute for a few more minutes.  Pour sauce mixture into the pan and stir to combine.
  • Add the crab and mix to evenly coat.  Cover and let simmer until the crab is heated through.
  • Remove cover and add the lemon juice.  Stir in the beaten egg.  Sprinkle with scallions to serve.

CRACKING AND CLEANING A CRAB

crab1crab2crab3crab5

  • Place the cooked crab on a cutting board on its back. Hold the body in one hand and gently twist each of the legs and claws off with the other.  Set them aside.
  • Remove the tail flap and both flaps near the eyes.  Discard.
  • Pull off the back shell and remove the ‘dead man’, the spongy gills and the orange ‘skin’.
  • Rinse the body then cut in quarters.
  • Using a metal or wooden meat tenderizer, give several hammers to each leg, enough to crack the shell and allow access to the meat.

Grilled Oysters with Garlic Chipotle Butter

4

Grilled Oysters

Today my husband came back from the Farmers Market at Country Mart with a bag of really large fresh oysters in the shell and I knew immediately what I wanted to do with them.  A couple of years ago, our friends, Chris and Carrie, gifted us with a bag of fresh oysters they had brought back from their weekend at Point Reyes.  Not having prepared oysters before, I went on to the Hog Island Oyster Company website and found many great recipes for both raw and cooked oysters.  We opted to try their “Hog Wash” mignonette and their barbecued oysters with Garlic Chipotle Butter. We really liked the Hog Wash for dipping raw oysters, but we Loved the Garlic Chipotle Butter. We were practically licking the shells clean!

Following is the Hog Island recipe. I took a shortcut and used one whole tube of garlic paste which was much easier than peeling and chopping ¾ cup of fresh garlic.  I had a 7 oz can of chipotle chiles in adobo sauce so I used the whole thing, rather than wasting some of it.  Otherwise, I followed the recipe pretty closely. I have now done both the ‘burrito’ method and the bowl and spoon and think both work just as well..

In preparing the oysters, you can pre-shuck them using an oyster knife or put them on the grill whole until the shell pops (it is an audible pop) and you can more easily remove the top shell.  Make sure you have an oyster knife.  A regular knife will not work and is unsafe.  Click on this link for a video of proper oyster shucking technique from Hog Island.  http://hogislandoysters.com/kitchen/shucking-oysters  Enjoy!

Grilled Oysters with Garlic Chipotle Butter

The Ingredients

50 Hog Island sweet water Oysters

1/2 lb (two sticks) unsalted butter softened to room temp

1/2 cup brown sugar

1/2 cup bourbon

3/4 cup finely chopped garlic

Half of (10 oz) can of chipotle chilies in adobo sauce,chopped.

Raw Oysters

The Butter (can be made up to one week in advance, keep refrigerated)

In a medium bowl, dissolve the brown sugar with the bourbon. In a food processor or blender, combine the softened butter with the bourbon/brown sugar mixture and add the garlic and chipotles. Mix on medium/high speed until well blended (OK if some chunks remain). Lay down a sheet of parchment paper (12″ or so), scoop the butter compound onto the sheet working to form a long row. Roll the butter in the parchment, like a burrito, folding the ends as you go. Refrigerate for about two hours or until firm. The finished roll should be the dimension of a cube of butter, only longer (about a foot). When you are ready to grill, slice 1/8″ pats of butter from the butter log and place on top of your shucked, raw oysters. Allowing the butter to melt as the oysters cook. *You can also skip the log-roll and leave the butter in a airtight covered bowl (refrigerate after making). Scoop a tablespoon of the mixture onto each oyster as they grill.

Tip:  I opted for the burrito method for the butter and found it a bit gloppy at first.  It was easier to work with once it was in the refrigerator for a bit.  I rolled it in the parchment paper and went back a couple of time to form it into a more rectangular shape as it hardened.
Chipotle butter burrito Chipotle butter

The Grill

Preheat the grill to medium hot. You can pre-shuck the oysters or just place them whole on the grill.  Once you hear them pop, they will be easier to open.  Wearing an oven mitt, pick up the hot oyster and insert the tip of an oyster knife in the opening at the skinny tip of the oyster and pry the top shell off.  Place a pat of butter onto each shucked oyster and place back on the grill.  After about 2-4 minutes of bubbling and sizzling remove the oysters from the heat.  The oysters will be ready when the edges of their meat begins to curl and the butter sauce is bubbling hot.  Remove from heat and let cool slightly before eating.

Grilled Oysters wholeGrilled Oysters openingGrilled Oysters 2Grilled Oysters

Wheatless Wednesday – Seared Ahi Tuna & Sunomono

0

Ahi Tuna Dinner

Wheatless Wednesday – Seared Ahi Tuna with Sunomono, Edamame & Ahi Poke

With Guest Chef, Eric Porter

ahi eric

 We are filled with great joy to have all three of our sons home for Christmas, the first time we have all been together since June.  Our oldest son, Eric, has been interested in cooking since he was a toddler, standing on a stepstool and helping me make peanut butter cookies, pancakes and other kid favorites.  When he was older, he learned cooking basics from me and grilling techniques from his Dad.  Then he moved out and has taken cooking to a whole new level.  For the past several years, Eric and I have engaged in what I think of as friendly ‘cooking wars’, where we take photos of whatever gourmet meal we just made and text it to each other. Eric has created quite a reputation as a great cook among his friends and rightly so.  I have had the pleasure of Eric’s famous Seared Ahi Tuna several times and am pleased to have him as the first guest chef for Good Mother Diet.

Notes from the Chef – A dish like this is delicious, beautiful and looks decadent but is actually very easy once you get comfortable working with Ahi.  Ahi is a fish that is generally served raw to rare. People are sometimes are afraid of working with raw or rare fish, however if you buy your fish from a reputable local source, the fish should be good.  Keep in mind that most if not all tuna is flash frozen on the boat which is a means to preserve the flavor and keep it fresh.  Pickling the daikon takes out all the sharpness and adds a pleasant sweetness.  This is best done days before but in a pinch, it can be done that day as well.  Kept in the refrigerator, it only gets better and will last for 2 weeks.  In making the dry rub for the tuna, I find that dry ginger works best in this dish rather than fresh, because it’s easier to blend evenly with the rest of the dry spices.  The hardest part of this dish is in removing what I call ‘the horn’, the fibrous tip on each piece of tuna. It’s easy to see what to remove when you look at the grain of the fish.  There are two parts of the Ahi steak, a large piece where the grain goes one way and a small piece where the grain goes the other direction.  You need to remove the small piece which is too fibrous for this dish.  I hate to throw it out so I usually use it to make Ahi Poke.  You can also make poke with a prime piece of tuna, which makes a prettier dish, but for our purposes, we are going to make use of the less desirable bits. If I have one thing to say about Ahi tuna, less is more, because it is so good on its own. I believe that everything on your plate should look good and I like to use edible ingredients in my presentation.

Seared Ahi Tuna over Marinated Daikon

2 cups fresh Daikon radish

1 Tbsp fresh ginger, finely minced or ginger paste

¼ cup carrot or beet juice to color (optional)

Up to ½ cup rice vinegar

2 lbs fresh Ahi tuna

1 Tbsn salt

2 tsp pepper

1 tsp garlic powder

1 tsp onion powder

1 tsp ginger powder

1 tsp sesame oil

1 Tbsn Wasabi powder

Pickled ginger

  • Using a mandolin or grater, shred the radish into long strips.
  • Combine radish, ginger and juice in a container. Add ½ to ½ rice vinegar and water to cover.  Cover and refrigerate. (The longer it marinates, the better)
  • Combine all dry ingredients in a medium bowl, or a pie plate.

Ahi1Ahi2Ahi 3Ahi 4

  • Place Ahi tuna on a cutting board.  You need to remove the tough fibrous part of the tuna (the small tip section).  Using a knife, beginning at the ‘knotch’ where the grain of the fish changes, cut, as shown, taking care to remove the fibrous tissue.  Reserve the small piece of fish to make Ahi Poke.  Recipe below.
  • Dredge each piece of fish in dry rub on both sides, including edges, and brush off excess.
  • Add sesame oil to bowl and toss fish to coat evenly.  Cover and refrigerate 1 to 2 hours. You don’t want it to come to room temperature before cooking.

Ahi

  • Make wasabi paste by combining one Tablespoon wasabi powder with 1 Tablespoon water. Mix and shape into a cone.  Let sit ten minutes.
  • Heat a heavy pan until it’s almost smoking.  Sear the tuna 30 seconds to 1 minute on each side.  Remove from heat and put in the freezer for 2 minutes.
  • Remove from freezer.  Press sesame seeds into both sides. Slice and serve.

Ahi done

Ahi Poke

½ lb Ahi Tuna (whatever scraps are left from the Ahi steaks)

½ tsp sesame oil

1 tsp soy sauce

½ Tbsn lemon zest (from about half a lemon)

1 firm avocado

  • Working from the long end toward the tip of each piece, run the knife between the sections to remove the white fibrous tissue.  You will need to use your hands to pull the meat off as well. Some of it will be small scraps.  Cut the longer pieces into cubes.
  • Put tuna pieces in a bowl.  Add remaining ingredients and toss well.  Cover and refrigerate. (Best if marinated overnight or 24 hours).
  • Cut slices of avocado and arrange tuna mixture on top. Serve

Ahi Poke

Sunomono

1/2  lb salad shrimp

2 cucumbers

2 large carrots

¼ cup rice vinegar

½ tsp salt

8/8 oz package thin rice noodles

Bring a large pot of water to a boil.  Remove from heat.  Add rice noodles and let stand 3 to 5 minutes, stirring occasionally.  Drain and rinse with cold water until they are no longer hot. Noodles should be soft but firm. Gently press the water out.  Set aside.

  • Using a mandolin or grater, cut carrots into long strips
  • Using a mandolin, Cuisinart or knife, cut cucumber into thin circles
  • Rinse shrimp
  • Combine all ingredients.  You may need to use your hands.
  • Top with shrimp

CHEF TIP-You can make a pretty cool dish to hold your edamame, or anything else, by shaving the side s of a cucumber on the wide setting.  Form them into rounds and clip together with carrot or zucchini pins.

zuxxhini bowl2

Edamame

Boil fresh or frozen edamame for 3 to 5 minutes.  Drain and sprinkle liberally with salt.  Serve.

Ahi Tuna Dinner


Seared Scallops with Zucchini “Pasta”

2

Seared scallops with zucchini pasta

Seared Scallops with Zucchini “Pasta” and Roasted Beet Salad

Last summer, spent at our Maine house, was a balancing act when it came to dinner, which we rotated among friends and took turns hosting.  I had just begun the Good Mother Diet, my husband was protein heavy and mostly carb free and our friend, Rick went back to our ancestral roots with the Paleo diet.  Well here is a meal that satisfies all three!  The pasta is not real pasta, but noodles made by slicing zucchini into long, skinny spaghetti-like ribbons.  For this a mandolin works best, however, you can also use a grater, zester or potato peeler but it won’t look as nice.  If you want it to look even more like spaghetti, you can peel the zucchini before cutting it but I prefer to keep the skins (and vitamins) in the dish.

This is my favorite way to prepare beets.  Roasting, rather than boiling, intensifies the color and flavor, plus it is by far the easiest way to remove the skin.  Using varieties with different colors makes for a prettier dish.  If making the entire meal, start by roasting the beets since that can take a half hour or so, depending on the size of your beets and get the zucchini ‘pasta’ going.  The beets can be made ahead of time and will last in the refrigerator several days.  The actual cooking time of everything else is pretty short and should be done just before serving.  Paleos, like Rick, should omit the pistachios, cheese and seasoning/salt.

Serves 4

Beet Salad

Roasted Beet Salad

4 beets

1-2 Tbsn olive oil

1 head butter lettuce (washed and separated)

Vinaigrette ( ¼ cup olive oil, ¼ cup red wine vinegar, 1 Tbsn Dijon Mustard, salt and pepper)

Feta (optional)

  • Cut leafy stalks off the beets, taking care not to cut into the flesh. (You want to keep all the juice inside).  Reserve leaves for another use or chop them and saute in olive or butter with garlic and serve on the side.

raw beets Beet packages

  • Wash and dry beets but don’t peel them. (The peel will slide off easily after they are roasted).  Lay them on a large piece of aluminum foil. Brush them with olive oil and fold the foil up and seal into a leak-proof package, or you can use a covered baking dish. Bake at 400 degrees for about 45 minutes or until you can easily pierce them with a fork.  Larger beets can take up to an hour, so check often. Be careful when you open the pouches, as they will be very steamy and can burn your fingers.
  • Remove from heat and let cool.  Once they are cool enough to handle, slip the skins off by hand or with a papertowel.  (You will be surprised how easy it is).
  • Slice and serve with lettuce and sliced apple.  Drizzle with vinaigrette and top with feta, if desired.

Roasted Beets

Seared Sea Scallops and Zucchini “Pasta”

1 lb large sea scallops

2 Tbsn avocado oil (or another oil that does well in high heat)

1/2 tsp creole seasoning (like Tony Chachere’s) or just salt and pepper

¼ cup white wine

4 – 6 zucchini (depending on size)

1 Tbsn olive oil plus 1 Tbsn butter (or all olive oil)

¼ cup shelled pistachios, coarsely chopped (Optional)

2 oz parmesan, grated or thinly sliced Optional)

  • Using a mandolin, cut the unpeeled zucchini into thin pasta sized ribbons. (A grater or potato peeler will work as well). Place the ‘pasta’ strands on a papertowel and sprinkle with salt. . Cover
    with a papertowel and press down gently.  Let them ‘sweat’ for about 30 minutes to remove the extra moisture.

zucchini noodlesPistachios

  • Toast the chopped pistachios in a small, dry pan on medium heat for a few minutes (until you can smell them cooking). Let cool.
  • Heat olive oil and butter in a saute pan over medium heat. Add the garlic and saute for a few minutes.  Turn off the heat and add ‘pasta’ and pistachios. Toss gently.  Top with parmesan if desired..
  • Wash and dry scallops.  Put them in a bowl with the oil and seasoning.  Gently mix until scallops are coated. The oil should not pool in the bottom of the bowl.  Pour off excess oil that doesn’t mix back in. The scallops won’t sear if there is too much moisture or oil.
  • Heat a cast iron, or other skillet, on medium high to high heat.  The pan should be very hot.  Cook scallops in a single layer, without crowding.  You may have to cook them in two batches.  Cook for about 2 minutes or until golden brown.  Turn and cook the other side 2 minutes.
  • Remove scallops from the pan.  Add wine to the hot pan and stir to deglaze and reduce the liquid to make a sauce. If you overcook and too much liquid goes away, just add a bit of water.
  • To serve, place ¼ of the ‘pasta’ mixture on each plate.  Top with ¼ of the scallops.  Drizzle with wine sauce.

Seared scallops with zucchini pasta

Wheatless Wednesday – Crab Quinoa Tower

4

crab tower

Crab season is here!  I had my first last week and it was sweet and delicious. It is less expensive and fresher to crack and clean your crab at home, however, if you don’t mind paying a bit extra, or you are in a rush for time, it can be nice to have it done at the market.  I don’t mind doing it myself and have included directions below.

I am excited to incorporate another grain into this menu that have never made at home before, quinoa.  As is my custom with new things, I googled quinoa and was impressed by what I found and sorry I haven’t made it before.  The Incas, who believed Quinoa to be sacred, called it “chisaya mama” or “mother of all grains”.  It is increasingly popular for its high protein content, dietary fiber and minerals; phosphorous, magnesium and iron.  It’s also a source of calcium, so good for vegans and those lactose intolerant. As a bonus it is gluten free.  For all those reasons, quinoa is considered a superfood. (www.Wikipedia.com) I used Rainbow quinoa but any kind will work just fine.

One note of warning, this recipe calls for an empty can for forming the tower.  Mine got recycled tonight so I had to open a new can.  Make sure your can has rims on both the top and bottom so the can opener has something to grab on to.  My salad tonight was only going to have only mixed greens and arugula but ended up with a few garbanzo beans and mandarin oranges since I had to open both cans to make my tower.

FRESH CRAB QUINOA TOWER

Serves 4

Ingredients:

1 cup quinoa

2 cups vegetable broth

1 Tbsn olive oil

1 large ripe tomato, sliced into rounds

1-2 ripe but firm avocados, halved lengthwise, seeded, peeled and sliced horizontally

3 scallions, thinly sliced

1Tbsn parsley, minced

1-2 fresh, cooked crab, cracked, cleaned with meat removed (reserve claws) *Instructions follow

8 ounces mixed greens

1 bulb fennel, trimmed and sliced

Lemon vinaigrette (½ cup olive oil, ¼ cup fresh lemon juice, 2 T red wine vinegar, ½ teaspoon salt, ¼ teaspoon black pepper)

Directions:

  • Rinse quinoa under cold water until the water runs clear. In a 1 quart saucepan, saute quinoa in olive oil until slightly toasted, about 5 minutes.  Add broth and bring to a boil. Reduce to a simmer, cover until liquid is absorbed and germ has spiraled out, about 20 minutes. Let cool.
  • Prepare vinaigrette or use your favorite.  Put ingredients in a small container and whisk together or shake until combined.
  • Remove crabmeat from shells, retaining claws for garnish, and pull meat apart leaving large chunks.  1 crab will serve 4 with moderate proportions/2 crabs generously. Combine in a bowl with 3 or 4 Tablespoons vinaigrette, scallions and parsley.
  • Remove both ends from an empty food can (regular soup size) to make a hollow cylinder.  Wash and dry can thoroughly.  Place can in the center of one of the serving plates.  Spoon in one fourth of the couscous mixture and gently press down with the back of the spoon.
  • Top couscous with one slice of tomato, then a quarter of the avocado, pressing with spoon after each layer.  We love avocado so would use ½ half for each serving, however you can adjust the quantity to your liking. Top the avocado with a quarter of the crab mixture. While pressing on the crab mixture with back of spoon, slowly lift off can. Repeat to make three more plates. Top with a crab claw.
  • Toss greens and fennel with remaining vinaigrette and serve with crab towers.

CRACKING AND CLEANING A CRAB

crab1


  • Place the cooked crab on a cutting board on its back. Hold the body in one hand and gently twist each of the legs and claws off with the other.  Set them aside

crab2

  • Remove the tail flap and both flaps near the eyes.  Discard.

crab3

  • Pull off the back shell and remove the ‘dead man’, the spongy gills and the orange ‘skin’.
  • Rinse the body then cut in quarters.

crab4

  • Using a metal or wooden meat tenderizer, give several hammers to each leg, enough to crack the shell and allow access to the meat.

crab5crab6

Wheatless Wednesday – Miso Ginger Braised Cod

1

Ginger Miso Cod

Miso Ginger Braised Cod with Littleneck Clams, Potato Latkes with Homemade Applesauce


Happy Hanukah!

Since I have guests in town for Thanksgiving, I wanted to make tonight’s meal a bit festive (and bear no resemblance to the turkey and all the trimmings that we will be eating for the rest of the week). Miso broth is a great way to sneak nutrients into a meal. It’s a good source of fiber, protein, vitamins and minerals like vitamin K, riboflavin and Omega 3 and Omega 6 fatty acids. It’s high in sodium, however, so I would be careful about adding extra salt or look for low sodium brands.

Normally I wouldn’t include a carb like potatoes on Wheatless Wednesday (since it seems like cheating) but it’s the first night of Hanukah and I can’t break with tradition, however, I did make them wheat free.

MISO GINGER BRAISED COD

Ingredients:
1 quart miso broth
1/2 Tbsn minced or grated ginger
2 cloves minced garlic
1 cup white wine
1/2 tsp sesame oil
2 scallions thinly sliced

Directions:
Mix miso broth, ginger and garlic in a bowl. Place fish in a shallow dish and pour miso mixture over and marinate for about a half hour. Remove fish and set aside. Pour broth into a sauté pan. Add wine and bring to a gentle boil. Add clams and cook until they open. Remove clams and keep warm. Add fish in a single layer and braise 6 to 8 minutes until firm. Place one piece of fish and several clams in each serving bowl. Add sesame oil to broth and stir. Pour 1/2 cup broth over each serving of fish and clams. Garnish with scallions.

LATKES

Ingredients:
4 large potatoes
2 eggs, beaten
1 tsp salt (or more to taste)
1/2 large or 1 whole small yellow onion, chopped
1/2 tsp baking powder
1 Tbsn lemon juice
2 Tbsn rice/coconut or oat flour
1 to 2 cups vegetable oil

Directions:
Grate potatoes using a hand grater or Cuisinart fitted with the grate attachment. Grating is more work but I like long lacy strips that get nice and crispy. You can use a blender but your latkes will be more like pancakes. Squeeze excess water from the grated potatoes with paper towels and add lemon juice right away to prevent browning. Add the rest of the ingredients except the oil and combine. I used coconut flour which worked well and added just a hint of sweet, nutty flavor. Heat half the oil in a heavy skillet on medium high to high until the oil is almost smoking. A cast iron pan works great as it holds the heat. Drop potato mixture by generous spoonfuls onto hot oil and flatten slightly with the tip of a wooden spoon. I try to poke a few holes so oil can bubble up through the middle. Brown well on both sides. Drain on paper towels. Keep warm in a 250 degree oven. Serve with applesauce and sour cream.

HOMEMADE APPLESAUCE
Directions:

Peel and core 3 pounds of apples. A combination of varieties, combining tart and sweet, makes a tastier applesauce. I used fuji, pippin and pink lady apples from my garden. Chop apples and place in a pot and cover with water. Simmer for 20 to 30 minutes until soft. Add 1/2 cup sugar and a dash of cinnamon and nutmeg. For chunkier applesauce just break apart with a wooden spoon. For a smooth sauce use a blender or Cuisinart.

Wheatless Wednesday – Roasted Salmon

0


Roasted Salmon with pureed cauliflower and maple glazed carrots

Roasted Salmon, Cauliflower Puree and Maple Citrus Glazed Carrots

Salmon is a family favorite, either roasted on the grill or in the oven. I try to find wild caught but will serve farm raised in a pinch as long as it comes from the US or Canada. The lack of regulations makes me wary of seafood that is farm raised in countries like Thailand and China. I love mashed potatoes, creamy polenta and all those luscious homey foods but don’t always make them for my family. Most recipes call for loads of cream cheese or heavy cream which my husband won’t eat so I had to create my own pureed cauliflower recipe. My husband went back for thirds so it was a big hit. The carrots were as delicious as they are beautiful.

SALMON:
2-4 salmon filets
Marinade ( 1T olive oil, 3 T soy sauce, 3 T Hoisin Sauce, 2 T lemon juice, 1 T honey)

Cut salmon into individual serving portions leaving skin intact. Wash and pat dry. Place skin side down in a glass baking dish. Pour marinade over the top and let sit in marinade while you prepare the cauliflower. Then roast in a 400 degree oven for ten to fifteen minutes. I like to broil for the last few minutes to carmelize the top. The sauce should be bubbling and the salmon easy to flake.

CAULIFLOWER:
1 large head of cauliflower
2 cloves garlic
1/2 cup vegetable broth
1 Tablespoon butter
1/2 teaspoon salt

Wash and dry one large head of cauliflower. Remove the core and cut into florets. Simmer the florets until they are soft with a chopped clove of garlic or two in 1/2 cup of vegetable broth with the lid on. Make sure the liquid doesn’t evaporate and add more broth if necessary. Put everything in a Cuisinart and blend until smooth. Do not drain or you will be throwing out good nutrients as well as flavor. Put the puree back in the pot to keep warm. You can add a pat of butter if you want a creamier consistency. Adjust liquid as necessary.

CARROTS:
6 – 8 whole carrots
Marinade (2 Tbsp maple syrup, 2 Tbsp olive oil, 1/4 tsp coarse salt, 1/8 tsp black pepper, juice from 1/2 orange, mandarin or lemon plus a bit of zest)

Scrub the carrots but do not peel. You don’t want to remove all the lovely nutrients that are so close to the skin. Remove stems, cut in half lengthwise and put in a lightly oiled glass pan. Place them in a single layer so all cut sides are up or down so you can keep track of which you have turned. Pour marinade over the top and make sure they are all coated. Roast at 400 degrees for 5 minutes. Turn them over and roast for another five minutes. Turn the oven to broil and broil each side for a couple of minutes until the carrots are slightly blackened.

TIP: You can cook the salmon and carrots together if you are good at multitasking or roast the carrots first and keep them warm while the salmon cooks.