Green Bean & Chick Pea Salad with Goat Cheese & Lemon Herb Vinaigrette

5

20160209_194846

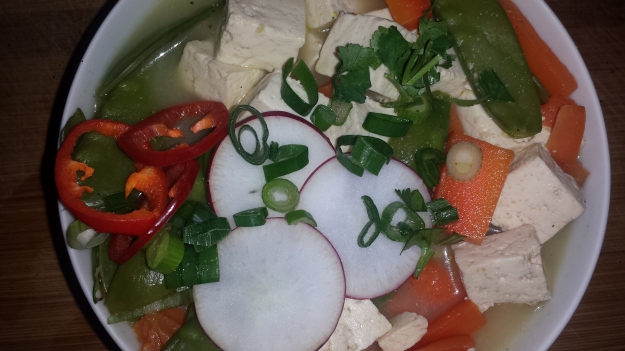
Sometimes I want a salad that goes beyond lettuce and vegetables, one that is hearty enough to have for dinner.  This green bean salad has it all; garbanzo beans for protein and bulk, spicy radiches, sweet cherry tomatoes and creamy goat cheese drizzled with a fresh herb vinaigrette.  I loved the combination of flavors and colors in this salad, with it’s array of green, red, purple, yellow, beige and white.  (Yes, even the beige and white provide important nutrients). You know when your meal is colorful that you are doing a good job of eating the rainbow. In other words, you are getting a wide assortment of nutrients from your food.

20160209_185014

Each color provides something different, which is why it’s a good idea to eat a variety of foods. The star of this salad, though is the green beans which I think are often forgotten about except for at Thanksgiving when Aunt Ellie brings out her traditional Green Bean Casserole topped with fried onions(Although I have to admit it’s one of my favorites too).  Green beans are a great base for a salad and pair nicely with beans, mushrooms or potatoes to provide a substantial belly-filling meal.  

5 Science-based Health Benefits of Green Beans

Green beans are low in calories and fat and contain no cholesterol. The fiber content of green beans is very high, and it also provides some of your daily protein requirements. They also act as an easy source for acquiring vitamins like A, C, K, B6, and folic acid. In terms of minerals, green beans are a good source of calcium, silicon, iron, manganese, potassium, and copper.

20160209_191453

I got the idea for the vinaigrette from a bit of Lemon Parsley Pesto that was left from my 

Meatless Monday-Roasted Artichokes & Fennel with Lemon Parsley Pesto

post on Monday.  I had loved the flavors and thought it would make a good dressing, and it did!  So I recreated the recipe as a vinaigrette which you can make with or without the nuts, which I love and include every time I get a chance.  I did not include parmesan because I was already adding goat cheese to the salad, and I thought it might get too heavy, but you could certainly include a tablespoon of that as well, especially if you aren’t adding cheese to your salad.

20160210_102828

TIPS:  You can make the whole salad ahead of time and either let it rest, undressed, on the counter or in the refrigerator covered with a paper towel. You can also prepare the beans and vinaigrette the day before and toss the salad when ready.  Or if you are in a real hurry, just use your favorite prepared salad dressing. I like to make a lot of different salad dressings and recently bought several small glass containers, like the one I used for this vinaigrette, from The Container Store.  I usually don’t use it all and that way I always have a good homemade dressing ready to go.

20160209_195507

GREEN BEAN AND CHICK PEAS WITH LEMON HERB VINAIGRETTE

1 lb fresh green beans
1 can garbanzo beans, drained and rinsed
2-3 radishes
6-8 cherry tomatoes
1/4 cup feta, goat cheese (or vegan cheese), crumbled (optional)
small handful arugula or whole sprigs parsley(optional)

20160209_191453

Lemon Herb Vinaigrette

1/4 cup lemon juice (plus zest from one lemon, optional)
1 Tbsn apple cider or red wine vinegar (or more to thin)
2 Tbsn fresh herbs (parsley, thyme or oregano), minced (or 1 tsp dried)
1 Tbsn pistachios, walnuts or pinenuts, finely minced (optional)
1/4 cup olive oil
1/2 tsp salt

20160209_190440

  • Blanch the green beans in a large pot of boiling salted water until tender-crisp, 3 minutes. Remove the green beans from the boiling water, run under cold water for a few minutes to stop the cooking, and then drain and dry with a paper towel (add ice cubes, if desired to speed the cooling process)

20160209_190833

  • Cut radishes into thin slices, cherry tomatoes in halves and red onion in thin slices.

20160209_191047


  • Place green beans in a large serving dish.

20160209_191125

  • Spread garbanzo beans evenly among green beans.

20160209_191716

  • Top with radishes, tomatoes and onions. Sprinkle arugula leaves on top, if using.

20160209_191453

  • Mix together vinaigrette ingredients and set aside.

20160209_191928

  • Sprinkle with crumbled cheese.

20160209_191954

  • Drizzle vinaigrette or serve on the side.

20160209_223914

Green Bean and Chick Pea Salad with Lemon Herb Vinaigrette

  • Servings: 4
  • Difficulty: easy
  • Print

20160209_194846

1 lb fresh green beans
1 can garbanzo beans, drained and rinsed
2-3 radishes
6-8 cherry tomatoes
1/4 cup feta or goat cheese, crumbled
small handful arugula or whole sprigs parsley(optional)

Lemon Herb Vinaigrette

1/4 cup lemon juice (plus zest from one lemon, optional)
1 Tbsn apple cider or red wine vinegar (or more to thin)
2 Tbsn fresh herbs (parsley, thyme or oregano), minced (or 1 tsp dried)
1 Tbsn pistachios, walnuts or pinenuts, finely minced (optional)
1/4 cup olive oil
1/2 tsp salt

  • Blanch the green beans in a large pot of boiling salted water until tender-crisp, 3 minutes. Remove the green beans from the boiling water, run under cold water for a few minutes to stop the cooking, and then drain and dry with a paper towel
  • Cut radishes into thin slices, cherry tomatoes in halves and red onion in thin slices.
  • Place green beans in a large serving dish.
  • Top with radishes, tomatoes and onions
  • Mix together vinaigrette ingredients and set aside.
  • Sprinkle with crumbled cheese.
  • Drizzle vinaigrette or serve on the side.


Wheatless Wednesday – Ginger Miso Tofu Noodle Bowl

5

20160122_135925

The Japanese have known the health benefits of miso and scallions and have used miso soup to cure the common cold since ancient times, kind of like a vegetarian version of homemade chicken soup. We have all had miso soup in Japanese restaurants, that savory broth with tiny cubes of tofu and thinly sliced scallions  floating on top. Usually, in restaurants we consider it as a small starter before the main courses arrive but in Japan miso soup is a staple and eaten for breakfast and throughout the day loaded with eggs, fish and other garnishes.  So I figure that they must be onto a good thing and decided to create a miso soup that is simple to make but worthy of being a main course for lunch or dinner, and I came up with this Ginger Miso Tofu Noodle Bowl. For more on using miso soup to cure the common cold check out this article: 

Miso Soup: An Ancient Remedy for the Common Cold

20160121_191548

It is delicious and satisfying and can be made spicy or mild depending on tastes.  I simmered bok choy, carrots, snow peas and cubes of tofu in miso broth and then served them over rice noodles.  I offered a selection of garnishes which, in my opinion, really makes the dish.   Not surprisingly, everyone’s noodle bowl looked different.

20160121_185549

What is miso anyway?  Miso is a Japanese word that means “fermented beans”, which are almost always soybeans, although other grains can be added to achieve certain flavors, resulting in many different varieties of miso available.  I used a white miso, which is lighter in color and milder in flavor, however any kind of miso will work just as well.  Miso is a good source of fiber and protein and a great way to increase your nutrient intake while you think you are just adding flavor.  In fact, adding  two tablespoons of miso to a soup or stir-fry, is the equivalent of approximately one-quarter cup of a legume(like lentils).  Miso is also  a very good source of copper, manganese and a good source of vitamin K, zinc, phosphorus, and omega-3 fatty acids.  It also has naturally occurring pro-biotics, those beneficial bacteria that are so good for our bellies.

20160121_192746

TIPS:  Making miso broth is easy but you can also find miso broths already prepared or in dried form that are pretty tasty too.  When purchasing both tofu and miso, make sure they are labelled organic since a wide majority (90% in the U.S.) of soy based products are made from genetically modified soybeans, those dasterdly GMO’s which are to be avoided at all costs. Miso is generally simmered on medium or medium low to prevent the loss of nutrients, so don’t let your soup boil! One last tip, noodles tend to get soft and mushy if left sitting in broth, so add them to the broth just before serving.

20160122_135956

GINGER MISO TOFU NOODLE BOWL

8 oz medium width rice noodles (or soba)
3-4 Tbsn shiro miso (white fermented-soybean paste)
6 cups vegetable broth (or water)
1 tsp fresh ginger, minced (or ginger paste) or more to taste
1 lb extra firm organic tofu
2 carrots, roughly chopped or sliced
1 cup snowpeas
2 bok choy, sliced in half lengthwise

TOPPINGS (all optional)
3-4 scallions, sliced into rings
3-4 radishes, thinly sliced
1-2 red chili peppers(or sweet mini red peppers), thinly sliced into rings
2 Tbsn cilantro, roughly chopped


  • Place miso in a small bowl with hot water and stir until dissolved.

20160121_192149

  • Prepare noodles as directed, rinse with cold water and divide among four bowls

20160121_185454

  • Prepare all soup ingredients. Cut tofu into cubes and let drain on paper towels.

20160121_185549

  • Prepare all toppings.

20160121_191548

  • Pour miso and remaining vegetable broth into a stockpot or wide saucepan. On medium heat, simmer carrots for about a minute, then add bok choy, snowpeas and tofu and simmer about five minutes.  Don’t let it boil or some of the nutrients in the miso will be lost.

20160121_192504

  • Spoon vegetables between the four bowls and pour in the broth.


20160122_135956

  • Top with radishes, scallions, chili peppers and cilantro, as desired.  Sriracha is also a great spicy addition.

20160122_135925

Ginger Miso Tofu Noodle Bowl

  • Servings: 4
  • Difficulty: easy
  • Print

 20160122_135925

8 oz medium width rice noodles (or soba)
3-4 Tbsn shiro miso (white fermented-soybean paste)
6 cups vegetable broth (or water)
1 tsp fresh ginger, minced (or ginger paste) or more to taste
1 lb extra firm organic tofu
2 carrots, roughly chopped
1 cup snowpeas
2 bok choy, sliced in half lengthwise

TOPPINGS (all optional)
3-4 scallions, sliced into rings
3-4 radishes, thinly sliced
1-2 red chili peppers(or sweet mini red peppers), thinly sliced into rings
2 Tbsn cilantro, roughly chopped

  • Place miso in a small bowl with hot water and stir until dissolved.
  • Cut tofu into cubes and let drain on paper towels.
  • Prepare noodles as directed, rinse with cold water and divide among four bowls
  • Prepare all soup ingredients and toppings.
  • Pour miso and remaining vegetable broth into a stockpot or wide saucepan.
  • On medium heat, simmer carrots for about a minute, then add bok choy, snowpeas and tofu and simmer about five minutes
  • Spoon vegetables between the four bowls and pour in the broth.
  • Top with radishes, scallions, chili peppers and cilantro, as desired.  Sriracha is also a great spicy addition.

Meatless Monday – Penne with Roasted Cauliflower & Greens

4

20160119_093908

Move over pasta with tomato sauce, penne with cauliflower roasted with parmesan and buttery wilted greens will knock you out of the ring! This is an easy and delicious, complete dinner in one bowl. Pasta is an easy go to for dinner because it’s inexpensive and quick to prepare.  Did you know that the average American eats 20 pounds of pasta a year? That’s a lot of carbs but luckily there are many whole grain and nutritious pastas from which to choose that are not empty calories but actualy boost nutrients and dietary fiber.  My current favorite is Ancient Grains Penne by Tru Roots (that I buy from Costco) made with a blend of organic whole grains including, brown rice, quinoa, amaranth and corn. It is naturally gluten free and has a great taste and texture in addition to all of it’s wholesome goodness. I also love Vio Life Vegan Parmesan which comes in a solid block to shred as needed.  Try it!

20160118_174601

Cauliflower is not only one of the World’s Healthiest Foods, it’s also a vegetable chameleon that can take on many flavors and textures depending on how it’s prepared. When roasted, especially with a sprinkling of parmesan, cauliflower becomes golden brown with rich and salty/sweet caramel flavors.  The crispy, almost burned bits of parmesan are divine so make sure you scrape them in with the cauliflower.  Roasted cauliflower also pairs nicely with the sauteed garlic and fresh greens.  I love an extra sprinkle of parmesan and red pepper flakes on top for an extra flavor boost.

20160118_202646

TIPS: I had a big bag of power greens that included spinach, chard and kale but any leafy green will work in this recipe. The trick is to not overcook the greens so they don’t lose their deep glossy green hue.  (Thicker greens like collards may need to saute a bit longer.) If you love greens, add more than you think.  They shrink quite a bit when cooked. One bunch is usually about 2 cups so plan according to your tastes. Don’t forget to save a cup of pasta water before draining. It is a miracle liquid and not to be underestimated. You can add it back to the pasta if needed to give it more of a ‘sauce’ and avoid  the temptation of adding more oil or butter.

20160118_204215

PENNE WITH ROASTED CAULIFLOWER AND GREENS

3/4 lb penne pasta
1 head cauliflower
1 large bunch spinach (kale, arugula or chard)
2 shallots (or 1/2 yellow onion), finely chopped
4 cloves garlic, minced
1/2 tsp salt
1/4 tsp red pepper flakes
1/2 cup grated parmesan (optional)

20160118_183710

  • Cut or break up cauliflower into bite sized florets. Spread cauliflower on a baking sheet in a single layer and spray or brush with olive oil.  Sprinkle with salt, red pepper flakes and half of the parmesan (if using) and bake in a 425 degree oven for 20 to 25 minutes, stirring a couple of times to brown all sides and get all the crunchy parmesan bits off the pan (yum!).

20160118_202431

  • Remove cauliflower from oven when easily pierced with a knife and let cool.

20160118_203440

  • Boil pasta as directed and reserve one cup of pasta water before draining.  Set aside.

20160118_201726

  • Saute red pepper flakes, garlic and shallots in olive oil until soft and fragrant, 4 or 5 minutes.

20160118_202646

  • Add greens and saute until just wilted, remove from heat.

20160118_203730

  • Stir in the cauliflower and pasta, adding pasta water as needed.

20160119_093755

  • To serve, sprinkle with the rest of the parmesan and a pinch of red pepper flakes.

Penne with Roasted Cauliflower and Greens

  • Servings: 4
  • Difficulty: easy
  • Print
20160119_093908 

3/4 lb penne pasta
1 head cauliflower
1 large bunch spinach (kale, arugula or chard)
2 shallots (or 1/2 yellow onion), finely chopped
4 cloves garlic, minced
1/2 tsp salt
1/4 tsp red pepper flakes
1/2 cup grated parmesan (optional)

  • Cut or break up cauliflower into bite sized florets.
  • Spread cauliflower on a baking sheet in a single layer and spray or brush with olive oil.  Sprinkle with salt and red pepper flakes and half of the parmesan and bake in a 425 degree oven for 20 to 25 minutes, stirring a couple of times to brown all sides and get all the crunchy parmesan bits off the pan (yum!).
  • Boil pasta as directed and reserve one cup of pasta water before draining.  Set aside.
  • Saute garlic and shallots in olive oil until soft and fragrant, 4 or 5 minutes.
  • Add spinach and saute until just wilted, remove from heat.
  • Stir in the cauliflower and pasta, adding pasta water as needed.
  • Sprinkle with the rest of the parmesan and a pinch of red pepper flakes.

Wheatless Wednesday – Collard & Black Eyed Pea Soup

2

20160106_101124

How about a bowl of comfort?  It’s chilly outside, so we’re making soup; healthy, yummy goodness in a bowl.  I am making this soup for lunch today and the house smells heavenly.   Last night was a stormy and today is another dreary and rainy day in California.  It just doesn’t stop raining.  Can I call the dought over yet?  Our cup streets literally runneth over.   At least my delicious soup is warming me up from the inside out.   I already feel it warding off my seasonal sniffles…

20160106_075952

I don’t see fresh black eyed peas very often so when I do I get very excited as they are so delicious, nothing like their canned counterparts and I have to admit that I don’t often think ahead to soak dried beans overnight (although both of those options will work too).  Black eyed peas are not really peas.  They are beans and high in fiber and protein, and good sources of iron and potassium.  They are also delicious and a personal favorite. Then I spotted these giant collard leaves and the rest is history.

20160106_075701

I have often heard that the pairing of black eyed peas and collard is a natural fit, at least it is so in the South, so decided to give it a go.  Now, I can see why.  I have never used collard greens before, although last year my friend, Kerri begged me for collard recipes because she kept getting collards in her CSA box. Apparently, collard greens are more plentiful in Virginia than they are here. Well here you go Kerri, a year later.  I’m not sure what took me so long.  Collard greens are loaded with nutrition, add more fiber, protein and iron plus a whole slew of other nutrients.  Plus, they are great in this soup.  If you don’t have (or don’t like) collard greens, you can substitute kale or chard.

TIPS:  Black eyed peas are available fresh, frozen, canned or dried.  I have included cooking directions for each type.  For frozen peas, thaw and use as fresh.

20160106_101124

COLLARD AND BLACK EYED PEA SOUP

11 oz tub of fresh black eyed peas (or 1 1/2 cups dried or canned)
2 tablespoons olive oil
1 large yellow onion, chopped
2 cloves garlic, finely chopped
2 stalks celery, chopped
2 carrots, chopped
6 cups vegetable broth
1 14 oz can diced tomatoes
1/2 tsp dried oregano or Italian seasoning (or fresh)
1 bunch collard greens
1/4 teaspoon salt
1/8 tsp black pepper
Cayenne pepper to taste

  • If you are using dried black eyed peas, pick through peas to remove any debris and rinse well. Transfer to a large bowl, cover by 3 inches with water, cover and set aside at room temperature for 8 hours or overnight; drain and rinse well.  If you are using fresh or canned peas, rinse and set aside.

20160106_075626

  • Heat oil over medium heat in a large pot. Add onion, garlic, celery and carrots. Saute until onion is translucent, 5 to 10 minutes.

20160106_092814

  • Add peas, broth and tomatoes and simmer, partially covered, until peas are tender, about 15-20 minutes for fresh peas and up to 45 minutes for dried.

20160106_092055

  • Rinse collard greens, remove tough stem and ribs and chop leaves.

20160106_100640

  • Add collard greens to soup and simmer until tender, 15 to 20 minutes more. Taste broth and season with salt (if needed), pepper and cayenne.

20160106_101026

  • Serve hot.

Collard and Black Eyed Pea Soup

  • Servings: 4
  • Difficulty: easy
  • Print

 20160106_101124

11 oz tub of fresh black eyed peas (or 1 1/2 cups dried or canned)
2 tablespoons olive oil
1 large yellow onion, chopped
2 cloves garlic, finely chopped
2 stalks celery, chopped
2 carrots, chopped
6 cups vegetable broth
1 14 oz can diced tomatoes
1/2 tsp dried oregano or Italian seasoning (or fresh)
1 bunch collard greens
1/4 teaspoon salt
1/8 tsp black pepper
Cayenne pepper to taste

  • If you are using dried black eyed peas, pick through peas to remove any debris and rinse well. Transfer to a large bowl, cover by 3 inches with water, cover and set aside at room temperature for 8 hours or overnight; drain and rinse well.  If you are using fresh or canned peas, rinse and set aside.
  • Heat oil over medium heat in a large pot. Add onion, garlic, celery and carrots. Saute until onion is translucent, 5 to 10 minutes. Add peas, broth and tomatoes and simmer, partially covered, until peas are tender, about 15-20 minutes for fresh peas and up to 45 minutes for dried.
  • Rinse collard greens, remove tough stem and ribs and chop leaves.
  • Add collard greens to soup and simmer until tender, 15 to 20 minutes more. Taste broth and season with salt (if needed), pepper and cayenne.
  • Serve with shredded or flaked parmesan, if desired.

Meatless Monday – Sesame Orange Tofu

7

20151227_183228

NEW YEAR, NEW YOU… START YOUR YEAR OFF RIGHT LIGHT!  I’m not talking about making major New Year’s Resolutions, just one small step to a healthier you (and planet Earth too).  How about joining the thousands of people in 36 countries around the world in the Global Meatless Monday Movement? It’s a very do-able goal (dare I say, trendy?) and you might actually like the results.  Here is a tasty recipe to get your new Meatless Monday tradition started in 2016; crispy and delicious Sesame Orange Tofu over a bowl of steaming brown Jasmine rice.  This sauce, which is savory but slightly sweet and slightly spicy, is so good, you will wonder why you ever thought you didn’t like tofu.  You won’t leave the table feeling deprived, for sure…

byf1.jpg (350×200)

I realize that not everyone is ready to give up eating meat, but how about just eating less?  YOU really can make a difference, definitely to our farm animals, but also to the planet we all share!  In his book In Defense of Food, journalist Michael Pollan coined the phrase “Eat food. Not too much. Mostly plants.” He has since cited Meatless Monday as a way to reach this goal. So in April 2009 Pollan expressed the need for Americans to reduce meat consumption: “even one meatless day a week—a Meatless Monday, which is what we do in our household—if everybody in America did that, that would be the equivalent of taking 20 million mid-size sedans off the road.”  Then, for all those people who try to make informed choices, Al Gore lists Meatless Monday as one of the Top 12 Things You Can Do Now for a better world. (https://en.wikipedia.org/wiki/Meatless_Monday)  There are a lot of reasons to eat less meat; health, weight loss, saving the environment, compassion for other sentient beings…just pick one.  Regardless of your reason, take the pledge and give Meatless Monday a try this new year.

20151227_172936

TIPS:  An easy way to mince garlic and onions is to use a small kitchen grinder like this one from Hamilton Beach that I got for Christmas.  It makes mincing a breeze and clean up is easy since the parts all come apart. This dish is slightly spicy but if you want to turn up the heat, add more red chili flakes and/or Sriracha.  I tend to stay away from breaded foods, but if you love an extra crispy coating like that, try dredging the tofu in flour, then egg whites, then panko before frying.  I’ll bet it will pick up the sauce nicely.  Let me know if you try…

Recipe adapted from Crazy Vegan Kitchen

20151227_182830

SESAME ORANGE TOFU

  • 1 14 oz block organic extra firm tofu
  • 2 Tbsn olive, avocado or coconut oil (divided)
  • 1/2 red onion or large shallot, minced
  • 1 tsp garlic, minced
  • ½ red chilli, minced (or 1/4 tsp red pepper flakes)
  • 2 tsp corn starch

Sesame Orange Sauce:

  • Zest and Juice of 1 large orange(1/3 – 1/2 cup)
  • 1 Tbsn Sriracha
  • 4 tsp sugar
  • 1 tsp cornstarch
  • 1½ tsp apple cider vinegar
  • 1 Tbsn white wine
  • ½ tsp white pepper
  • 4 tsp Tamari (or soy sauce)
  • 1 tsp sesame seeds
  • 2 scallions, sliced (optional garnish)

20151227_161315

  • Drain tofu and cut into four slices.  Place in a single layer on a kitchen towel or double layer of paper towels.  Cover with another towel or paper towels and place something heavy on top to help drain excess moisture.

20151227_171725

  • While tofu is draining, combine all ingredients for orange sauce and whisk to combine. Set aside.

20151227_173352

  • Cut tofu into 1/2 inch cubes. Toss in cornstarch to thinly coat.

20151227_181359

  • Heat 1 Tablespoon of oil in a pan and lightly sear your tofu on all sides to create a crispy crust. Don’t crowd.  Do in batches if necessary.

20151227_181844

  • Remove seared tofu from the pan and set aside.

20151227_182030

  • In a large pan, heat 1 tablespoon of oil and sautee garlic, onion and chillis for several minutes.  Pour in orange sauce and stir to combine.

20151227_182255

  • Once sauce thickens, add tofu and stir to coat pieces.

20151227_183228

  • Serve over brown jasmine rice and top with scallions.

Sesame Orange Tofu

  • Servings: 2-4
  • Difficulty: easy
  • Print
20151227_183228

 SESAME ORANGE TOFU

  • 1 14 oz block organic extra firm tofu
  • 2 Tbsn olive, avocado or coconut oil (divided)
  • 1/2 red onion or large shallot, minced
  • 1 tsp garlic, minced
  • ½ red chilli, minced (or 1/4 tsp red pepper flakes)
  • 2 tsp corn starch

Sesame Orange Sauce:

  • Zest and Juice of 1 large orange(1/3 –  1/2 cup)
  • 1 Tbsn Sriracha
  • 4 tsp sugar
  • 1 tsp cornstarch
  • 1½ tsp apple cider vinegar
  • 1 Tbsn white wine
  • ½ tsp white pepper
  • 4 tsp Tamari (or soy sauce)
  • 1 tsp sesame seeds
  • 2 scallions, sliced (optional garnish)
  1. Drain tofu and cut into four slices.  Place in a single layer on a kitchen towel or double layer of paper towels.  Cover with another towel or paper towels and place something heavy on top to help drain excess moisture. Cut into cubes and toss with corn starch to thinly coat.
  2. While tofu is draining, combine all ingredients for orange sauce and whisk to combine. Set aside.
  3. Heat 1 Tablespoon of oil in a pan and lightly sear your tofu on all sides to create a crispy crust. Don’t crowd.  Do in batches if necessary.
  4. Remove seared tofu from the pan and set aside.
  5. In a large pan, heat 1 tablespoon of oil and sautee garlic, onion and chillis for several minutes.
  6.  Pour in orange sauce and stir to combine.
  7. Once sauce thickens, add tofu and stir to coat pieces.
  8. Serve over brown jasmine rice and top with scallions.

Wheatless Wednesday – 5 Ingredient Thai Pumpkin Soup

0

20151203_104354

Brrr…It’s cold outside.  Warm up with this easy and delicious hot soup.  With only 5 ingredients, including pumpkin from a can, this tasty vegan soup is ready in less than 10 minutes.  (Deborah, this one is for you!) With a bit of spice from red curry paste, this soup will delight your tastebuds and warm you from your head to your toes.  Best of all, the recipe is so quick and easy, making it a great last minute throw together meal with items straight from your pantry. It just tastes like it’s been bubbling away on the stove all day.  Just add crusty bread or a salad and dinner is ready. Sometimes you just need to get dinner on the table STAT or it’s going to be takeout again…This is a recipe I spotted on Foodie Crush which is a great source of foodie inspiration so check out her site, but I think the original recipe is from “The Instant Cook”‘ by Donna Hay.

We know that using canned pumpkin is a time saver and allows us to use pumpkin all year around and not just in the Fall/Winter when it is in season, but is canned pumpkin as healthful as fresh?  It actually appears that it does have some other  benefits than just being convenient.  ‘Canned pumpkin has a concentrated density so has more calories per serving than fresh pumpkin and higher amounts of several essential nutrients. One-half cup of canned pumpkin has 40 calories, 9 grams of carbohydrates, 5 grams of fiber, 0.5 gram of fat, 5 milligrams of sodium and 2 grams of protein, according to the University of Illinois. One-half cup of canned pumpkin has 17,500 international unites of vitamin A, almost twice the amount one-half cup of fresh pumpkin provides. This serving also includes 4.8 milligrams of vitamin C, 40 milligrams of calcium and 2 milligrams of iron. Canned pumpkin offers more fiber, protein, vitamin A, calcium and iron than fresh, boiled pumpkin.’ (Jillian Michaels) Some cooks actually prefer canned pumpkin to fresh, especially in baking, probably due to it’s density of nutrients and thicker, less watery consistency.

So don’t feel like a deadbeat cook for using canned or boxed pumpkin.  Just think of yourself as making smart choices, but do make sure you buy organic canned pumpkin that does not contain any salt, spices or ingredients other than pumpkin. The label should indicate that it is organic pumpkin with nothing added, especially pumpkin pie spice and/or sugar.

TIPS:   If you are a purist and prefer to use a fresh pumpkin instead of the canned variety, choose a 2-3 pound pumpkin, peel, seed and chop it and simmer in veggie broth or water for about 5-10 minutes or until pumpkin is tender. Puree in a food processor, blender or with an immersion blender until smooth then return to the pan.OR you can cut the pumpkin in half, scoop out the seeds and roast it until soft. Remove the skin, then puree it. Continue the recipe at the coconut milk stage. To add more protein, add chunks of tofu, toasted pumpkin seeds or cooked quinoa and cook until warmed through.

20151203_103105

5 INGREDIENT THAI PUMPKIN SOUP

2 tablespoons red curry paste
4 cups chicken or vegetable broth, about 32 ounces
2 15 ounce cans pumpkin puree
1¾ cup coconut milk, or a 13.5 ounce can, reserving 1 tablespoon or more
1 large red chili pepper, sliced

cilantro for garnish (optional)

  • In a large saucepan over medium heat, cook the curry paste for about one minute or until paste becomes fragrant. Add the broth and the pumpkin and stir.

20151122_182001

  • Cook for about 3 minutes or until soup starts to bubble. Add the coconut milk and cook until hot, about 3 minutes.

20151203_102717

  • Ladle into bowls and garnish with a drizzle of the reserved coconut milk and sliced red chilis. Garnish with cilantro leaves if desired.

20151203_103256

5 Ingredient Thai Pumpkin Soup

  • Servings: 4-6
  • Difficulty: easy
  • Print

 20151203_104354

  • 2 tablespoons red curry paste
  • 4 cups chicken or vegetable broth, about 32 ounces
  • 2 15 ounce cans pumpkin puree
  • 1¾ cup coconut milk, or a 13.5 ounce can, reserving 1 tablespoon or more
  • 1 large red chili pepper, sliced
  • cilantro for garnish (optional)
  1. In a large saucepan over medium heat, cook the curry paste for about one minute or until paste becomes fragrant. Add the broth and the pumpkin and stir.
  2. Cook for about 3 minutes or until soup starts to bubble. Add the coconut milk and cook until hot, about 3 minutes.
  3. Ladle into bowls and garnish with a drizzle of the reserved coconut milk and sliced red chilis. Garnish with cilantro leaves if desired.


Easy No-Peel Applesauce

6


20151206_170305

Every year, after the apple pies are baked and enjoyed, I make applesauce with all the rest of the apples from my garden. Of course it’s usually just in time for Hanukkah which means yummy latkes with applesauce and sour cream. Making applesauce is pretty easy but peeling the apples is very tedious and time consuming, so this year I decided to try leaving the peels on. Okay, I’ll admit it, I got lazy, but it worked out for the best. I LOVE this applesauce and it is so easy! It’s got a richer and creamier texture AND it’s more nutritious since most of the nutients and fiber are in or right under the peel which is usually removed and thrown away. Win! Win!  For best results use a combination of both sweet and tart apples.  Fuji, Red Delicious, Pink Lady and Golden Delicious apples are sweeter in taste, while Granny Smith and Pippin apples add a nice tartness.

20151102_160003

Applesauce is a favorite snack for little kids in particular.  The healthiest applesauce is made from organic apples with the skin on and no added sugar. Apples are one fruit in which you can’t wash off the pesticides, so buying organic apples is especially important if you don’t have your own apple trees. Apples are a great source of natural fiber and vitamin C.  The pulp and skin of apples contain flavonoids, which offer numerous health benefits; reduce inflammation, regulate blood pressure. The phytonutrients in apples work as antioxidants to support your heart and helping to lower your bad cholesterol levels.  My weight concious readers will like to hear that eating applesauce can also decrease your risk of developing abdominal fat. Studies show that the pectin in apples suppresses your appetite.  So what are you waiting for?

20151206_170329

Just core the apples, either with a sharp knife or with an apple corer, then cut the apples, peels and all, into slices or chunks. Simmer with a bit of water, lemon juice and a couple of cinnamon sticks until soft. Taste and add sugar if desired. Depending on the apples, it may not need any. Then remove the cinnamon sticks and process the apple mixture until smooth in a blender or food processor. The applesauce can be stored in the refrigerator for a couple of weeks or placed in plastic freezer bags and frozen. It can also be canned while hot. Click HERE for directions from Bell on canning hot applesauce.

Latkes3

Of course, my favorite way to emjoy applesauce is on top of crispy potato pancakes (latkes) with sour cream.  Click HERE for my yummy Latke Recipe.

20151206_170305

EASY NO-PEEL APPLESAUCE

6 lbs apples (about a dozen large)
1 lemon (or 1/4 cup)
2 cinnamon sticks optional
1 cup water

20151127_114518

  • Core apples and slice or cut into chunks.  Place in a large stockpot. Pour water and lemon juice over the top.

20151127_123301

  • Add two cinnamon sticks (or ground cinnamon to taste).  Cover and simmer for about 30 to 45 minutes.  If it starts to stick, add a bit more water but not too much.

20151127_140608

  • When apples are completely soft and falling apart, remove cinnamon sticks and process apples in a food processor or blender until smooth.

20151127_140043

  • For a chunkier applesauce, use a potato masher.

20151127_140739

  • Store in the refrigerator up to 2 weeks.


Easy No-Peel Applesauce

  • Servings: 6 cups
  • Difficulty: easy
  • Print


EASY NO-PEEL APPLESAUCE20151206_170305

6 lbs apples (about a dozen large)
1 lemon (or 1/4 cup)
2 cinnamon sticks optional
1 cup water

  • Core apples and slice or cut into chunks.  Place in a large stockpot.
  • Pour water and lemon juice over the top.
  • Add two cinnamon sticks (or ground cinnamon to taste).  Cover and simmer for about 30 to 45 minutes.  If it starts to stick, add a bit more water but not too much.
  • When apples are completely soft and falling apart, remove cinnamon sticks and process apples in a food processor or blender until smooth.
  • For a chunkier applesauce, use a potato masher.
  • Store in the refrigerator up to 2 weeks.


Meatless Monday – Mini Mushroom Vegetable Pot Pies

0

20151124_200236

‘Twas the night before Thanksgiving and I was looking for some inspiration for dinner.  All of our food preparation had been about the ‘Big Day’ tomorrow with no thought to tonight.  So with the recent nip in the air, I decided to make cozy, comfort food that would bake in the oven sending lovely smells throughout the house and bring warmth into the kitchen.  Checking the refrigerator yielded two already prepared pie crusts that we didn’t use and loads of mushrooms not destined for the dressing/stuffing.  So I quickly brainstormed a vegetable pot pie starring criminy mushrooms and a rich mushroom base using a creamy portobello mushroom soup which I had picked up at Trader Joe’s.  I added a couple of carrots, a potato and frozen peas and corn.  I loved this combination!  Even my meat loving family came back for seconds! Most people ate two mini pies, so this recipe would serve six people as a main course and 10-12 as a side dish.

20151124_195528

I opted for mini pies because I’m still enamored with pretty little food that is easily served as individual portions.  Plus, we already had quite a few big pies in the works for Thanksgiving.  For mini pies, use a 4 inch cookie cutter to cut the bottom crust and a 3 inch round for the top.  OR you can use shaped cookie cutters because, well…cute.  It’s also an easy way to make your little pies part of a theme.  I used small leaf cookie cutters to go with our Thanksgiving/Fall theme.  For St. Patrick’s Day I would probably go with the one that looks most like a clover, hearts for Valentine’s Day.  You get the picture.  If you use a full top, just pinch the edges closed, like you would on a large pie, and make a few slits in the top with a sharp knife to let steam escape.  You can also make this as a large pie and place assorted leaves all over the top for a pretty presentation. I have had my leaf cookie cutters for over ten years but they are still available on-line.  Try googling  Mrs Andersons 42111 Leaf Cookie Cutters, set of seven. I found them for $14.36 on jet.com.

20151125_122533

This turned out to be a very flavorful and savory pot pie.  I loved the mushroom soup as a creamy base but without the cream.  The potato added substance and the veggies all added not just flavor but fiber and nutrients.  Substitute any veggies that your family likes, especially root vegetables.  If you have a non-mushroom lover, substitute cream of celery or other condensed soup or prepared gravy, or you can make a nice thick sauce with reduced vegetable broth, butter and flour.  With mini pies, dice vegetables fairly small so you get a nice selection of them in each pot pie.

20151124_172315

TIPS:  For a more nutritious pie crust, try substituting whole wheat pastry flour or white whole wheat flour.  Yes, that is a thing.  White whole wheat flour is ground from white wheat, rather than from red wheat, which makes the traditional whole wheat flour. Both are 100% whole-grain and have the same nutritional benefits; but the white wheat flour has a milder taste and lighter color.  Whole wheat pastry flour is red wheat ground very fine which makes it much lighter than regular whole wheat.  When using whole wheat flour, you may have to add a bit more water but only do so a tablespoon at a time or you could end up with a gooey dough. Whole wheat dough should also rest for a half hour before working with it or it can crack and crumble. The dough is ready when it sticks together in a clump when squeezed.  Dough can be made a day ahead and refrigerated until ready.

NOTE:  I made this recipe last minute and on a whim so used two already prepared pie crusts.  Next time I will use white whole wheat flour and make it myself.  For great step by step instructions on making a homemade pie crust with photos go to Chez Pim.

20151124_210054

MINI MUSHROOM VEGETABLE POT PIES

FILLING

1 medium or 1/2 large onion, diced
3-4 cloves garlic, minced
2 carrots, dice
1 russet potato, peeled and diced
1/2 cup water
1 lb criminy mushrooms, roughly chopped
11 oz condensed mushroom soup
1/2 cup frozen or fresh peas
1/2 cup frozen or fresh corn
1 Tbsn fresh thyme
salt and pepper to taste

DOUGH ( OR 2 prepared pie crusts)

2 1/2 cups all-purpose flour
1 tsp salt
2 sticks chilled unsalted butter, cut into pieces

  • To make the dough for the pie crust, mix 2 1/2 cups all-purpose flour and 1 teaspoon each salt and sugar in a medium-size bowl. Cut 2 sticks chilled unsalted butter into pieces. With a pastry blender, cut in butter, working until mixture resembles coarse meal.
  • Add 4 tablespoons ice water; work with hands until dough comes together. If dough is still crumbly, add more ice water a tablespoon at a time (up to 4 more tablespoons).
  • Divide dough in half, and flatten halves into disks. Wrap disks separately in plastic; refrigerate at least 30 m9nutes. Take out 10 minutes or so before rolling to let it soften.

20151124_172845

  • Saute onions in olive oil for several minutes until translucent.  Add carrots and garlic and saute another few minutes

20151124_173117

  • Add potatoes and water, cover and saute on medium low for about 10 minutes, stirring occasionaly.  If it starts to stick add a bit more water.  Potatoes and carrots should be softened.

20151124_174301

  • Add mushrooms and saute until they start to lose their water.

20151124_175417

  • Stir in mushroom soup and fresh herbs and let bubble on medium low until veggies are all soft. Taste and add salt and pepper to taste.

20151124_181143

  • Fold in peas and corn, turn off heat and let cool.

20151124_180518

  • Roll out dough.  Using a 4″ circle cookie cutter, cut 12 rounds

20151124_180808

  • Place each round in lightly greased cupcake tins, pressing sides into place.

20151124_181638

  • Spoon filling into each tin.  If you overfill, it will overflow when cooked.

20151124_182135

  • Using a leaf (or other shape) cookie cutter, cut 12 – 24 shapes.  Or you could cut 3″ circles and completely enclose pies by pinching the sides together. Make a slice in the top of each to release steam.

20151124_182403

  • Arrange leaves on top of mini pies.

20151124_182432

  • Beat an egg with a tsp of water in a small bowl and brush mixture on the tops of each pie. (optional)

20151124_193803

  • Bake at 375 for about an hour. Let cool slightly before removing from tins.

20151124_195515

Mini Mushroom Vegetable Pot Pies

  • Servings: 6-8
  • Difficulty: medium
  • Print
20151124_200236

FILLING

1 medium or 1/2 large onion, diced
3-4 cloves garlic, minced
2 carrots, dice
1 russet potato, peeled and diced
1/2 cup water
1 lb criminy mushrooms, roughly chopped
11 oz condensed mushroom soup
1/2 cup frozen or fresh peas
1/2 cup frozen or fresh corn
1 Tbsn fresh thyme
salt and pepper to taste

DOUGH ( OR 2 prepared pie crusts)

2 1/2 cups all-purpose flour
1 tsp salt
2 sticks chilled unsalted butter, cut into pieces

  • To make the dough for the pie crust, mix 2 1/2 cups all-purpose flour and 1 teaspoon each salt and sugar in a medium-size bowl. Cut 2 sticks chilled unsalted butter into pieces. With a pastry blender, cut in butter, working until mixture resembles coarse meal.
  • Add 4 tablespoons ice water; work with hands until dough comes together. If dough is still crumbly, add more ice water a tablespoon at a time (up to 4 more tablespoons).
  • Divide dough in half, and flatten halves into disks. Wrap disks separately in plastic; refrigerate at least 30 minutes. Take out 10 minutes or so before rolling to let it soften.
  • Saute onions in olive oil for several minutes until translucent.  Add carrots and garlic and saute another few minutes
  • Add potatoes and water, cover and saute on medium low for about 10 minutes, stirring occasionaly.  If it starts to stick add a bit more water.  Potatoes and carrots should be softened.
  • Add mushrooms and saute until they start to lose their water.
  • Stir in mushroom soup and fresh herbs and let bubble on medium low until veggies are all soft. Taste and add salt and pepper to taste.
  • Fold in peas and corn, turn off heat and let cool.
  • Roll out dough.  Using a 4″ circle cookie cutter, cut 12 rounds
  • Place each round in lightly greased cupcake tins, pressing sides into place.
  • Spoon filling into each tin.  If you overfill, it will overflow when baked.
  • Using a leaf (or other shape) cookie cutter, cut 12 – 24 shapes and arrange them on top of mini pies.  Or you could cut 3″ circles and completely enclose pies by pinching the sides together. Make a slice in the top of each to release steam.
  • Beat an egg with a tsp of water in a small bowl and brush mixture on the tops of each pie.
  • Bake at 375 for about an hour. Let cool slightly before removing from tins.

Wild Rice, Mushroom and ‘Sausage’ Stuffed Pumpkin (Vegan)

0

20151117_203702

JUST IN TIME FOR THANKSGIVING! If you are looking for a glorious edible centerpiece for your table or you just want to stuff something that isn’t a turkey, how about roasting your favorite stuffing (or mine) in a pumpkin?  Pumpkins make a lovely serving dish and the rich and creamy pumpkin flesh gets scooped up along with the flavorful wild rice, mushrooms, pecans and vegan sausage stuffing.  It’s a wonderful and savory dish, sure to satisfy both vegan and meat loving friends.   This recipe makes a perfect Vegan main course or a hearty side dish for about ten people and is naturally gluten free.

20151117_171030

I have always loved the colors of Fall and the view from my window shows why. (Notice that roses in the lower left corner are still blooming too.) The gorgeous orange of pumpkins is the essence of the season. As the pumpkin bakes it gains a gorgeous dark amber color. I bought a Tutti Frutti Sugar Pie Pumpkin just shy of 6 lbs. Who can resist a name like that?  This is a dense, sweet smaller pumpkin that is great for cooking and less so for making jack ‘o lanterns.  ‘The bright orange color of pumpkin is a dead giveaway that pumpkin is loaded with an important antioxidant, beta-carotene. Beta-carotene is one of the plant carotenoids converted to vitamin A in the body. In the conversion to vitamin A, beta carotene performs many important functions in overall health.'(University of Illinois Extension)

Have you heard about the Great Pumpkin Shortage of 2015?  Apparently, it’s true.  If you see pumpkins in your market, don’t wait until the last minute.  Scoop them up or maybe try Farmer’s Markets.  Pumpkins (and all winter squash) can stay quite happily on your counter for  a week or two until you are ready to use them.  ‘The sugar pumpkins are grown primarily in Illinois, which produces about 90% of the supply each year.  But this year heavy rains hit Illinois and cut deeply into the sugar pumpkin crop.’ (CNN)

20151117_170231

Historically, I have stayed away from Vegan ‘meats’ and ‘cheeses’ because I usually don’t like either the taste or the texture but I keep on trying. I am not Vegan but I do believe in using non-dairy products as often as possible, both to promote all the new products (and encourage more) and to boycott the dairy industry, in particular, the factory farming/ Concentrated Animal Feeding Operations (CAFO’s) which are crueltry beyond belief. Click on How Our Food Animals Are Raised it if you don’t already know.  The Vegan world is rapidly changing and there are some really good options out there now that are pretty good.  There are several really good vegan sausages, Beyond Meat Italian Sausages are a favorite.  I first made this using Field Roast Italian Sausages (made with eggplant, fennel garlic and red pepper) They also make some good vegan cheeses under the name of Chao. If you are gluten free, check the labels.  Some are made with vital wheat gluten. I threw these same sausages on the grill a few weeks ago during a family barbecue and we were all pleasantly surprised.  I thought that grilled they were a bit dry but with a great flavor and consistency.  I decided that next time I would brush them in olive oil before grilling or saute them in a pan with oil.  In this recipe I removed the casings and crumbled the ‘meat’ and sauteed it along with the onions and celery.  Of course this step is optional as there are enough other good flavors and textures in this dish without it.  See TIPS for some suggested substitutions.  NOTE: This is not a paid endorsement, just my personal opinion.

20151117_210724

The inspiration for this dish came from Vegetarian Times and I used their directions as a guide but created my own ingredients.  If you are interested in the original recipe which is also Vegan and includes wild rice, beans, corn and spinach, click HERE.

TIPS:  The stuffing can be made two days ahead of time and refrigerated unstuffed.  Substitute any ingredients that you and your family really like.  Some suggestions would be substituting chopped chestnuts instead of pecans, 1 1/2 cups of cooked cannelini, black or kidney beans instead of vegan sausage;  2 cups of fresh spinach instead of mushrooms.  For a bit of sweetness add 1/4 – 1/2 cup dried cranberries, yellow raisins or black currants.

20151117_210945

WILD RICE, MUSHROOM, PECAN & ‘SAUSAGE’ STUFFED PUMPKIN

Note:  Amounts are listed fill a 6 lb pumpkin. An 8lb pumpkin will call for 2 cups wild rice blend. Adjust accordingly.

1 1/2 cup wild rice blend (or 1/2 cup wild rice and 1 cup long grain brown rice)
1/4 cup olive oil, divided
1 large onion, chopped
3 stalks celery, chopped
6 cloves garlic, minced (divided)
2 links vegan sausage (optional)
1 cup criminy mushrooms
2 Tbsn fresh sage, chopped (divided)
2 Tbsn fresh thyme, chopped (divided)
1 cup pecans, roughly chopped
1 6-8 lb pumpkin*See note.
 20151117_180128
  • Prepare wild rice blend according to package directions. Transfer to bowl and allow to cool.

20151117_174213

  • Heat 2 Tbs. oil in skillet over medium heat. Add onion, celery,; sauté 5 minutes.

20151117_174225

  • Remove sausage from casings and crumble.

20151117_175407

  • Wipe mushrooms clean with a damp papertowel and chop. Add sausage and mushrooms, 4 cloves garlic, 1/2 of. sage and thyme to pan with onions and saute another 5 minutes or so until all liquid has evaporated.

20151117_180336

  • Toast pecans in a dry pan for several minutes until aromatic.

20151117_182551

  • Stir mushroom mixture into rice mixture. Fold in pecans. Taste and season with salt and pepper, if desired.

20151117_181934

  • Preheat oven to 350°F. Line rimmed baking sheet with foil. Cut top from pumpkin, and scoop out seeds and pulp. Reserve seeds for roasting if desired.  See below for directions.

20151117_182335

  •  Combine remaining oil, garlic, sage, and thyme in bowl. Brush oil mixture over inside of pumpkin.

20151117_183019

  • Fill pumpkin with rice mixture, cover with top, and bake 1 1/2 to 2 hours, or until pumpkin is tender when side is pierced with knife tip.

20151117_183116

  • Uncover, and bake 10 to 20 minutes more.

20151117_203224

BONUS:

ROASTED PUMPKIN SEEDS

  • Remove the large pieces of pulp from the seeds. Don’t worry, the smaller shreds will disappear in the second step.
  • Boil the seeds in really salty water for about 5 minutes. Drain and let dry.
  • Spread seeds on a baking sheet. Spray or coat with olive oil.  Sprinkle with salt and pepper, cayenne or any other spices you like.
  • Bake for 30 – 45 minutes at 300 degrees or until golden.  Remove from heat and let cool. Store at room temperature for up to a week.
  • Use as toppings for salads or soups if you have any left after you’ve been snacking on them.

20151118_091227


Wild Rice Mushroom Sausage Stuffed Pumpkin

  • Servings: 8-10
  • Difficulty: medium
  • Print
20151117_203702

Note:  Amounts are listed fill a 6 lb pumpkin. An 8 lb pumpkin needs 2 cups uncooked rice. Adjust recipe accordingly.

1 1/2 cup wild rice blend (or 1/2 cup wild rice and 1 cup long grain brown rice)
1/4 cup olive oil, divided
1 large onion, chopped
3 stalks celery, chopped
6 cloves garlic, minced (divided)
2 links vegan sausage (optional)
1 cup criminy mushrooms
2 Tbsn fresh sage, chopped (divided)
2 Tbsn fresh thyme, chopped (divided)
1 cup pecans, chopped
1 6-8 lb pumpkin*See note.
  • Prepare wild rice blend according to package directions. Transfer to bowl and allow to cool.
  • Heat 2 Tbs. oil in skillet over medium heat. Add onion, celery, 4 cloves garlic, 1/2 of. sage and thyme; sauté 5 minutes.
  • Remove sausage from casings and crumble.
  • Wipe mushrooms clean with a damp papertowel and chop.
  • Add sausage and mushrooms to pan with onions and saute another 5 minutes or so until all liquid has evaporated.
  • Stir mushroom mixture into rice mixture.
  • Toast pecans in a dry pan for several minutes until aromatic.
  • Fold in pecans. Taste aand season with salt and pepper, if desired.
  • Preheat oven to 350°F. Line rimmed baking sheet with foil. Cut top from pumpkin, and scoop out seeds and pulp. Reserve seeds for roasting if desired.  See below.
  •  Combine remaining oil, garlic, sage, and thyme in bowl. Brush oil mixture over inside of pumpkin.
  • Fill pumpkin with rice mixture, cover with top, and bake 1 1/2 to 2 hours, or until pumpkin is tender when side is pierced with knife tip.
  • Uncover, and bake 10 to 20 minutes more.

ROASTED PUMPKIN SEEDS

  • Remove the large pieces of pulp from the seeds. Don’t worry, the smaller shreds will disappear in the second step.
  • Boil the seeds in really salty water for about 5 minutes. Drain and let dry.
  • Spread seeds on a baking sheet. Spray or coat with olive oil.  Sprinkle with salt and pepper, cayenne or any other spices you like.
  • Bake for 30 – 45 minutes at 300 degrees or until golden.  Remove from heat and let cool. Store at room temperature for up to a week.
  • Use as toppings for salads or soups if you have any left after you’ve been snacking on them.

Wheatless Wednesday – Curried Carrot, Sweet Potato and Ginger Soup

2

20151111_083542

Happiness is…hot soup on a cold day.

On Monday I shared 25 things to make with sweet potatoes since I had just been gifted a big back of them…So which of the recipes did I decide to make?  Soup!   Curried Carrot, Sweet Potato and Ginger Soup to be specific.  It finally rained more than a few drops here in Northern California and when its cold and wet outside, soup is the ultimate comfort food since it warms you up from the inside out. I love this flavorful gingery soup, made creamy from the sweet potatoes and not from adding cream or butter.  At only 144 calories per serving (1 1/4 cups), this is a low calorie, zero cholesterol meal with a high nutrient payoff; 4.1 grams protein, 3.9 grams fiber, with loads of vitamins, including Vitamin C to help fight winter colds, plus iron and calcium.

This week we are eating orange on the rainbow.  So what does orange do for us?

“Most yellow and orange food is packed with carotenoids, which give them their vibrant colour. Three of the most common carotenoids – alpha-carotene, beta carotene and beta cryptoxanthin – can be converted from foods into vitamin A in the body. This nutrient is needed for good vision in dim light, normal growth and development, a strong immune system and to keep the skin and cells that line the airways, digestive tract and urinary tract healthy. But thanks to their antioxidant activity, there’s also evidence to suggest that carotenoids – and especially beta carotene, found in orange and yellow food – might help to reduce the risk of heart disease and certain cancers.

However, these findings haven’t always been shown with supplements of beta-carotene, so it’s much better to boost intakes through eating foods which are naturally rich in beta-carotene such as carrots and sweet potatoes.” (Weightloss Resources)

20151109_164037

TIPS:  If I have really fresh, youngish carrots, I like to keep their peels on since so many of the nutrients are in or just under the peel and it’s a shame to cut them off.  Just scrub them with a vegetable brush or sponge and rinse.  They should be smooth and shiny.  If you have older carrots, you may have to peel them because the skins can have a bitter flavor that is best removed.

CURRIED CARROT, SWEET POTATO AND GINGER SOUP

1 Tbsn olive oil
1/2 cup chopped shallots (2-3 large)
3 cups peeled sweet potato
1 1/2 cups carrots (2-3 large)
1 tablespoon grated ginger (or ginger paste)
2 tsp curry powder
1 quart vegetable broth
1/2 tsp salt

20151109_165830

  • Peel and cube sweet potato into about 1/2 inch pieces.

20151109_165213

  • Scrub carrots and slice or chop them into 1/2 inch pieces.

20151109_170536

  • Peel  ginger and grate about a tablespoon.

20151109_164905

  • Heat oil in a large saucepan over medium-high heat. Add shallots; saute 3 minutes or until tender.

20151109_170145

  • Add potato, carrots, ginger, and curry; cook 2 minutes.

20151109_170836

  • Add broth; bring to a boil. Cover, reduce heat, and simmer 25 minutes or until vegetables are tender; taste and add salt if necessary.

20151109_180604

  • Pour half of soup in a food processor; pulse until smooth. Repeat procedure with remaining soup.

20151109_181620

  • Clean saucepan and pour soup back in and reheat.

20151111_083542


  • Serve with a swirl of plain yogurt and cilantro with a pinch of paprika (optional).

Curried Carrot, Sweet Potato and Ginger Soup

  • Servings: 4-6
  • Difficulty: easy
  • Print
20151111_083542

1 Tbsn olive oil
1/2 cup chopped shallots (2-3 large)
3 cups peeled sweet potato
1 1/2 cups carrots (2-3 large)
1 tablespoon grated ginger (or ginger paste)
2 tsp curry powder
1 quart vegetable broth
1/2 tsp salt

  • Peel and cube sweet potato into about 1/2 inch pieces.
  • Scrub carrots and slice or chop them into a/2 inch pieces.
  • Peel  ginger and grate about a tablespoon.
  • Heat oil in a large saucepan over medium-high heat. Add shallots; saute 3 minutes or until tender.
  • Add potato, carrots, ginger, and curry; cook 2 minutes.
  • Add broth; bring to a boil. Cover, reduce heat, and simmer 25 minutes or until vegetables are tender; taste and add salt if necessary.
  • Pour half of soup in a food processor; pulse until smooth. Repeat procedure with remaining soup.
  • Clean saucepan and pour soup back in and reheat.
  • Serve with a swirl of plain yogurt and cilantro with a pinch of paprika (optional).

Meatless Monday – Honey Glazed Winter Squash with Pomegranate

5

20151101_200735

It’s finally starting to feel like Fall!  We actually got a few drops of much needed rain here in California last night.  It’s been six months since we have received this manna from heaven and the weatherman was positively giddy during his forecast last night.  With Fall comes a fabulous selection of gorgeous squashes with their colorful but knobby exteriors and rich and sweet interiors. Their gorgeous skins make them a perfect table centerpiece and then you can turn them into a spectacular meal later. This dish combines some of my favorite flavors, rich and earthy winter squash, roasted with shallots, then tossed with toasted pine nuts and pomegranate seeds and finely, drizzled with a sweet and tangy cider vinegar and honey reduction.

20151101_133824

This recipe from “Eating Well, November/December 2015” will work with any winter squash, except for Spaghetti Squash. Each has a unique flavor but all are nutritious and good sources of vitamins and minerals with zero fat. I have been wanting to try Delicata squash but only found three small ones in my supermarket so I also used an Acorn squash but didn’t have room in the pan for the Carnival squash that I couldn’t resist (Who can pass up something called Carnival Tutti Frutti?) so that will have to be another meal.  Look at how different they are from the outside.  From left to right in the photo above, is Carnival (Tutti Frutti), Acorn Squash and three small Delicata.  Delicata squash is named for it’s delicate skin which is thin enough to easily cut, unlike other winter squashes that have hard shells (and you fear losing a hand just cutting them in half).  As an added bonus, the skin is also edible so the squash doesn’t need to be peeled.  If you are using acorn, carnival or kabocha squash, the peel looks just as pretty but it’s not edible.

20151101_190032

I love this time of year when pomegranate seeds are readily available.  Their vivid color transforms any dish into a showstopper and these nutrient rich little gems add a host of vitamins and anti-oxidants to the meal.  One word of caution though; pomegranate juice stains any porous surface including a wood cutting board, so I would recommend cutting over a ceramic plate or other non-porous surface. Sometimes you can find them already seeded in the supermarket as an easy but more expensive shortcut.

20151102_120312

TIPS: Seeds from winter squash make a great snack food, just like the popular pumpkin seeds. Just scoop the pulp and seeds from inside the squash and separate out the seeds. Toss them in olive oil and place them in a single layer on a cookie sheet, sprinkle with salt and lightly roast them at 300 degrees in the oven for about 30 minutes. If you have time, you can try soaking them in salt water for several hours or overnight before roasting for a tastier, cleaner result. Soaking helps the salt permeate the seed and makes it easier to remove the last bits of pulp.

20151101_200729

HONEY GLAZED WINTER SQUASH WITH POMEGRANATE

5 lbs delicata or Acorn squash
4 large shallots
3 Tbsn olive oil
1/4 cup pomegranate seeds
1/4 cup pinenuts
1/2 tsp salt
1/4 tsp pepper
1/4 cup fresh mint, chopped
HONEY GLAZE:
1/2 cup apple cider vinegar
1/3 – 1/2 cup honey
1/4 tsp salt

20151101_173855

  • Preheat oven to 400 degrees. Cut the squash in half and scoop out the seeds.20151101_174404
  • Then cut horizontally into 1 inch slices

20151101_175546

  • Quarter shallots.

20151101_180824

  • Toss the squash slices and shallots with olive oil, salt and pepper and divide between two roasting pans.

20151101_194759

  • Roast for 30-35 minutes, alternating between top and bottom racks, or until squash is tender. (turning halfway through cooking process) While the squash is cooking, combine honey, vinegar and salt in a small saucepan and bring to a boil.  Reduce heat to a simmer until reduced to about a 1/2 cup.

20151101_181513

  • Toast pinenuts in a dry pan for several minutes until golden.  Remove from heat and let cool.

20151101_200657

  • Transfer squash to  a serving platter, top with pomegranate seeds, pine nuts and mint. Drizzle with syrup. Serve warm.

Honey Glazed Winter Squash with Pomegranate

  • Servings: 4-6
  • Difficulty: easy
  • Print

 20151101_200735

5 lbs delicata or Acorn squash
4 large shallots
3 Tbsn olive oil
1/4 cup pomegranate seeds
1/4 cup pinenuts
1/2 tsp salt
1/4 tsp pepper
1/4 cup fresh mint, chopped
HONEY GLAZE:
1/2 cup apple cider vinegar
1/3 – 1/2 cup honey
1/4 tsp salt

  • Preheat oven to 400 degrees. Cut the squash in half and scoop out the seeds.  Then cut horizontally into 1 inch slices
  • Quarter shallots.
  • Toss the squash slices and shallots with olive oil, salt and pepper and divide between two roasting pans.
  • Roast for 30-35 minutes, alternating between top and bottom racks, or until squash is tender. (turning halfway through cooking process)
  • Combine honey, vinegar and salt in a small saucepan and bring to a boil.  Reduce heat to a simmer until reduced to about a 1/2 cup.
  • Toast pinenuts in a dry pan for several minutes until golden.  Remove from heat and let cool.
  • Transfer squash to  a serving platter, top with pomegranate seeds, pine nuts and mint. Drizzle with syrup. Serve warm.

Meatless Monday – Spice Crusted Whole Roasted Cauliflower

6

20151019_193128

If you are looking for a dramatic (and delicious) non-meat entre, I have a goodie for you to try this holiday season.  You have probably roasted cauliflower florets before, or maybe you have even made cauliflower ‘steaks’, but what about roasting the whole darn thing? I have seen photos of cauliflower cooked this way but have never tried it until now. All I can say is ‘What was I waiting for?’

20150927_201050

I have called cauliflower a vegetable chameleon before because it is so adaptable and a great substitute for many less healthy ingredients, so I decided to take it a step further and prepare it like a ‘meat’ for roasting. I removed the stem and leaves, brushed the outer head with a thick spicy sauce made with chili powder, cumin, garlic and cayenne pepper and then roasted in a hot oven for almost an hour.  The sauce becomes a spicy and yummy crust and the interior is creamy goodness.  I served it in wedges. Yum!

20150927_181725

Can cauliflower really serve as a main course and not just a side dish?  It’s just a white veggie, so how can it have enough nutrients to be the star of the show?  Well, in comparison it’s not going to have as much protein as a steak but it’s also not going to have all the fat and calories either.  Cauliflower has a surprising number of nutrients for something so pale and unassuming.  One cup cooked = 2.28 grams of protein. Cauliflower is also a good source of fiber, phytonutrients and omega 3 fatty acids, plus vitamin C, a host of B vitamins and minerals (manganese, phosphorus and potassium). Cauliflower is known to help in fighting cancer and preventing cardiovascular disease.  I’m pretty sure that meat can’t make those ‘health’ claims. Just sayin’.

20151019_192940

TIPS:  For an even more colorful display, try using yellow, purple or green cauliflower. This is a fairly spicy and flavorful coating which can be toned down by reducing the amount of cayenne pepper and/or chili powder.  Or you could add a half cup of plain yogurt (any kind) into the spice mix.  I have made it both ways (with and without yogurt) and it looks pretty much the same either way but the yogurt makes the end result a little more mild.

20151019_192822

SPICE CRUSTED WHOLE ROASTED CAULIFLOWER

1 head cauliflower
2 Tbsn olive oil
1 lemon, juiced (about 1/3 cup)
2 Tbsn chili powder
1 Tbsn cumin
4-5 cloves garlic, minced (or 1 Tbsn garlic powder)
1 tsp cayenne pepper (optional)
1 tsp black pepper
1/2 tsp salt (or more to taste)

20150927_181725

  • Preheat the oven to 400° and lightly grease a small baking dish with vegetable oil. Set aside. Trim the base of the cauliflower to remove any green leaves and the woody stem and place on prepared baking dish.

20150927_182541

  • In a medium bowl, combine the rest of the ingredients

20150927_182813

  • Using a pastry brush, evenly spread the marinade to cover the entire surface of the cauliflower.

20150927_182752

  •  Roast about 45 minutes. Check for doneness (it should be easily pierced with a sharp knife).  Cook for another 15 miinutes, if necessary.

20150927_195101

  • For a pretty presentation, move to a serving platter.  Cut into wedges and serve warm.

20151019_193128


Spice Crusted Whole Roasted Cauliflower

  • Servings: 4
  • Difficulty: easy
  • Print

20151019_193128 

1 head cauliflower
2 Tbsn olive oil
1 lemon, juiced (about 1/3 cup)
2 Tbsn chili powder
1 Tbsn cumin
4-5 cloves garlic, minced (or 1 Tbsn garlic powder)
1 tsp cayenne pepper (optional)
1 tsp black pepper
1/2 tsp salt (or more to taste)

  • Preheat the oven to 400° and lightly grease a small baking dish with vegetable oil. Set aside.
  • Trim the base of the cauliflower to remove any green leaves and the woody stem and place on prepared baking dish..
  • In a medium bowl, combine the rest of the ingredients
  • Using a pastry brush, evenly spread the marinade to cover the entire surface of the cauliflower.
  • Roast about 45 minutes. Check for doneness (it should be easily pierced with a sharp knife).  Cook for another 15 miinutes, if necessary.
  • Cut into wedges and serve warm.


Meatless Monday – Roasted Red Pepper and Red Lentil Soup

1


20150928_100643

This is a One Pot Wonder!  Soup is known to be a comforting and healing food. I just got my first cold of the year, possibly a result of the multiple cross country airplane flights I’ve taken or maybe its just a change of season sniffles.  I was craving warm, hearty and a bit spicy to clear everything up.  So soup was a natural choice. My friend, Sandy had just given me a platter of roasted red peppers and tomatoes that she said her family wouldn’t eat.  Their loss was my gain and the inspiration for today’s soup.  I decided to pair both roasted red veggies with red lentils to make a flavorful and spicy soup.  Yum…  Just what the doctor ordered.

20150927_180549

People often ask me  if I’m getting enough protein since I’ve stopped eating meat. The answer is YES! This soup is rich in protein as well as vitamins and minerals, from both the lentils and the veggies. The protein content of Red Lentils is comparable to that of one serving of meat, but generally healthier because they contain low levels of fat. In one cup of red lentils, you consume nearly 18 grams of protein which is the same as one 3-ounce serving of chicken breast but without the 3 grams of fat. Lentils are also rich in slow-digesting carbohydrates and dietary fiber that keep you feeling full and satisfied.  (Read:  Less likely to find yourself standing back in front of the open refrigerator.) I will throw one last little factoid at you.  We learned from Eating the Rainbow that red foods (especially tomatoes) are loaded with lycopene, an important antioxidant which is good for a healthy heart, lowering the risk of some cancers and protecting the skin from ultra-violet light. So dig in!

20150927_180143

TIPS:  Okay. I was just given roasted tomatoes and red peppers, however, if you don’t have the time or inclination to roast them yourself, you can buy them already roasted in jars or substitute a can of fire roasted tomatoes and saute diced red peppers with the onions.

20150928_100651

ROASTED RED PEPPER AND RED LENTIL SOUP

2 Tbsn olive oil
1 large onion, diced
4-5 cloves garlic, minced
2 red bell peppers
2-3 large red tomatoes (or one can of fire roasted tomatoes)
1 red chili pepper (or jalapeno)
2 cups dried red lentils
8 cups vegetable stock
1 tsp cumin
1/4 – 1 tsp cayenne pepper (optional)
1/2 tsp salt (or to taste)

20150927_180334

  • If roasting red peppers (and tomatoes), broil until the skin has blackened, 5-8 minutes.  Turn to broil the other side.  Remove from heat and let cool.  Roughly chop and set aside.

20150927_175912

  • In a large stockpot, heat the olive oil and saute the onion, chili pepper, and garlic and saute several minutes.

20150927_180417

  • Add the red peppers and tomatoes and stir to combine.

20150927_180847

  • Add the lentils, vegetable stock and spices and simmer until the lentils are tender, about 20 minutes.

20150927_183033

  • Let the soup cool slightly and puree in a food processor or blender.  You may have to do it in two batches.

20150927_183742

  • Clean the stockpot and return the soup to the pot.  Reheat.

20150927_200828

  • Serve with a dollop of plain yogurt, sliced chili peppers or fresh herbs.

Roasted Red Pepper and Red Lentil Soup

  • Servings: 4-6
  • Difficulty: easy
  • Print

20150928_100643

2 Tbsn olive oil
1 large onion, diced
4-5 cloves garlic, minced
2 red bell peppers
2-3 large red tomatoes
1 red chili pepper
2 cups dried red lentils
8 cups vegetable stock
1 tsp cumin
1/4 -1 tsp cayenne pepper (optional)
1/2 tsp salt (or to taste)

  • If roasting red peppers(and tomatoes), broil until the skin has blackened, 5-8 minutes.  Turn to broil the other side.  Remove from heat and let cool.  Roughly chop and set aside
  • In a large stockpot, heat the olive oil and saute the onion, chili pepper, and garlic and saute several minutes.
  • Add the red peppers and tomatoes and stir to combine.
  • Add the lentils, vegetable stock and spices and simmer until the lentils are tender, about 20 minutes.
  • Let the soup cool slightly and puree in a food processor or blender.  You may have to do it in two batches.
  • Serve with a dollop of plain yogurt, sliced chili peppers or fresh herbs.

Meatless Monday – Barbecue Pulled “Pork” Sliders with Spicy Slaw (Vegan)

2

20150918_192438

If you LOVE carnitas or pulled pork but want to pass on the meat, try this vegan version made with hearts of palm  I know, it sounds implausible, but it’s really good and the texture is very similar to pulled pork but without the calories and the guilt. Piled high on a fresh slider bun and dripping with barbecue sauce, this pulled ‘pork’ is pretty delicious.  You don’t miss the meat!  It’s really all about the barbecue sauce, so choose wisely.  You can go spicy, mild or sweet.  The recipe below is for a slightly spicy barbecue sauce.  You can also use a store-bought sauce and doctor it up with a bit of spices or hot sauce if need be.

20150920_160730

Pulled pork is often served with coleslaw whose cool and crispy tangyness is the perfect accompaniment to the warm and spicy filling.  My husband really dislikes creamy foods, so I made a mustard and vinegar based slaw instead of a creamy one with mayo.  This slaw is fresh and a bit spicy with cabbage, carrots, cilantro and red onions with thinly sliced hot chili peppers to give it some pizzaz.  Or you can be a purist and just go ‘meat’ and bun… Yes, that is really hearts of palm.

20150918_192152

So what is hearts of palm and how does it add up from a nutritional standpoint? Hearts of Palm is harvested from the inner, less fibrous, part of various palm trees, most commonly the cabbage palm.  Nutritionally, it’s extremely low in calories, weighing in at only 41 calories per cup(146 grams). It is also very low in Cholesterol and a good source of Protein (four grams in one cup), Riboflavin and Potassium, and a very good source of Dietary Fiber, Vitamin C, Folate, Calcium, Iron, Magnesium, Phosphorus, Zinc, Copper and Manganese. Whew! Even though I have always liked hearts of palm, I thought they were fairly empty calories, so this was a pleasant surprise. I will definitely be tossing them into more salads and maybe even on the barbecue or in casseroles.  Stay tuned…

20150918_143254

I have been wanting to try a version of this recipe for a while.  I’m not sure where I saw the idea for the first time (probably on Pinterest) but I adapted this recipe from Blissful Basil although she used canned jackfruit which I have heard is also a good shredded pork/carnitas substitute but I have never seen jackfruit in grocery stores around me.

TIPS:  An easy short cut is to use  a 16 oz bag of pre-shredded slaw mix which is available in most grocery stores instead of shredding all the veggies yourself.  Add a prepared sauce and dinner is practically done!

20150919_124719

BARBECUE PULLED ‘PORK’ SLIDERS WITH SPICY SLAW

2 Tbsn olive oil
1  large onion, chopped
4-5 cloves garlic, minced
2 (14 oz) cans of hearts of palm
1 1/2 cup Barbecue Sauce (Homemade or Prepared)
8 slider buns

HOMEMADE BARBECUE SAUCE
2 small cans tomato paste + one cup of water(or 2 cans tomato sauce)
1/2 cup apple cider vinegar
2-3 Tbsn brown sugar
1 tsp garlic powder
1/2 tsp onion powder
1 tsp chili powder(or more)
1/2 tsp cayenne pepper or hot sauce (or more)
salt and fresh ground black pepper to taste

SPICY SLAW
2 cups shredded cabbage (green or purple or both)
1/2 cup shredded carrot
1/4 large red onion, thinly sliced
1-2 red chili peppers, thinly sliced into rounds
1/2 cup cilantro, chopped
2 scallions, thinly sliced
1/4 cup olive oil
1/4 cup apple cider vinegar
juice from one lemon
1 tsp dijon mustard
1/2 tsp salt
1//4 tsp pepper

20150920_160607

  • Combine cabbage, carrots, peppers, cilantro and scallions in a medium serving bowl.  Whisk together the oil, vinegar, lemon juice, mustard, salt and pepper and pour over slaw.  Toss to combine and set aside.

20150918_145332

  • Heat olive oil in a large heavy pan (preferably one that can go into the oven) over medium heat. Add onion and garlic and sauté until tender (5-7 minutes).

20150918_144611

  • Drain the hearts of palm and shred using your hands or a knife.

20150918_145932

  • Add hearts of palm to the pan with the onions and garlic and sauté for 5-10 minutes.

20150918_151633

  • If making homemade sauce, combine barbecue sauce ingredients in a small bowl. Start with only one tablespoon of brown sugar.  Taste and adjust seasonings. Stir the barbecue sauce and one cup vegetable broth (or water)into the hearts of palm mixture. Cover and simmer for 20-25 minutes or until tender, stirring occasionally to get the browned bits off the bottom.  You can use a wooden spoon to break up the hearts of palm a bit more. If it gets dry add water or vegetable broth.

20150918_191756

  • Continue to simmer with the lid off for for another 10 or 15 minutes or place in a 350 degree oven to brown.

20150918_192334

  • Fill each of the buns with generous spoonfuls of  barbecue mixture and spicy slaw.  Top with pickles.

BBQ 'Pork' Sliders with Spicy Slaw

  • Servings: 4-6
  • Difficulty: easy
  • Print
20150918_192438

2 Tbsn olive oil
1  large onion, chopped
4-5 cloves garlic, minced
2 (14 oz) cans of hearts of palm
1 1/2 cup Barbecue Sauce (Homemade or Prepared)
8 slider buns

HOMEMADE BARBEQUE SAUCE
2 small cans tomato paste + 1 cup water(or 2 cans tomato sauce)
1 cup water
1/2 cup apple cider vinegar
2-3 Tbsn brown sugar
1 tsp garlic powder
1/2 tsp onion powder
1 tsp chili powder(or more)
1/2 tsp cayenne pepper or hot sauce (or more)
salt and fresh ground black pepper to taste

SPICY SLAW
2 cups shredded cabbage (green or purple or both)
1/2 cup shredded carrot
1/4 large red onion, thinly sliced
1-2 red chili peppers, thinly sliced into rounds
1/2 cup cilantro, chopped
2 scallions, thinly sliced
1/4 cup olive oil
1/4 cup apple cider vinegar
juice from one lemon
1 tsp dijon mustard
1/2 tsp salt
1//4 tsp pepper

  • Combine cabbage, carrots, peppers, cilantro and scallions in a medium serving bowl.  Whisk together the oil, vinegar, lemon juice, mustard, salt and pepper and pour over slaw.  Toss to combine and set aside.
  • Heat olive oil in a large heavy pan (preferably one that can go into the oven) over medium heat. Add onion and garlic and sauté until tender (5-7 minutes).Drain the hearts of palm and shred using your hands or a knife.
  • Add hearts of palm to the pan with the onions and garlic and sauté for 5-10 minutes.
  • If making homemade sauce, combine barbecue sauce ingredients in a small bowl. Start with only one tablespoon of brown sugar. Taste and adjust seasonings.
  • Stir the barbecue sauce and one cup vegetable broth (or water)into the hearts of palm mixture. Cover and simmer for 20-25 minutes or until tender, stirring occasionally to get the browned bits off the bottom.  You can use a wooden spoon to break up the hearts of palm a bit more. If it gets dry add water or vegetable broth.
  • Continue to simmer with the lid off for for another 10 or 15 minutes or place in a 350 degree oven to brown.
  • Fill each of the buns with generous spoonfuls of  barbecue mixture and spicy slaw.  Top with pickles.
 

Wheatless Wednesday – Cauliflower Quinoa Chowder Topped with Caramelized Shallots

0

20150915_204149

It’s starting to look like Soup Season – and this one is magic!  I just arrived at my house in Maine, where summer and fall are definitely having a collision. Summer is not over yet; the days are still sunny and beautiful, but once the sun goes down the temperature drops and sweaters come out. School is back in session, so that means that grownups have to actually go back to work too.  It is this time of year when I still eat salads for lunch but start to crave warm homey food for dinner.  Last night I made this savory vegan Cauliflower Quinoa Chowder topped with caramelized shallots (not bacon), parsley and sliced green onion.  Mmmm… a definite Winner!  This is an easy One Pot Meal that serves about 6 adults with generous portions. This will be one I make again and again.

20150915_174802

This soup has two magic ingredients:  cauliflower and quinoa.  Cauliflower is the chameleon of vegetables.  It can take the place of flour (Pizza Crust), pasta (Mac and Cheese), grain (Tabouleh) or potatoes (Cauliflower Puree).  Adding Cauliflower to foods is a sneaky smart way to get some nutrients in your diet.  Cauliflower is an excellent source of vitamin C, vitamin K, folate, pantothenic acid, and vitamin B6. It is a good source of dietary fiber, protein, omega-3 fatty acids and a whole host of vitamins and minerals.  I only used one potato in this dish and the cauliflower stepped in for the rest.  If you are trying to avoid carbs (even though potatoes are good ones), you can elinimate the potato altogether and add a bit more cauliflower.

20150916_170617

Quinoa is another master of illusion and can be the star of a main course casserole or added to veggies in a salad.  In this dish it is mixed in towards the end as a thickener and, as one of the Worlds ‘nearly perfect foods’ (as described on the package) it also provides a huge protein boost.  I used Pearl Quinoa which I have never used before, partially because I thought it would add good texture to soup (it did) but also to support the company, Alter Eco, a Fair Trade company who gets its organic quinoa from Quechua and Aymara farmers in who grow the grain 13,000 feet up on the arid and desolate Soar De Uyuni salt flat of Bolivia.  I want to support that kind of effort!  That said, any kind of quinoa will work, so use what you have.

20150915_172815

I adapted this recipe from  Foodie Crush but made a few changes to make it vegan (trying to use less milk and dairy) and based on what vegetables I had on hand.  She has a great recipe though, so you can click on the link to see the original.  I love the color and sweetness that the carrots added.  The original recipe called for red bell pepper which I didn’t have, so I added more carrots and a stalk of celery.  Follow your own tastes (or pantry).  I also used Original flavor coconut millk instead of regular milk and LOVED the added flavor.  This chowder gets it’s thick and creamy texture from the quinoa but also from pureeing one third to a half of the vegetable mixture before adding the quinoa.  If you like it chunky, puree less, if you like a smoother soup, puree more.  Its that easy!

20150915_194731 (1)

I love toppings and these really turn chowder into something special.  The caramelized shallots are worth the 15 minutes it takes, trust me.  I recommend making the shallots ahead or while the cauliflower and potatoes are cooking.  This is my Go To substitute for bacon and it works!  Be creative – or be a purist and go bare!

20150916_130754

I eased myself into Maine yesterday with a windy and challenging kayak across the lake where the headwinds tossed water into out kayaks at each wave.  Luckily we had the wind at our backs on the way back and breezed home but I definitely earned my dinner.  I was not disappointed.  I hiked Pleasant Mountain this morning instead of writing this blog (Sorry not sorry).  In the photo above you can see the White Mountains in the distance.  Now I’m looking for leftovers…

20150915_204149

CAULIFLOWER AND QUINOA CHOWDER

1/4 cup olive or coconut oil
2-3 cloves garlic, minced
1/2 large onion, diced
1 stalk celery, diced
2 carrots, diced
1 russet potato, peeled and diced
1 small head cauliflower, roughly chopped (about 3 cups)
1 quart vegetable broth
2 cups coconut milk (or any other kind of milk)
2 bay leaves
2 tsp dried thyme
1/2 cup pearled quinoa (or regular quinoa)
1 tsp salt
1/4 tsp pepper

TOPPINGS: (optional)

Carmelized shallots*Recipe below
Chopped parsley
Sliced scallions

20150915_175023

  • In large stock pot, garlic and onions in oil over medium high heat for about 5 minutes, or until onions are opaque. Add celery and carrots and cook for about 10 minutes.

20150915_180723

  • Add potato, cauliflower, vegetable broth, coconut milk, bay leaf and thyme. Bring to boil, then reduce heat to simmer and cook for about 10-12 minutes or until cauliflower and potato are softened.

20150915_192712

  • Remove bay leaf. Ladle about 1/3 to 1/2 of the soup into a food processor or blender and process until smooth. Add back to pot. Add salt and pepper.  Taste and add seasoning if desired.

20150915_193314

  • Rinse 1/2 cup quinoa in cold water and add to cauliflower mixture. Reduce to simmer and cook until quinoa is softened, about 15 minutes. If soup gets too thick add water and lower temperature.

20150915_194731 (1)

  • Add more liquid if needed.  Serve with desired toppings.  I highly recommend carmelized shallots, parsley and sliced scallions.

CARMELIZED SHALLOTS (makes about 1/4 cup)

6-8 shallots
1 Tbsn olive oil
1/2 tsp salt

20150915_190142

  • Peel and thinly slice shallots into rounds.

20150915_191057

  • Saute in oil for 15  minutes or so until golden brown.

20150915_191730

  • Remove from pan and drain on paper towels.

20150915_194731 (1)

  • Place in a small serving dish along with other toppings.

Cauliflower Quinoa Chowder

  • Servings: 6
  • Difficulty: easy
  • Print
20150915_204149

1/4 cup olive or coconut oil
2-3 cloves garlic, minced
1/2 large onion, diced1 teaspoon salt
1 stalk celery, diced
2 carrots, diced
1 russet potato, peeled and diced
1 small head cauliflower, roughly chopped (about 3 cup)
1 quart vegetable broth
2 cups coconut milk (or any other kind of milk)
2 bay leaves
2 tsp dried thyme
1/2 cup pearled quinoa (or regular quinoa)
1 tsp salt
1/4 tsp pepper

  • In large stock pot, garlic and onions in oil over medium high heat for about 5 minutes, or until onions are opaque.
  • Add celery and carrots and cook for about 10 minutes.
  • Add potato, cauliflower, vegetable broth, coconut milk, bay leaf and thyme. Bring to boil, then reduce heat to simmer and cook for about 10-12 minutes or until cauliflower and potato are softened.
  • Remove bay leaf. Ladle about 1/3 to 1/2 of the soup into a food processor or blender and process until smooth.
  • Add back to pot. Add salt and pepper.  Taste and add seasoning if desired.
  • Rinse 1/2 cup quinoa in cold water and add to cauliflower mixture. Reduce to simmer and cook until quinoa is softened, about 15 minutes.
  • Add more liquid if needed.  Serve with desired toppings.  I highly recommend carmelized shallots, parsley and sliced scallions.

CARMELIZED SHALLOTS (makes about 1/4 cup)

6-8 shallots
1 Tbsn olive oil
1/2 tsp salt

  • Peel and thinly slice shallots into rounds.
  • Saute in oil for 15  minutes or so until golden brown.
  • Remove from pan and drain on paper towels.
  • Place in a small serving dish.