Meatless Monday – Beet & Apple Salad with Almonds & Feta

2

20150830_190404

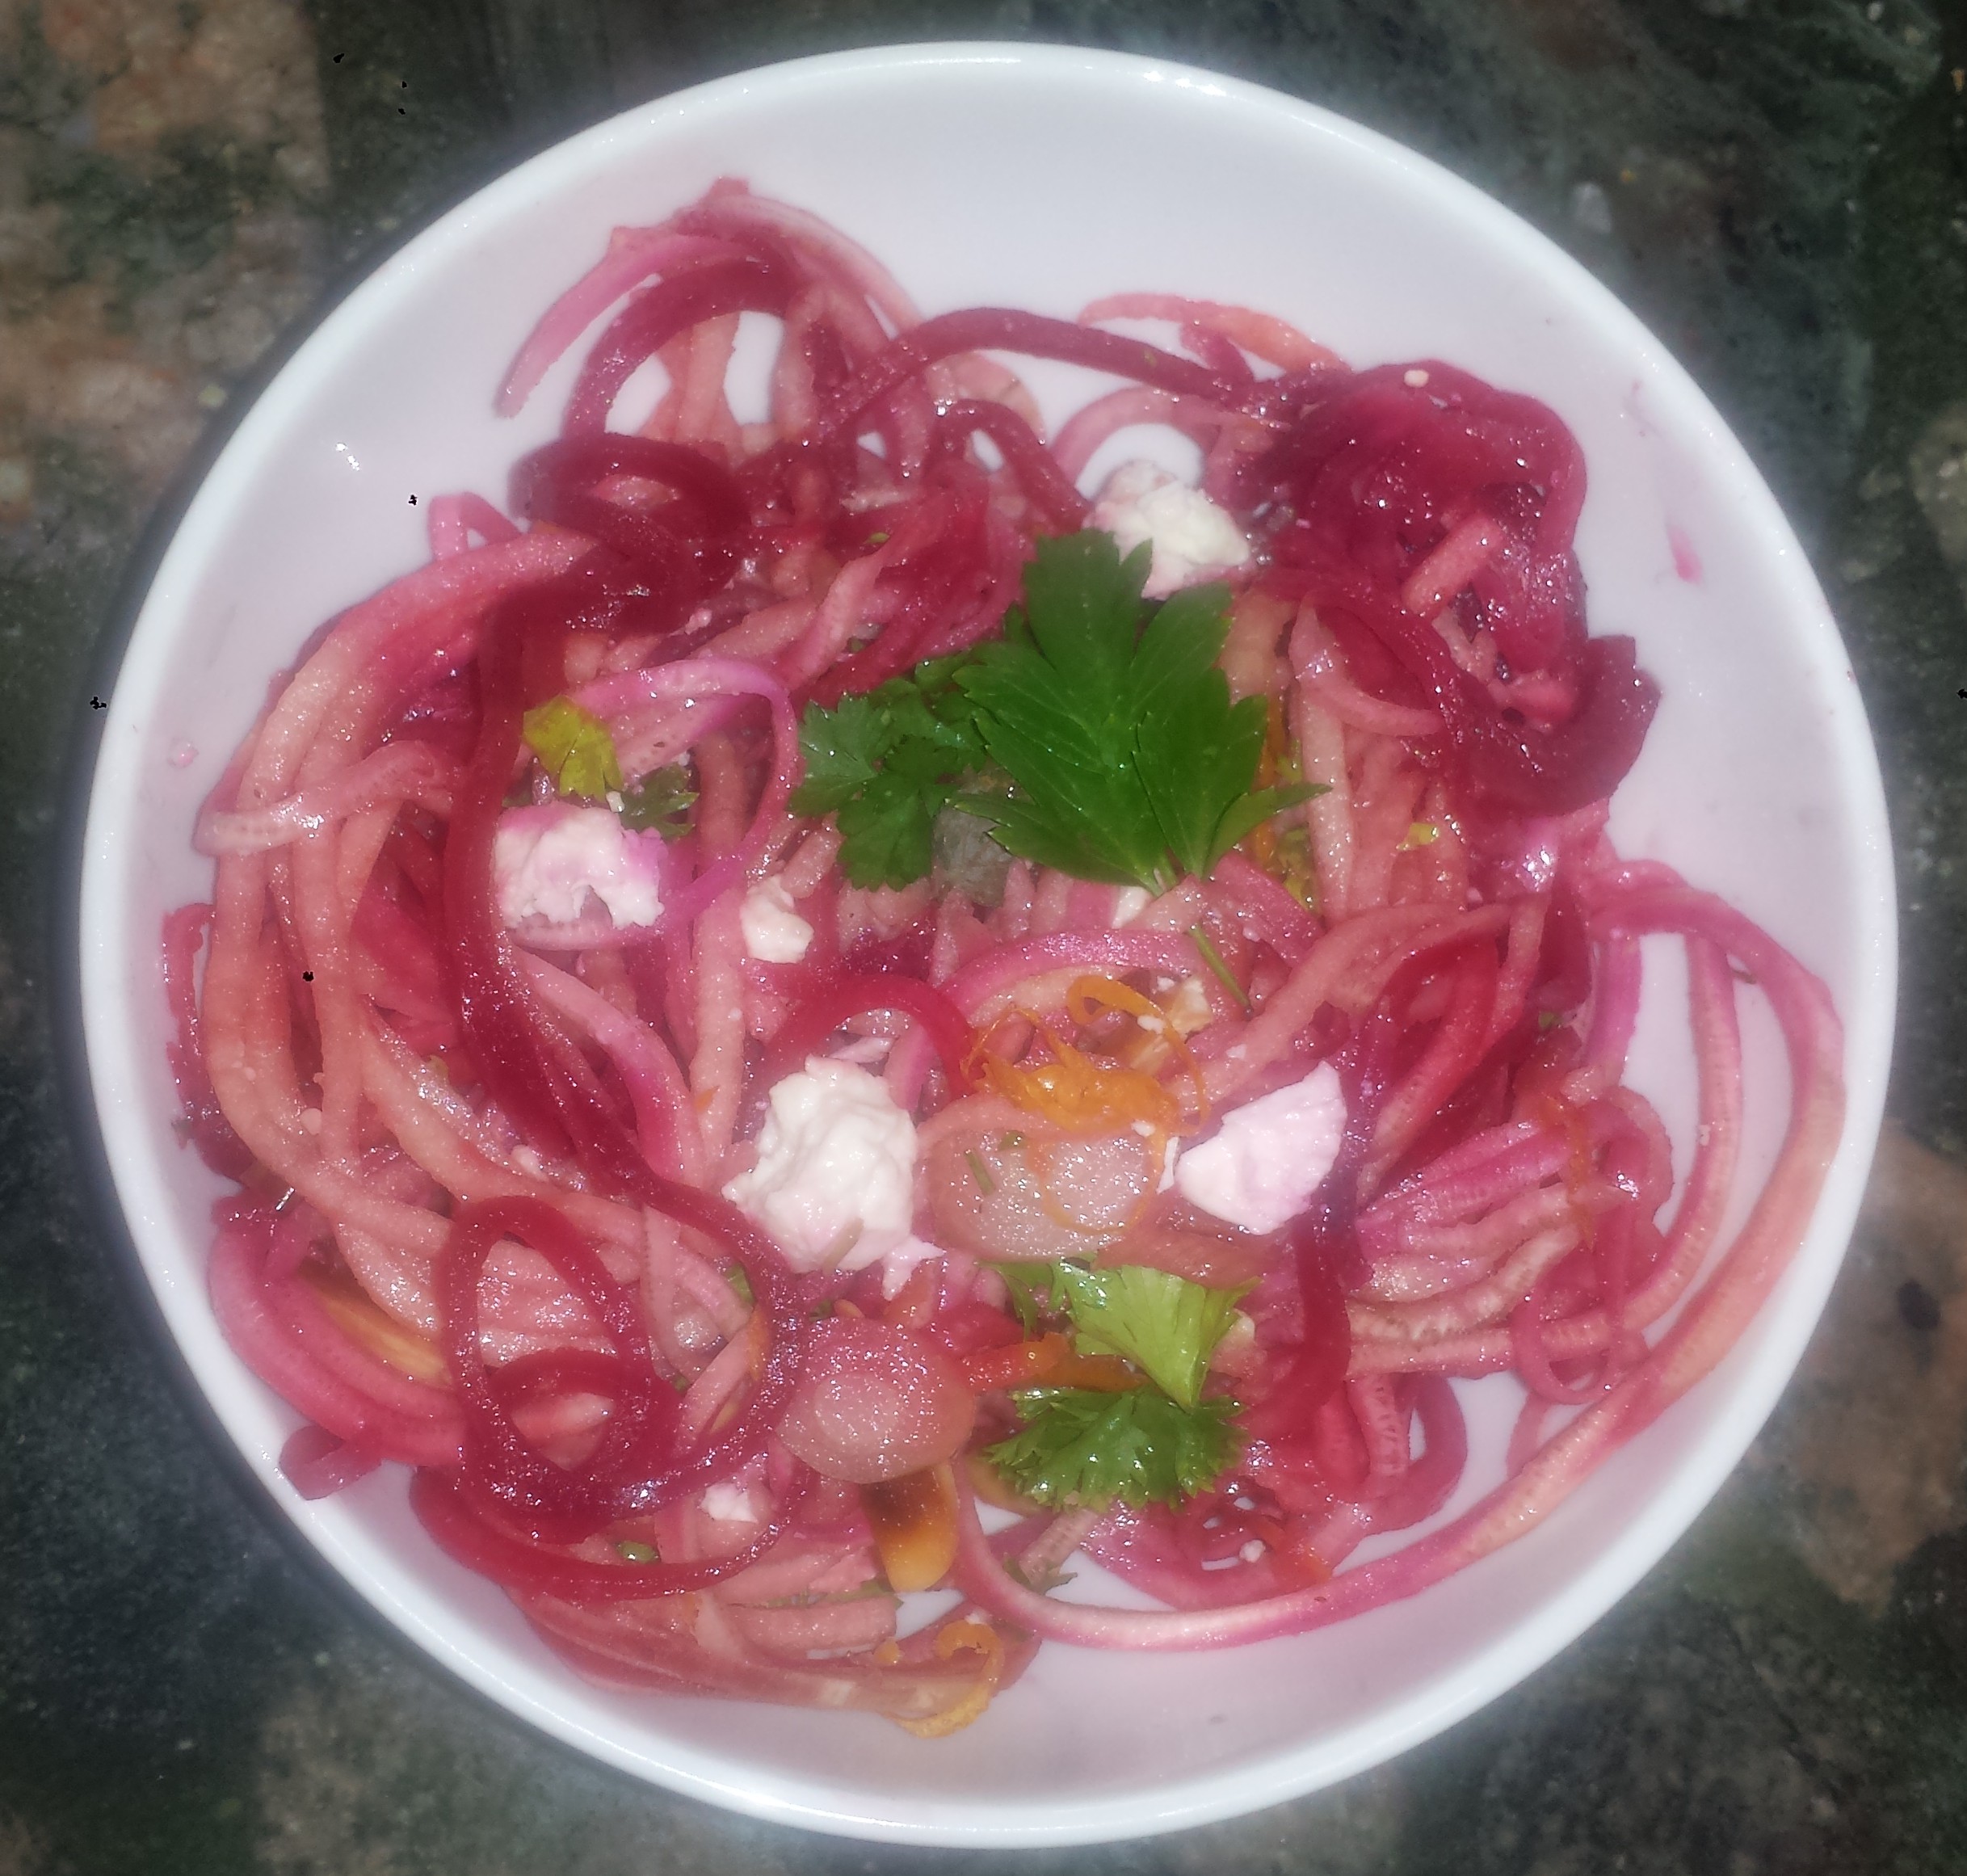
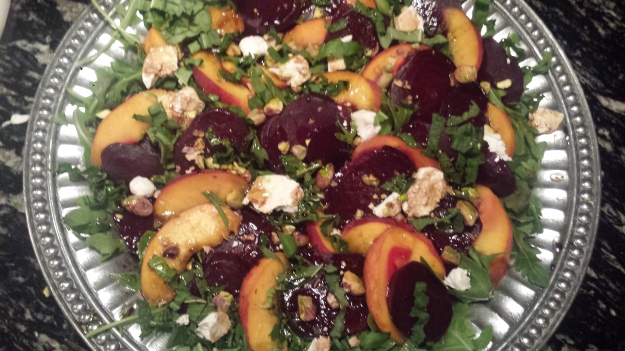
I know what you’re thinking…raw beets, yuck!  Think again.  Did you know that Beets are considered to be nature’s Viagra? (I’m not making this up) The ancient Romans, used them medicinally as an aphrodisiac and science has backed them up. Yep!  Apparently, it’s all about Boron which is used in the production of hormones. That aside, beets are surprisingly sweet and delicious when eaten raw, especially if they are thinly sliced, shaved or shredded.  In fact, that they are so sweet, especially in combination with the apple spirals, that they need an acidic dressing, fresh herbs and buttery almonds for balance.  I also love the addition of creamy feta or goat cheese to round out the flavors and add a bit more protein.


20150830_133429

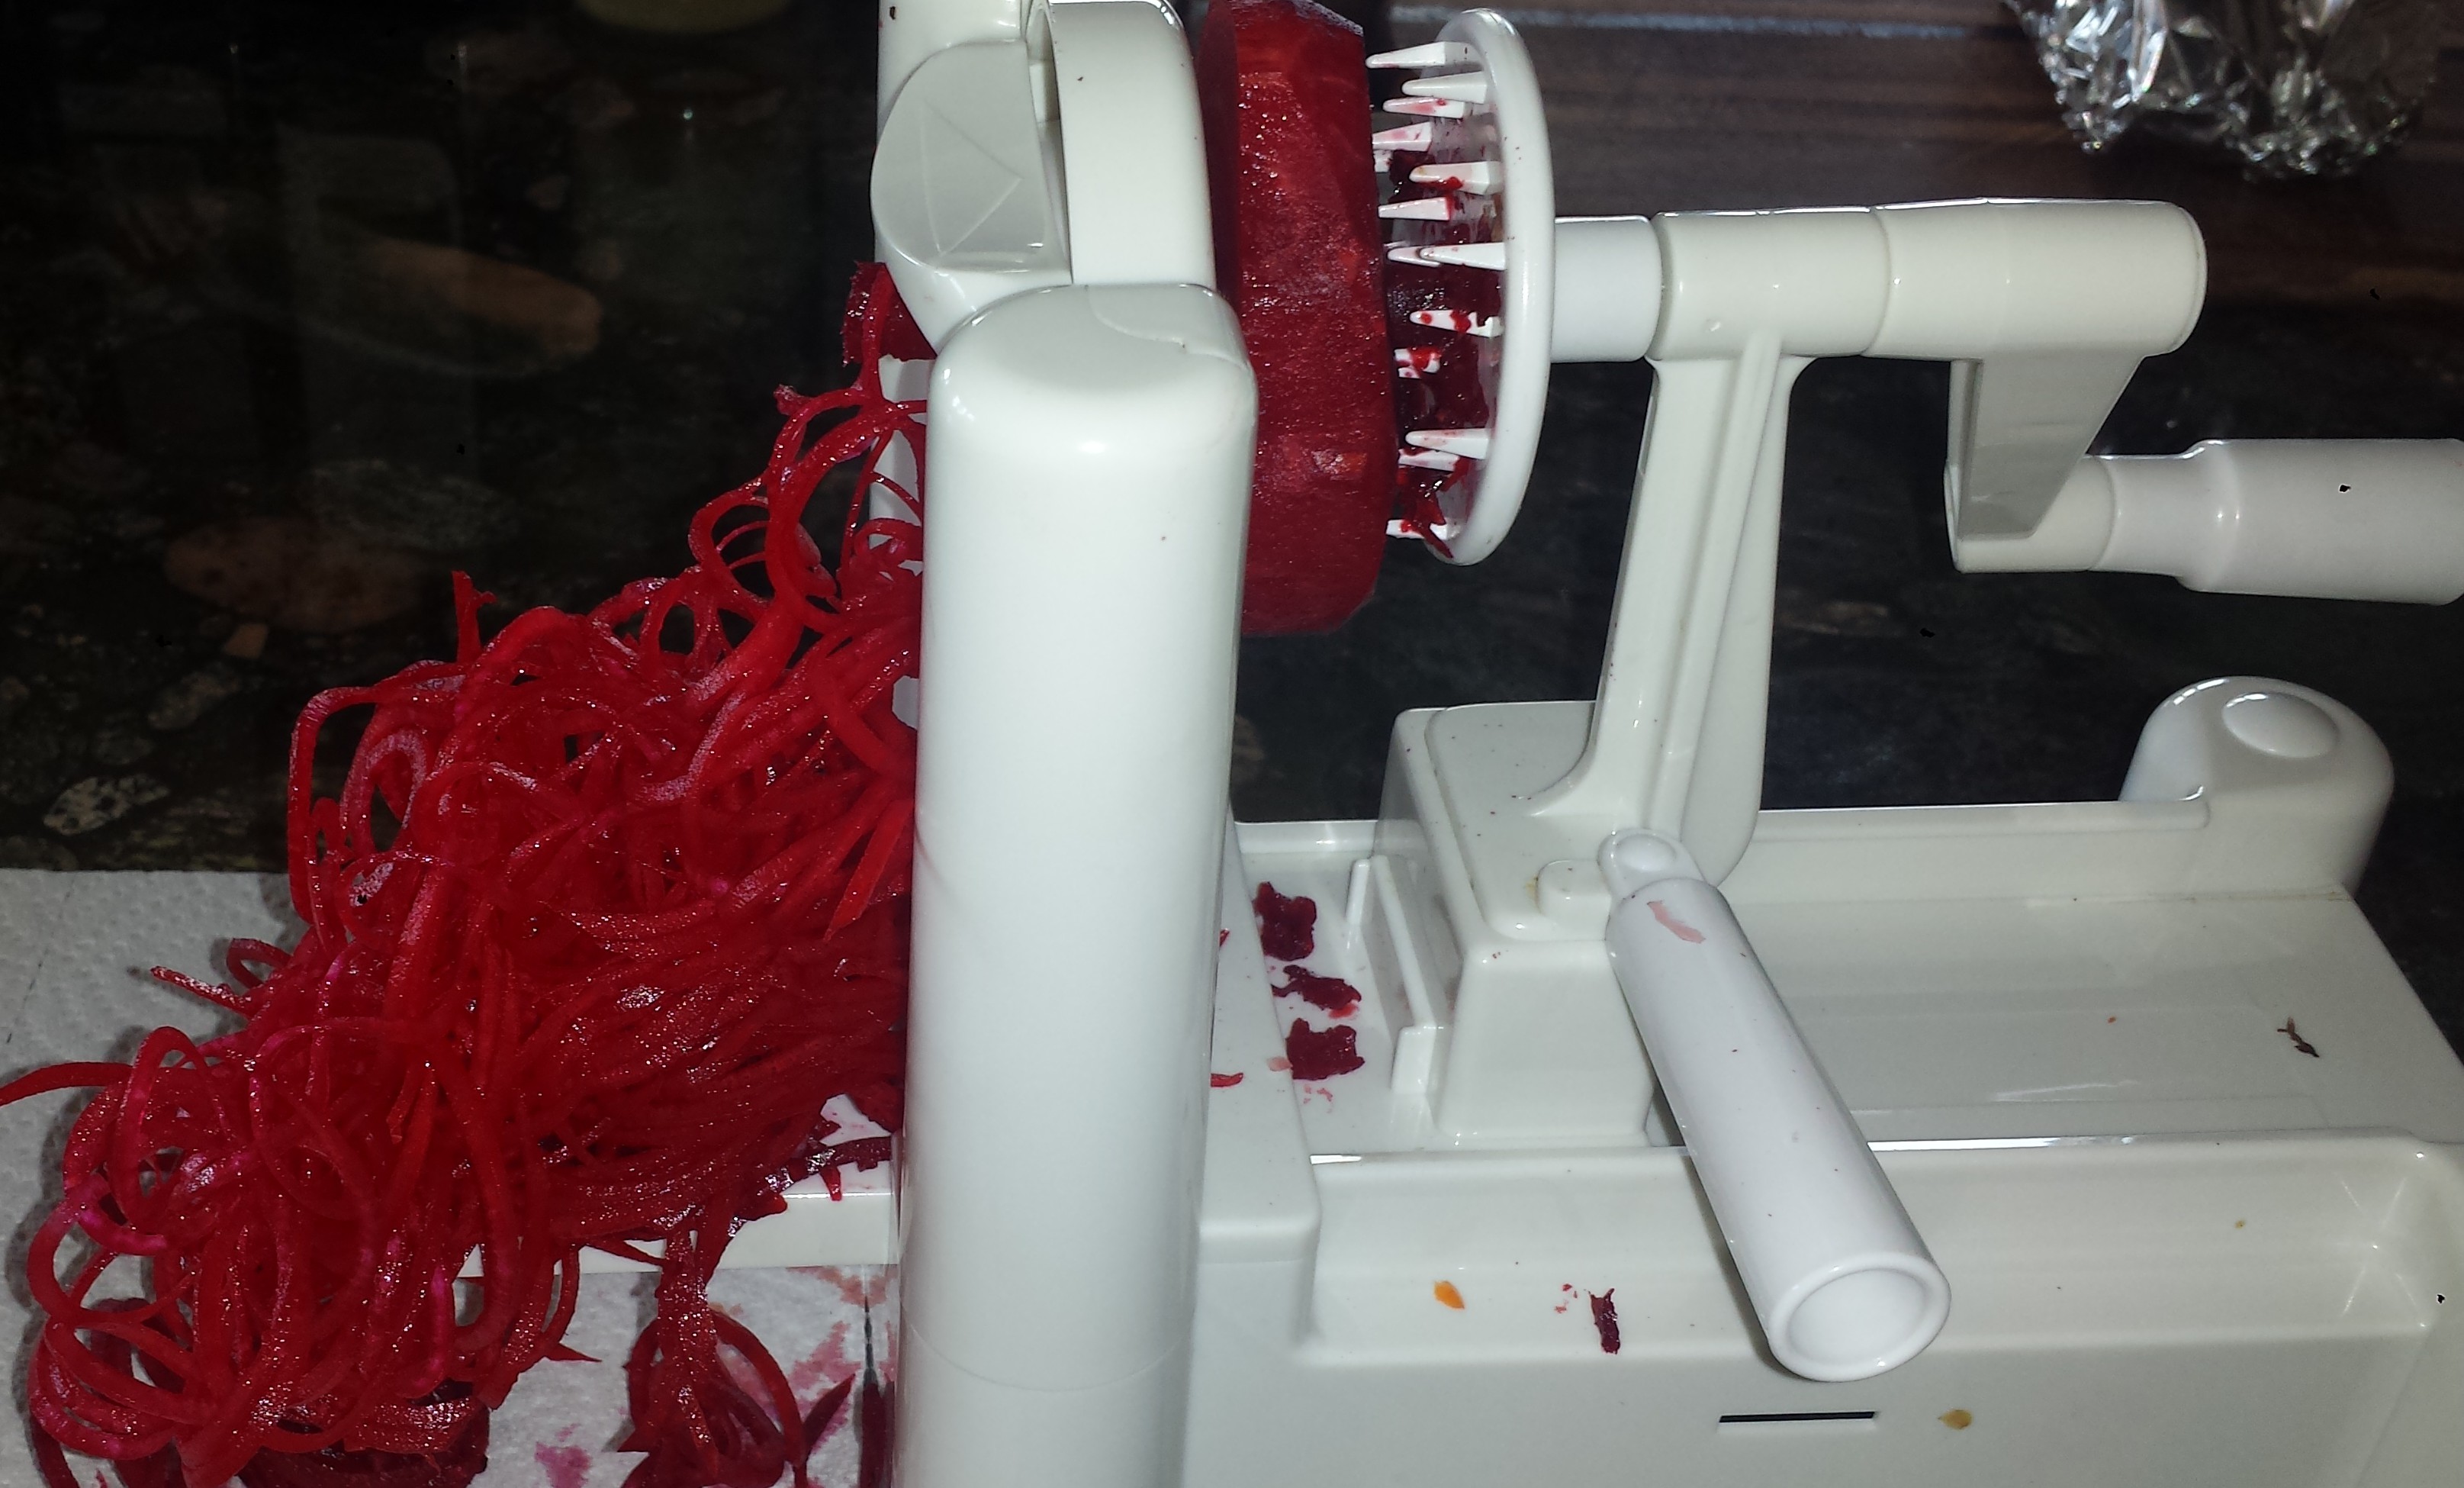
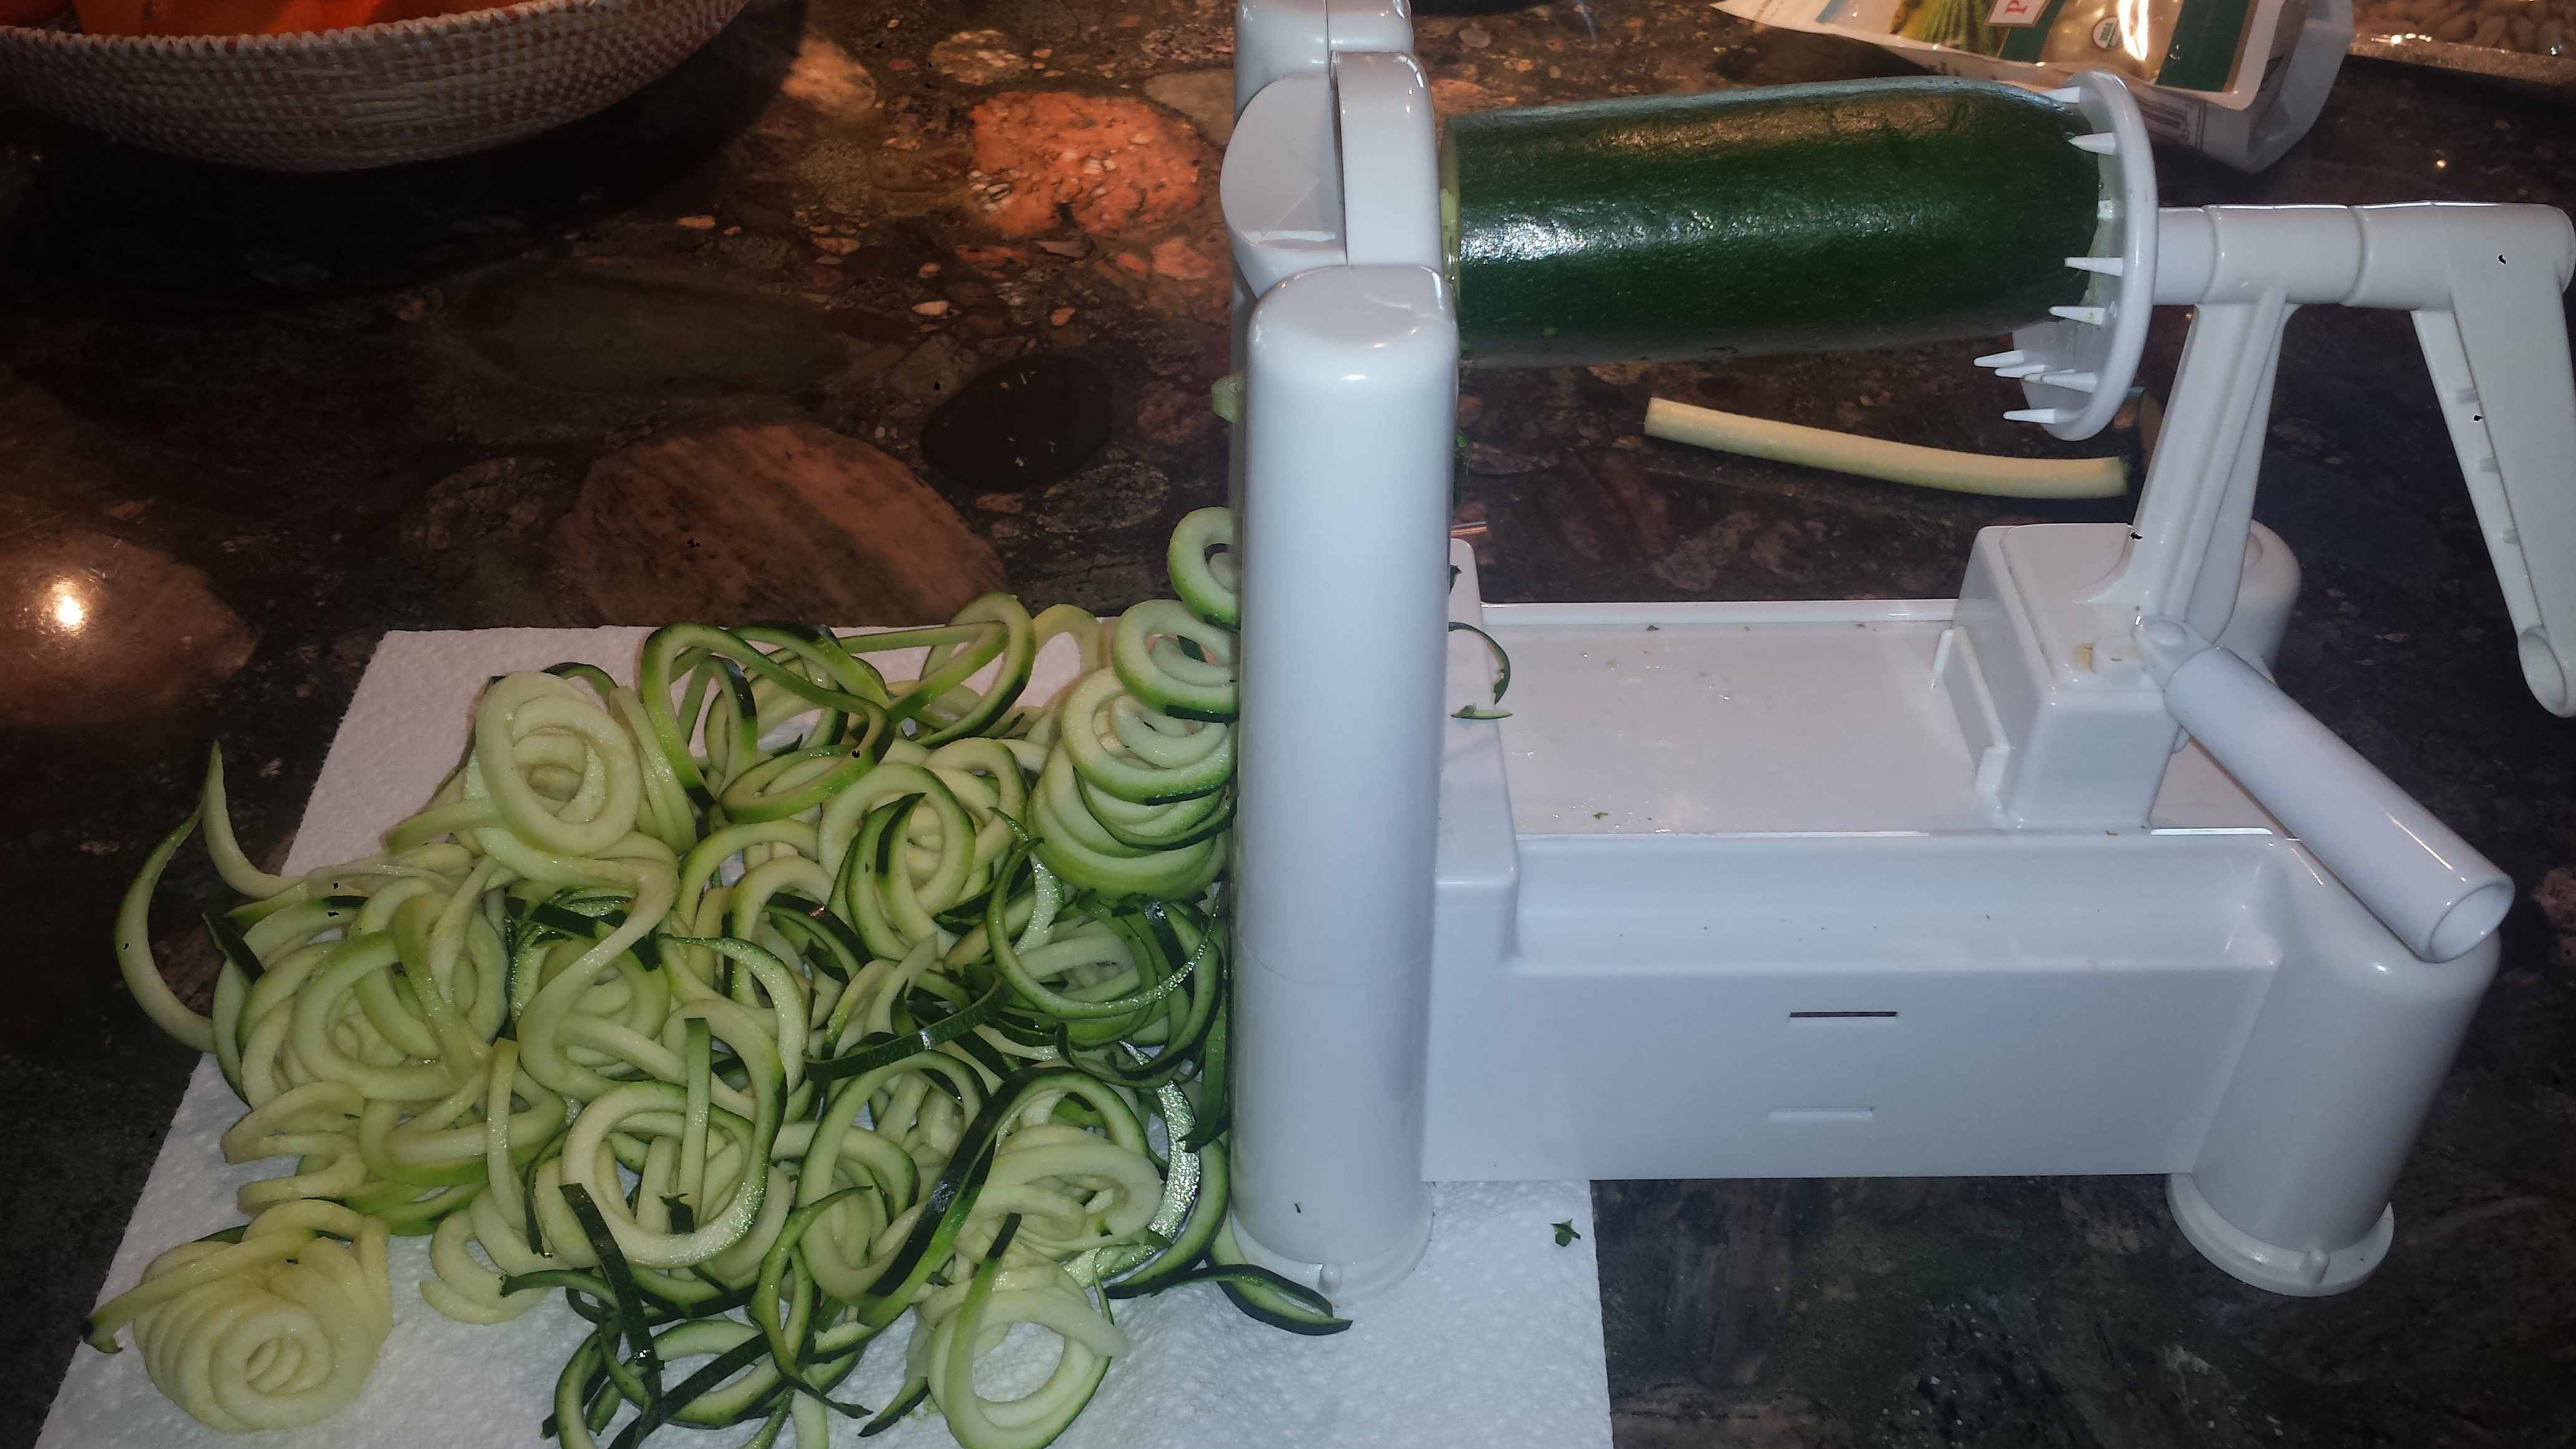
Okay, I’m admitting to a mild obsession with my spiralizer.  Who knew how gorgeous raw beets could look when spiral sliced into angel hair proportions! I added Fuji apple because I thought they would be a good combination, but another veggie or fruit combo would work too, like kohlrabi or carrots.  OR try several colors of beets for a very pretty salad.  You really can’t go wrong here. If you don’t have a spiral slicer, you can use a grater or mandoline but it will be a bit more work.

In case you are still not convinced about Beets, from a nutritional standpoint they have a lot to offer. They are good sources of potassium, magnesium, fiber, phosphorus, iron; vitamins A, B & C; beta-carotene, beta-cyanine; folic acid.  They are also wonderful for the liver and work as a purifier for the blood. It also contains trytophan, which relaxes the mind and creates a sense of well-being, similar to chocolate. At the same time they are low in calories and high in sugar (although the sugar is released into your system gradually, as opposed to chocolate). Very few foods found in the natural world are as beneficial as beets in this regard.  Whoa, heady stuff here!   But I know you’re still thinking about Boron and Nature’s Viagra. Am I right?

TIPS: I love almonds with this dish.  They add just the right buttery crunch, however, almost any nut will work.  If your almonds are raw, just toast them in a dry pan over medium heat until golden brown, stirring occasionally.  Let cool before adding to salad.

20150830_142537

BEET & APPLE SALAD WITH ALMONDS AND FETA

2 medium raw beets
1 large Fuji apple (or other firm sweet apple)
2 large scallions, thinly sliced
1/3 cup slivered almonds, toasted
1/3 cup crumbled feta or goat cheese (optional)
1/4 cup fresh herbs (parsley, thyme, etc), chopped

VINAIGRETTE
1/4 cup apple cider vinegar (0r red wine vinegar)
2 Tbsn olive oil
2 Tbsn lemon juice + zest from one lemon
1 Tbsn fresh parsley or mint, chopped
1 Tbsn maple syrup, honey or agave (or more to taste)
1/3 tsp salt
1/8 tsp pepper

20150830_132855

  • Cut off the stem end and peel the beets.  Using the smallest blade on the spiral slicer, slice  beet into angel hair strands. Repeat with remaining beet. Place beets into large bowl or platter.

20150830_140408

  • Peel apple and slice into angel hair strands. Add to platter.

20150830_140838

  • Whisk together all ingredients for vinaigrette and pour over beet apple mixture along with scallions and herbs. Toss to combine.

20150830_141938

  • Top with toasted almonds, scallions and feta.

20150830_142537

  • Serve chilled or at room temperature.

Beet & Apple Salad with Almonds & Feta

  • Servings: 4
  • Difficulty: easy
  • Print

20150830_142537 

2 medium raw beets
1 large fuji apple (or other firm sweet apple)
2 large scallions, thinly sliced
1/3 cup slivered almonds, toasted
1/3 cup crumbled feta or goat cheese
1/4 cup fresh herbs (parsley, thyme, etc), chopped

VINAIGRETTE
1/4 cup apple cider vinegar (0r red wine vinegar)
2 Tbsn olive oil
2 Tbsn lemon juice + zest from one lemon
1 Tbsn fresh parsley or mint, chopped
1 Tbsn maple syrup, honey or agave(or more to taste)
1/3 tsp salt
1/8 tsp pepper

  • Cut off the stem end and peel the beets.  Using the smallest blade on the spiral slicer, slice into angel hair strands.
  • Place into large bowl or platter.
  • Peel apple and slice into angel hair strands. Add to platter.
  • Add toasted almonds and scallions.
  • Whisk together all ingredients for vinaigrette and pour over beet apple mixture.
  • Toss to combine.  Top with feta or goat cheese.

Wheatless Wednesday – Kung Pao Tofu with Zoodles

0

20150824_195714

Love noodles but not the Carbs? Enter Zoodles, ‘noodles’ made from zucchini spirals that are surprisingly noodle-like.  They nestle right into this tasty Kung Pao Sauce just like regular pasta – but without the extra calories.  This Kung Pao was a crowd favorite; crispy tofu, bell pepper, ‘noodles’, all in a spicy, delicious sauce, topped with peanuts and green onions.  Even my non-tofu lovers gobbled it up and asked for more! Cutting the tofu into a small dice and cooking it separately from the sauce is key. With Kung Pao though, it’s really all about the sauce.  This one is spicy, but not not mouth burning, and easy to adjust to suit your personal tastes.  Alas, if you are one of those people that can’t be bothered with recipes that have lots of ingredients, there is any easy solution. Just pick one up one of the many wonderful sauces sitting on the shelf in your local market and you’re good to go!

20150824_194815

I’m not really a gadget person, however this one is a game changer.  In seconds, zucchini (or any vegetable) becomes spaghetti, angel hair or ribbons. There are countless uses for these shapes; pastas, salads and casseroles to name a few.  Other than my food processor and my lemon zester, this is a favorite.  Just in case you don’t know what a spiral slicer can do, just check out the photo below showing zucchini being sliced using three different blades. For this recipe I used the center blade to make a thicker noodle.

Making zoodles is easy if you have a spiralizer, and FUN!  If you have a picky eater who won’t eat anything green, you can peel the zucchini first to remove the offending green, then spiralize into beautiful ‘noodles’ that may fool even the pickiest of eaters. I wish I had known about zoodles back in the day when my little boys only ate pasta with butter!   I prefer keeping the peel on since so many of the nutrients are in or right under the skin, but any nutrients is better than none…

20150824_194405 - Copy

TIPS:  This is a mildly spicy Kung Pao Sauce.  To adjust spiciness, add more or less of the red pepper flakes and red chili paste.  Taste sauce to make sure you like the amount of spice before adding to the pan.  It will continue to develop flavor as it cooks and combines with the sesame oil, garlic and ginger.  For large appetites, you might want to double the tofu  (Yes, they will like it.) or serve with brown rice. If you do make rice, toss a one inch chunk of peeled ginger into the pot to give the rice a nice gingery flavor.  Remove the ginger before serving.

Recipe Adapted from Skinny Taste Kung Pao Chicken Zoodles For Two

20150824_195624

KUNG PAO TOFU WITH ZOODLES

1 block extra firm tofu
2 Tbsn olive, avocado or coconut oil
2 -3 cloves garlic, minced
1 tsp fresh ginger, grated (or ginger paste)
salt and pepper
2-3 medium zucchini
1 red bell pepper
1 green bell pepper
2-3 scallions
1/2 cup dry roasted peanuts (or more)

KUNG PAO SAUCE

2 Tbsn soy sauce (or wheat free Tamari)
1 Tbsn balsamic vinegar
2 Tbsn hoisin sauce
1 Tbsn red chili paste
1 tsp red pepper flakes (or more)
1 Tbsn sugar
1 Tbsn cornstarch
2 Tbsn water

20150211_185201

  • Drain block of tofu and cut into 1/2 inch cubes.  Place in a single layer on a double thickness of papertowels.  Cover with more paper towels and place a heavy object on top (like a cast iron pan) to help press out water. Let sit at least 10 minutes.

20150824_191137

  • Using a spiralizer fitted with a shredder blade (this makes a thicker noodle), or a mandolin fitted with a julienne blade, cut the zucchini into long spaghetti-like strips. If using a spiralizer, cut the strands into pieces that are about 8 inches long.

20150824_185553

  • In a small bowl or measuring cup, whisk together soy sauce, balsamic, hoisin, water, red chili paste, sugar and cornstarch; set aside.

20150824_190752

  • Cut scallions into one inch pieces, then thinly julienne OR thinly slice into circles.

20150824_191754

  • Cut bell peppers into 1/2 inch dice.  Measure out peanuts and roughly chop them or leave them whole.

20150824_192655

  • Heat oil in a large, deep nonstick pan or wok over medium-high heat. Add the cubed tofu, sprinkle with salt and pepper, and cook, stirring several times to brown all six sides, about 5 minutes.

20150824_192933 - Copy

  • Remove tofu to a plate and set aside.

20150824_194237 - Copy

  • Reduce heat to medium, add sesame oil, garlic and ginger to the skillet and cook until fragrant, about  30 seconds. Add the bell pepper, stir in soy sauce mixture and bring to a boil; reduce heat and simmer until thickened and bubbling, about 2 minutes.

20150824_194623

  • Stir in zucchini noodles and cook, mixing for two or three minutes until just tender and mixed with the sauce. If it seems dry, don’t worry the zucchini will release moisture which helps create a sauce.

20150824_194834

  • Once zucchini is cooked to your liking, add the tofu, half of the peanuts and scallions and stir to combine.

20150824_195624

  • Serve with more peanuts and scallions on top.

Kung Pao Tofu with Zoodles

  • Servings: 4
  • Difficulty: easy
  • Print
20150824_195714

1 block extra firm tofu
2 Tbsn olive, avocado or coconut oil
2 -3 cloves garlic, minced
1 tsp fresh ginger, grated (or ginger paste)
salt and pepper
2-3 medium zucchini
1 red bell pepper
1 green bell pepper
2-3 scallions
1/2 cup dry roasted peanuts (or more)

KUNG PAO SAUCE

2 Tbsn soy sauce (or wheat free Tamari)
1 Tbsn balsamic vinegar
2 Tbsn hoisin sauce
1 Tbsn red chili paste
1 tsp red pepper flakes (or more)
1 Tbsn sugar
1 Tbsn cornstarch
2 Tbsn water

  • Drain block of tofu and cut into 1/2 inch cubes.  Place in a single layer on a double thickness of papertowels.  Cover with more paper towels and place a heavy object on top (like a cast iron pan) to help press out water. Let sit at least 10 minutes.
  • Using a spiralizer fitted with a shredder blade (this makes a thicker noodle), or a mandolin fitted with a julienne blade, cut the zucchini into long spaghetti-like strips. If using a spiralizer, cut the strands into pieces that are about 8 inches long.
  • In a small bowl or measuring cup, whisk together soy sauce, balsamic, hoisin, water, red chili paste, sugar and cornstarch; set aside.
  • Cut scallions into one inch pieces, then thinly julienne OR thinly slice into circles.  Cut bell peppers into 1/2 inch dice.
  • Heat oil in a large, deep nonstick pan or wok over medium-high heat. Add the cubed tofu, sprinkle with salt and pepper, and cook, stirring several times to brown all six sides, about 5 minutes.
  • Remove tofu to a plate and set aside.
  • Reduce heat to medium, add sesame oil, garlic and ginger to the skillet and cook until fragrant, about  30 seconds. Add the bell pepper, stir in soy sauce mixture and bring to a boil; reduce heat and simmer until thickened and bubbling, about 2 minutes.
  • Stir in zucchini noodles and cook, mixing for two or three minutes until just tender and mixed with the sauce. If it seems dry, don’t worry the zucchini will release moisture which helps create a sauce.
  • Once zucchini is cooked to your liking, add the tofu, half of the peanuts and scallions and stir to combine.
  • Serve with more peanuts and scallions on top.

Bruschetta with Leafy Green Pesto and Heirloom Tomatoes

2

20150820_201340

Pesto + Ripe Heirloom Tomatoes + Toasted Ciabatta = Perfect  Summer Appetizer.  Warning!  May not leave room for dinner…

You could say I’m on a pesto kick.  I posted a recipe for Kale Pesto Pasta earlier this week, for Meatless Monday, (Click link for recipe or scroll down for more pesto recipes) but I obviously didn’t get enough since I was still craving those yummy flavors. Plus, earlier in the day, I had gathered bunches of baby kale and arugula along with fresh tomatoes from my garden.  Add to that the fresh ciabatta loaf that I just bought, and all the arrows lined up resulting in Kale-Arugula Pesto spread on toasted sliced ciabatta and topped with fresh heirloom tomatoes=Heaven

20150820_195325

I made this pesto with kale and arugula but any dark leafy greens will work in any combination.  It’s a great way to use up large quantities of greens from your garden or CSA box, especially if you are tired of salads and casseroles.  Even though it tastes pretty decadent, this little bruschetta offers a sneaky amount of nutrition; fiber, vitamins, minerals and protein, but you would never know by the taste…

20150810_180956

For those adventurous readers, or just lovers of pesto, check out some of the other types of pesto I have already tried by clicking on the links below.  Loved them all!

Kale Pesto Pasta

Roasted Rainbow Carrots with Carrot Top Pesto

Avocado Pesto Pasta

Bow Ties with Broccoli Pesto

TIPS:  Everything can be made ahead of time (up to 2-3 hours) and set aside to be assembled at the last minute.  Or make pesto a day ahead of time and store in the refrigerator.  Bring to room temperature before serving.  To store any leftover pesto, cover with a thin layer of olive oil before refrigerating to prevent it from turning brown.

20150820_223815

BRUSCHETTA WITH LEAFY GREEN PESTO AND HEIRLOOM TOMATOES

1 loaf ciabetta or sourdough
3-4 large tomatoes
1 cup pesto *recipe below

PESTO

3 cups roughly chopped dark leafy greens(kale, arugula, collard, mustard, etc.)
3 cloves garlic, peeled
1/2 cup pinenuts (walnuts, cashews or pistachios)
1 cup olive oil
1 tsp lemon zest
1 tsp salt
1 cup grated parmesan

TOPPINGS (OPTIONAL)
toasted pine nuts
sliced or chopped basil
shredded parmesan, goat cheese or feta

20150820_184251

  • Roughly chop the leafy greens and place them in a food processor with the pinenuts and garlic. Pulse until coarsely chopped.

20150820_184429

  • With the motor running, drizzle in the olive oil to form a smooth sauce. Add the salt, lemon zest and parmesan and pulse to combine.

20150820_193609

  • Pour the pesto into a large bowl and set aside.

20150820_200028

  • Chop tomatoes and place in a medium bowl, set aside.  You can always drizzle with a bit of balsamic vinegar, if desired, but if your tomatoes are ripe, they probably are sweet enough on their own.

20150820_191903

  • Slice ciabatta into one half inch slices.

20150820_192607

  • Place ciabatta on a baking sheet and brush with olive oil. Broil 3 to 4 minutes until golden brown, then turn brush with oil and broil the other side. Remove from heat and let cool.

20150820_200938

  • Spread a tablespoon of pesto on each slice of bread.

20150820_201340

  • Top with a spoonful of tomatoes and any desired toppings.

20150820_204022

  • Or set out a bruschetta bar and let your guests design their own.

20150820_223815

  • Serve at room temperature.

Bruschetta with Leafy Green Pesto and Heirloom Tomatoes

  • Servings: 6-8
  • Difficulty: easy
  • Print
20150820_201340

1 loaf ciabetta or sourdough
3-4 large tomatoes
1 cup pesto *recipe below

PESTO

3 cups roughly chopped dark leafy greens(kale, arugula, collard, mustard, etc.)
3 cloves garlic, peeled
1/2 cup pinenuts (walnuts, cashews or pistachios)
1 cup olive oil
1 tsp lemon zest
1 tsp salt
1 cup grated parmesan

TOPPINGS (OPTIONAL)
toasted pine nuts
sliced or chopped basil
shredded parmesan, goat cheese or feta

  • Roughly chop the leafy greens and place them in a food processor with the pinenuts and garlic. Pulse until coarsely chopped.
  • With the motor running, drizzle in the olive oil to form a smooth sauce.
  • Add the salt, lemon zest and parmesan and pulse to combine.
  • Pour the pesto into a large bowl and set aside.
  • Chop tomatoes and place in a medium bowl, set aside
  • Slice ciabatta into one half inch slices.
  • Place ciabatta on a baking sheet and brush with olive oil
  • Broil 3 to 4 minutes until golden brown, then turn brush with oil and broil the other side.
  • Remove from heat and let cool.
  • Spread a tablespoon of pesto on each slice of bread.
  • Top with a spoonful of tomatoes and any desired toppings.
  • Or set out a bruschetta bar and let your guests design their own.
  • Serve at room temperature.

Wheatless Wednesday Tomatoes, Mozzarella & Peaches with Balsamic Reduction

2

20150816_180840

Summertime favorite, Caprese Salad goes rogue with sliced ripe peaches and a drizzle of velvety rich balsamic reduction. This colorful combo was the brainchild of my son, Eric.  I had recently purchased a flat of perfectly ripe peaches and I am lucky enough to have a constant supply of lovely heirloom tomatoes from my garden in shades of red, yellow and even striped green.  The peaches add a nice sweetness to the traditional tomatoes and mozzarella and the balsamic reduction is the piece de resistance.  Of course, you can drizzle with a balsamic vinaigrette which is easy and delicious, but the reduction is worth the minimal effort.  In only 10 minutes or so, balsamic vinegar is transformed into a richly flavored syrup that can be drizzled on almost anything to enhance its natural flavors.  I also love using a variety of colors for an exceptionally colorful presentation.

20150816_161811

Peaches are one of summer’s most popular fruits and they are so good when they are at the peak of the season, like they are right now. Peach peels can  be fuzzy and tough, so I peel them for this salad so they blend better with the tomatoes.  If you are using a thinner skinned peach or nectarine, just slice them up without peeling.  Peaches are low in calories and fat free but provide fiber and a host of vitamins and minerals, including A, C and potassium.  They definitely add some pizzazz to this salad! For another ‘rogue move’, try substituting goat cheese or feta and adding some chopped fresh mint along with the basil.  Yum!

20150818_092200

I love using columnar basil when I can, especially as a garnish.  It has small leaves which are tender and fragrant, and quite pretty when sprinkled on top of foods since they don’t need to be chopped.  Most grocery stores don’t carry columnar basil but some Farmer’s Markets do.  I grow my own from seedlings I bought at a garden center.  They are pretty hardy compared to other types of basil and don’t flower as often (i.e. needing to be constantly clipped) so the plant keeps growing, up to three feet tall.

20150816_183343

TIPS:  For a beautiful arranged salad, cut all components into similar sizes, shapes and thickness, at least as much as possible.  To make ahead, slice tomatoes, peaches and mozzarella and arrange on a serving platter.  It will be fine sitting at room temperature for an hour or so until you’re ready to serve.  Drizzle with balsamic reduction and garnish with basil just before serving.

20150816_180734

TOMATOES AND MOZZARELLA WITH PEACHES AND BALSAMIC REDUCTION

3-5 assorted ripe tomatoes
1 large ripe peach
6 oz bocconcini (or other size fresh mozzarella balls)
1/4 cup fresh basil
1 cup balsamic vinegar
2 Tbsn sugar

20150816_164403

  • Bring balsamic vinegar and sugar to a boil in a small saucepan, reduce heat to low, and simmer until the vinegar mixture has reduced to 1/3 cup, about 10 minutes.

20150816_174651

  • Taste balsamic reduction and add another Tbsn sugar if it seems too acidic and cook another 5 minutes.. Set the balsamic reduction aside to cool (It should be a syrupy consistency) Check the consistency.  If it’s too thin, simmer for a few more minutes.  If it’s too thick stir in one drop of water at a time until syrupy.  Transfer to a small bowl or server with a spout.

20150816_162525

  • Remove stem end of tomatoes and cut in half vertically.  Cut horizontally into 1/4 inch slices (or wedges, if you prefer)

20150816_163505

  • Cut peach in half and remove pit and peel.  Slice horizontally into 1/4 inch slices and place on a platter with the tomatoes.

20150816_163705 20150816_163853

  • Slice each bocconcini the long way into 3 slices. and arrange over tomatoes and peaches.

20150816_164325

  • Cut basil into julienned slices if using large basil leaves and sprinkle evenly over tomato mixture.

20150816_180821

  • Drizzle balsamic reduction over tomato mixture and serve with more reduction on the side.


  • Servings: 4-6
  • Difficulty: easy
  • Print
20150816_180840

3-5 assorted ripe tomatoes
1 large ripe peach
6 oz bocconcini (or other size fresh mozzarella balls)
1/4 cup fresh basil
1 cup balsamic vinegar
2 Tbsn sugar

  • Bring balsamic vinegar and sugar to a boil in a small saucepan, reduce heat to low, and simmer until the vinegar mixture has reduced to 1/3 cup, about 10 minutes.
  • Taste balsamic reduction and add another Tbsn sugar if it seems too acidic and cook another 5 minutes.. Set the balsamic reduction aside to cool (It should be a syrupy consistency) Check the consistency.  If it’s too thin, simmer for a few more minutes.  If it’s too thick stir in one drop of water at a time until syrupy.  Transfer to a small bowl or server with a spout.
  • Remove stem end of tomatoes and cut in half vertically.  Cut horizontally into 1/4 inch slices (or wedges, if you prefer)
  • Cut peach in half and remove pit and peel.  Slice horizontally into 1/4 inch slices and place on a platter with the tomatoes.
  • Slice each bocconcini the long way into 3 slices. and arrange over tomatoes and peaches.
  • Cut basil into julienned slices if using large basil leaves and sprinkle evenly over tomato mixture.
  • Drizzle balsamic reduction over tomato mixture and serve with more reduction on the side.

Meatless Monday – Kale Pesto Pasta

1

20150810_203351

Kale Pesto? Sounds too healthy doesn’t it? Wait, don’t run away screaming. I know the Kale ‘fad’ has been around for a while but bear with me.   Pesto made with a dark leafy green like kale is surprisingly delicious and so easy.  This is a NO COOK sauce that can be thrown together in about five minutes (while the pasta is cooking) and dinner is on the table easily in less than 20 minutes (including the time it takes for the water to boil).   I also used non-traditional pistachios, which are a MUFA (Mono Unsaturated Fatty Acid) aka ‘good fat’ for a richer flavor.  I actually think I liked this pesto better than the traditional version – And the extra vitamins and minerals are an added bonus. This could be the way you get YOUR picky eaters to eat their greens…

20150810_201932

So we all know that Kale is King, since we are told ad nauseum, but why?  Kale is very high in nutrients and very low in calories, making it one of the most nutrient dense foods on the planet.  A single cup of raw kale contains 3 grams of protein and an alphabet list of vitamins and hard to get minerals:

  • Vitamin A: 206% of the RDA (from beta-carotene).
  • PistachiosVitamin K: 684% of the RDA.
  • Vitamin C: 134% of the RDA.
  • Vitamin B6: 9% of the RDA.
  • Manganese: 26% of the RDA.
  • Calcium: 9% of the RDA.
  • Copper: 10% of the RDA.
  • Potassium: 9% of the RDA.
  • Magnesium: 6% of the RDA.
  • Then it contains 3% or more of the RDA for Vitamin B1 (Thiamin), Vitamin B2 (Riboflavin), Vitamin B3 (Niacin), Iron and Phosphorus.

You get all of this and more for the low price of 33 calories and very little fat.  That, my friends, is why kale is deserving of the crown.  Furthermore, kale is actually pretty versatile.  It can be sliced into ribbons and eaten raw in salads, sauteed or added to pasta, soups and stews.  Or you can make this delicious Kale Pesto which is a sneaky smart way to get kale onto the dinner table.  BTW, Pistachios are no slouch either, adding protein, beneficial antioxidants, vitamins B and E, and a whole slew of minerals, including iron.

20150810_180956

I used baby kale from my garden but any dark leafy green would work well too, like spinach, mustard or collard greens.  Arugula would  made a nice, zesty pesto.  Since its uncooked, this sauce works best with young leafy greens. if you want to give it a try with larger, more mature leaves , I would recommend removing the stems and larger ribs and blanching them in boiling water for 45 seconds, then running them under cold water. Squeeze the water out with paper towels before processing to avoid a too watery sauce.

20150810_185310

I hate eating empty carbs so try to use whole grain pasta whenever possible.  Whole grain pastas have come a long way in the past few years, in response to demand for high quality healthful ingredients.  I like Tru Roots Ancient Grain Penne Pasta which is organic and gluten free, made with brown rice, quinoa, amaranth and corn.  It has a great texture (not gluey like so many others) and tastes like regular pasta.  It’s also available at Costco so I buy it in volume.

20150810_203555

TIPS: To further boost flavor and nutrition, try topping your pesto pasta with roasted butternut or summer squash which adds a creamy sweetness.  Just peel and cube squash, drizzle with olive oil, sprinkle with salt and pepper and roast at 450 degrees for about a half hour.  Let cool slightly and toss with pasta.  Yum!

20150810_203337

KALE PESTO PASTA

PASTA

3/4 lb penne, gemelli or fusilli pasta (preferably whole grain)
1 Tbsn olive oil
1 tsp salt
1 cup cooking water (reserve before draining)

PESTO

1 large bunch kale (about 3 cups roughly chopped leaves)
3 cloves garlic, peeled
1/2 cup pistachios (walnuts, cashews or pine nuts), toasted
1 cup olive oil
1 tsp lemon zest
1 tsp salt
1 cup grated parmesan

TOPPINGS (Optional)

Fresh basil, chopped or julienned
shredded or flaked parmesan
lemon zest

20150810_183852

  • Roughly chop the kale and place it in a food processor with the pistachios and garlic. Pulse until coarsely chopped.

20150810_184737

  • With the motor running, drizzle in the olive oil to form a smooth sauce.

20150810_184943

  • Add the salt, lemon zest and parmesan and pulse to combine.

20150810_201932

  • Pour the pesto into a large bowl and set aside.

20150810_203124

  • Bring a large pot of salted water to a boil. Cook the pasta for 8-10 minutes or until al dente. Scoop out a cup of pasta water and set aside. Drain the pasta.  Add the hot pasta to the bowl with pesto and  toss well to evenly coat.  Add some of the reserved cooking water if necessary.

20150810_203337

  •  Serve with fresh basil and more lemon zest and parmesan, if desired.  To make ahead or store, put in a container, cover the surface with a little more olive oil and keep in the refrigerator for a week, or freeze for up to a month.


Kale Pesto Pasta

  • Servings: 4-6
  • Difficulty: easy
  • Print

20150810_203337 

PASTA

3/4 lb penne, gemelli or fusilli pasta (preferably whole grain)
1 Tbsn olive oil
1 tsp salt
1 cup cooking water (reserve before draining)

PESTO

1 large bunch kale (about3 cups roughly chopped leaves)
3 cloves garlic, peeled
1/2 cup pistachios (walnut or pine nuts), toasted
1 cup olive oil
1 tsp lemon zest
1 tsp salt
1 cup grated parmesan

TOPPINGS (Optional)

Fresh basil, chopped or julienned
shredded or flaked parmesan
lemon zest


  • Roughly chop the kale and place it in a food processor with the pistachios and garlic. Pulse until coarsely chopped.
  • With the motor running, drizzle in the olive oil to form a smooth sauce.
  • Add the salt, lemon zest and parmesan and pulse to combine.
  • Pour the pesto into a large bowl and set aside.
  • Bring a large pot of salted water to a boil. Cook the pasta for 8-10 minutes or until al dente. Scoop out a cup of pasta water and set aside. Drain the pasta.  Add the hot pasta to the bowl with pesto and  toss well to evenly coat. Add some of the reserved cooking water if necessary.
  • Serve with fresh basil and more lemon zest and parmesan, if desired.
  • To make ahead or store, put in a container, cover the surface with a little more olive oil and keep in the refrigerator for a week, or freeze for up to a month.

Wheatless Wednesday – Cucumber Ribbons with Red Onion, Feta and Mint

0

20150811_200757

Are you a lover or a hater?  Cucumbers have a reputation for being boring. I don’t agree.  I love cucumbers and this salad, which is refreshing and definitely not boring, brings it!  There is a bit of a kick and crunch with added jalapenos, lemon zest and pistachios. Topped with crumbled feta and a drizzle of red wine vinaigrette and you have a taste sensation. Did you know cucumbers have a secret?  Scroll down for the big reveal.

Lemon Water

I am on the cucumber bandwagon and drink Lemon Cucumber water every morning (recipe HERE) but know there are haters out there, including my future daughter in law.  (For her I make strawberry, lemon, blueberry water or other concoctions)  So, if you avoid cucumber but like the ‘idea’ of this salad, just substitute zucchini.  Win!

20150811_191710

I was gifted a bag of lovely Heirloom Japanese long cucumbers from my friends, Linda and Michael Rosso, and their prolific garden in Sonoma.  Aren’t they fabulous?  Linda tells me that one plant has already yielded 20 of these babies and summer is not over yet.  Linda and Michael own Sonoma Rosso, a California Wine Country getaway in Kenwood, California that offers a one bedroom guest cottage with access to a salt water pool and an organic garden.  Yes, you can keep what you pick! I haven’t been lucky enough to see it yet, but it looks like a beautiful spot for getting away.  Click on the LINK for more information.  Here’s a photo of Michael harvesting ‘my’ cucumbers and other produce from their garden.

Are you ready for a botanical shocker?  You may have heard that tomatoes are a fruit and not a vegetable.  Well cucumbers fall under that same umbrella.  What?  Tomatoes were a surprise way back when I heard that news – but at least they are sweetish, round and colorful.  This is quite a shocking revelation to me as there is nothing remotely fruity about cucumbers, however they are actually a fruit. Really!  They contain seeds and grow from the ovaries of flowering plants which is the definition of a fruit.  Does this make all vegetables males?  I’m afraid to ask.  Cucumbers are members of the plant family Cucurbitacae, which also makes them related to squashes and melons.  But there is more to cucumber than just water which makes them really hydrating and great to eat in summer.  Cucumbers also contain Vitamins B1, B2, B3, B5, Folic Acid, Calcium, Vitamin C, Iron, Magnesium, Phosphorus, Potassium, and Zinc.  Mind still blown…

20150811_191909

TIPS: Cucumbers have a lot of water which makes them a super healthy snack but in salads, they continue to release water so this salad should only be made just before needed, otherwise it will be sitting is a pool of water.  To store any leftovers, pour off excess water before refrigerating and toss with a bit more vinaigrette and fresh mint to refresh.

20150811_200805

CUCUMBER RIBBON SALAD WITH RED ONION, FETA AND MINT

2 large cucumbers (Persian or other thin skinned cucumber)
1/2 red onion
1 jalapeno (or more)
1/2 cup fresh mint
1/2 cup roasted pistachios
zest from one lemon
1/4 cup olive oil
1/4 cup red wine or apple cider vinegar
1/2 tsp salt
1/4 tsp pepper

20150811_192854

  •  Using a mandolin, slice cucumbers on the thinnest setting. Cucumbers don’t need to be peeled unless they have thick and bitter skins. Place in a large serving bowl.

20150811_194037

  • Slice onion vertically and add to the bowl with the cucumbers

20150811_194524

  • Chop or julienne mint leaves and add to the bowl

20150811_194857

  • Finely dice jalapeno

20150811_195628

  • Roughly chop pistachios

20150811_195653

  • Add mint, jalapeno, pistachios and lemon zest to the bowl

20150811_200230

  • Whisk together the oil, vinegar, salt and pepper.  Taste and adjust seasonings.  Drizzle over cucumber mixture and toss to combine.

20150811_200757

  • Sprinkle with crumbled feta cheese, if desired. Serve immediately. (This is not a make ahead salad as cucumbers make a lot of water.)


Cucumber Ribbons with Red Onion, Feta and Mint

  • Servings: 4
  • Difficulty: easy
  • Print

 20150811_200757

2 large cucumbers (Persian or other thin skinned cucumber)
1/2 red onion
1 jalapeno (or more)
1/2 cup fresh mint
1/2 cup roasted pistachios
zest from one lemon
1/4 cup olive oil
1/4 cup red wine or apple cider vinegar
1/2 tsp salt
1/4 tsp pepper

  •  Using a mandolin, slice cucumbers on the thinnest setting. Cucumbers don’t need to be peeled unless they have thick and bitter skins. Place in a large serving bowl.
  • Slice onion vertically and add to the bowl with the cucumbers
  • Chop or julienne mint leaves and add to the bowl
  • Finely dice jalapeno
  • Roughly chop pistachios
  • Add mint, jalapeno, pistachios and lemon zest to the bowl
  • Whisk together the oil, vinegar, salt and pepper.  Taste and adjust seasonings.  Drizzle over cucumber mixture and toss to combine.
  • Sprinkle with crumbled feta cheese, if desired.
  • Serve immediately. (This is not a make ahead salad as cucumbers make a lot of water.)


Meatless Monday – Poblano Peppers Stuffed with Pinto Beans, Corn and Zucchini

0

20150809_110851

Sometimes you just want to go South of the Border…  I’m talking about Mexican food – nachos, tacos and burritos – delicious but often calorie and carb laden.  To satisfy my craving but keep it healthy, I made these yummy, spicy Poblano peppers stuffed with summer favorites, corn and zucchini, along with creamy pinto beans and shredded cheddar, all grilled or roasted to cheesy deliciousness. Yum!  This is a great summertime Meatless Monday recipe.  It takes advantage of seasonable vegetables that are plentiful and cheap, and only takes about a half hour to assemble and cook.  On hot summer days you can grill them outside to avoid heating up your kitchen, or if you are not grill savvy, they can be roasted right in the oven.  Best of all, the peppers can be assembled ahead of time and stored in the refrigerator for a day or so before cooking.  Easy!  Fast!  Done!

20150808_175327

I love the moderate spiciness of Poblano peppers which have more oomph than a bell pepper but are not quite as hot as a jalapeno.  They are also large enough, when stuffed, for one or two to serve as a main course.  That said, not everyone in my family likes spicy food so I stuffed several sweet bell peppers to satisfy those less daring diners. Bell peppers are also larger so good for a heartier appetite – colorful too!

20150808_183913

However, if you can tolerate spicy foods, the experts claim that spicy foods have many Health Benefits. Studies show that the main compound in chilies, called capsaicin, may cause the body to burn extra calories for 20 minutes after eating.  Chili peppers can also reduce the damaging effects of LDL (bad cholesterol) and capsaicin may fight inflammation, which has been flagged as a risk factor for heart issues. Vitamins A and C strengthen the heart muscle walls, and the heat of the pepper increases blood flow throughout your body. All of this equals a stronger cardiovascular system. (SELF)  So eat up and pour on the hot sauce.  You’re doing your body good!

20150808_221456

Enjoy them plain or fully dressed with a squeeze of lime.

20150808_221730

TIPS:  When removing the lid (stem end ), make sure you keep the lid with the matching pepper, otherwise it will be like solving a complicated puzzle to get them to fit later and you don’t want all the stuffing to fall out while they cook.  I also recommend cutting veggies into a fine dice to ensure that they are properly cooked.  Since these peppers don’t need to cook for very long, larger cut veggies may not have time to soften.  The flavors will also blend better if everything is cut a similar size.  Think chopped salad.

20150809_120906

Recipe Adapted From: Cooking Light, August 2015

POBLANO PEPPERS STUFFED WITH PINTO BEANS, CORN AND ZUCCHINI

(15-ounce) can unsalted pinto beans, rinsed and drained
8-10 medium poblano peppers (or Anaheims) or 6 bell peppers
2 ears fresh corn on the cob or 1 cup frozen corn kernels
1/2 red bell pepper
1 small zucchini
1-2 cups shredded cheddar cheese
1 tablespoon olive oil
1/2 teaspoon salt
1/4 teaspoon black pepper

TOPPINGS (Optional)
lime wedges
chopped fresh herbs (cilantro, parsley or basil)
crumbled queso

20150808_180004

  • Preheat oven to 450 degrees or grill to high heat. Cut  bell pepper and zucchini into a small dice and place in a medium bowl.

20150808_180216

  • With a sharp knife, cut kernels of corn from the cob and add to the other veggies.

20150808_180708

  • Add pinto beans, cheese, salt and pepper to the bowl and stir to combine. (for a less cheesy, lower calorie meal use 1 cup of cheese, or double the quantity for cheese lovers)

20150808_181756

  • Remove tops from poblanos and reserve tops. Scoop out seeds; discard.

20150808_181910

  • Place about 1/2 cup bean mixture in each pepper.

20150808_182849

  • Replace pepper tops and secure each with wooden skewers.  I broke 10 inch skewers in half and used 3 per pepper.

20150808_184227

  • Brush peppers evenly with oil. Place peppers on grill or oven rack; grill or broil 12 – 15 minutes or until lightly charred, turning once after 6 minutes. (Larger peppers may need to be cooked longer to properly heat the insides.)

20150808_205810

  • Place stuffed peppers on a platter; remove skewers. Serve stuffed peppers with lime wedges, crumbled queso and fresh herbs.

20150809_110851

Poblano Peppers Stuffed with Pinto Beans, Corn and Zucchini

  • Servings: 4
  • Difficulty: easy
  • Print

 20150808_221730

(15-ounce) can unsalted pinto beans, rinsed and drained
8-10 medium poblano peppers (or Anaheims) or 6 bell peppers
2 ears fresh corn on the cob or 1 cup frozen corn kernels
1/2 red bell pepper
1 small zucchini
1-2 cups shredded cheddar cheese
1 tablespoon olive oil
1/2 teaspoon salt
1/4 teaspoon black pepper

TOPPINGS (Optional)
lime wedges
chopped fresh herbs (cilantro, parsley or basil)
crumbled queso

  • Preheat oven to 450 degrees or grill to high heat.
  • Cut  bell pepper and zucchini into a small dice and place in a medium bowl.
  • With a sharp knife, cut kernels of corn from the cob and add to the other veggies.
  • Add pinto beans, cheese, salt and pepper to the bowl and stir to combine.
  • Remove tops from poblanos and reserve tops. Scoop out seeds; discard.
  • Place about 1/2 cup bean mixture in each pepper. Replace pepper tops and secure each with a 4-inch skewer.
  • Brush peppers evenly with oil. Place peppers on grill or oven rack; grill or broil 12 – 15 minutes or until lightly charred, turning once after 6 minutes. (Larger peppers may need to be cooked longer to properly heat the insides.)
  • Place stuffed peppers on a platter; remove skewers. Serve stuffed peppers with lime wedges, crumbled queso and fresh herbs.

Grilled Salmon with Salsa Verde

0

20150805_211402

HERE is what’s on the grill this weekend.  It’s EASY, FAST AND YOUR GUESTS WILL LOVE YOU!  I am eating more plant based foods and  less seafood these days but salmon is still a favorite.  This version is roasted or grilled over high heat and topped with a deliciously spicy  Italian Salsa Verde aka Magic Green Sauce.  I can’t say enough about this tasty green sauce made with fresh parsley, thyme and jalapeno peppers combined with capers, lemon and olive oil.  Yum!  This amazing sauce would be great on anything grilled or roasted, including veggie skewers or tofu.  It’s that good!

20150729_161232

The beauty of this preparation is that once you have made the green sauce and sprinkled the salmon with fresh herbs, scallions, capers and lemon, all of which only takes about ten minutes, it can all sit until you are ready to cook.  Refrigerate if you won’t be cooking for a while. I was curious, so I let my fingers do the walking.  According to FDA , ‘raw seafood can sit at room temperature for no more than 2 hours or 1 hour if room temperature is 90 degrees or more.’   Then when you are ready, just pop the salmon into a hot oven or grill and in ten minutes or less – perfection!   I have made this salmon preparation several times now.  The first time I grilled it skin side down on a hot grill.  I was just cooking for my family and forgot to take photos before we ate, but once I tasted the results I knew I would be making again and again.  The next time I roasted two sides of salmon with salsa verde for a party of about 16 women.  It was a 90 degree day in a house with no air conditioning so I decided to roast the salmon on the grill and not heat up the kitchen any further.  Since I was dealing with two large unwieldy sides of salmon, I roasted them in the roasting pan right on the grill with great results.  With the lid closed, the grill became an effective outdoor oven.   The salmon in these photos was skinless  which I roasted in the ovenat 450 for about five minutes and then broiled for several more minutes.  All three cooking techniques yielded great results, so take your pick.

20150805_211133

As always when selecting seafood, to get the best in nutrition as well as being good to the planet, know where your food is from.  Make sure that you are buying fish or shellfish that is sustainably raised or caught.  An easy way to access the most current information is to check with  Seafood Watch and enter “Salmon” or any other seafood you are considering.  Currently Seafood Watch has this to say about salmon:  “Salmon is one of the most commonly eaten fish in North America. Wild-caught salmon is generally a “Best Choice” or “Good Alternative,” but if you’re considering farmed salmon, try to find out where it comes from. While there are several more sustainable sources, most farmed salmon is on the “Avoid” list. The Marine Stewardship Council certifies some salmon fisheries as sustainable.”

20150805_211410

TIPS:  I recommend pre-slicing the salmon before cooking for ease of serving and presentation.  Often a side of salmon gets hacked up by well intentioned people trying to serve themselves. By making cuts ahead of time, you ensure that each slice is perfectly sized for your crowd and ready to serve.  If the skin is on, you don’t have to slice through the skin which can be very tough to do.  The cooked salmon will slide right off the skin.  Salmon can be grilled or roasted in several ways.  If the skin is on, salmon can be placed, skin side down, on a hot grill and cooked with the lid closed 8 to 10 minutes.  Salmon without the skin is easy to roast in the oven at 450 for about 5 minutes and then broiling several more minutes.  Salmon can also be roasted on the grill, which is great on hot summer days when you don’t want to heat up the kitchen.  Just heat the grill until very hot and then place the salmon in the roasting pan in the grill and cook with the lid down 8 to 10 minutes.

20150805_211126

Recipe Adapted From:  The Best of Fine Cooking – Summer Eats 2015

GRILLED SALMON WITH SALSA VERDE

1 1/2 lb salmon (preferably skin on)
1 Tbsn olive oil
1 tsp fresh thyme
1 tsp parsley, minced
1 scallion, minced
1 tsp capers, drained
1 lemon, juice and zest

SALSA VERDE

1/2 cup olive oil
3 scallions, green and white parts
1/4 cup fresh thyme leaves
2 Tbsn capers, drained
1-2 jalapeno or serrano chilis, stem and seeds removed
1 lemon, juice and zest
1/4+ tsp salt
1/8+ tsp pepper

20150729_163622

  • To prepare the salsa verde most easily, process the scallions, thyme and chilis in a food processor until finely minced. Or finely mince by hand with a sharp knife.  Add olive oil and process until smooth.  Transfer to a small bowl and add capers, lemon juice and zest, salt and pepper.  Set aside.

20150805_193553

  • Rinse and dry the salmon and place skin side down on a large pan or aluminum foil that has been coated with olive oil. Pre-slice individual portions if desired.  (You don’t have to cut through the skin)

20150805_194624

  • Brush salmon with olive oil and sprinkle with thyme, parsley, scallion, capers, lemon juice and zest.

20150805_211004

  • Grill skin side down on high heat with the lid down 8 to 10 minutes. (Or alternately, see TIPS for oven roasting options) Salmon is done when top is golden, slices start to pull apart and fat collects on top.  Don’t overcook.

20150805_211133

  • Remove from heat and drizzle with some of  the salsa verde.  Serve with more salsa verde on the side.

Grilled Salmon with Salsa Verde

  • Servings: 6
  • Difficulty: easy
  • Print

 20150805_211410

1 1/2 lb salmon (preferably skin on)
1 Tbsn olive oil
1 tsp fresh thyme
1 tsp parsley, minced
1 scallion, minced
1 tsp capers, drained
1 lemon, juice and zest

SALSA VERDE

1/2 cup olive oil
3 scallions
1/4 cup fresh thyme
2 Tbsn capers, drained
1-2 jalapeno or serrano chilis
1 lemon, juice and zest
1/4+ tsp salt
1/8+ tsp pepper

  • To prepare the salsa verde most easily, process the scallions, thyme and chilis in a food processor until finely minced. Or mince by hand.  Add olive oil and process until smooth.  Transfer to a small bowl and add capers, lemon juice and zest, salt and pepper.  Set aside.
  • Rinse and dry the salmon and place on a large platter or aluminum foil skin side down.
  • Pre-slice individual portions if desired.  (You don’t have to cut through the skin) Brush salmon with olive oil and sprinkle with thyme, parsley, scallion, capers, lemon juice and zest.
  • Grill skin side down on high heat with the lid down 8 to 10 minutes. (Or alternately, roast in a pan at 450)
  • Remove from heat and drizzle with some of  the salsa verde.  Serve with more salsa verde on the side.


Wheatless Wednesday – Roasted Eggplant Caprese

4


20150728_210941 - Copy

Here is a twist on a summertime favorite – Caprese Salad.  When tomatoes are ripe and delicious, I can eat them every day, topped with fresh mozzarella and spicy basil drizzled with balsamic vinaigrette.  There is a reason that the Caprese is so popular.  The flavors are perfect companions, but I’m not always in the mood for a salad.   So I’ve taken the traditional caprese salad, added thinly sliced eggplant , drizzled with an herby balsamic vinaigrette and roasted it in a hot oven to golden deliciousness.  I was not disappointed and neither was my husband, who ate more than half of it, going back three times for more.

20150728_213045 - Copy

Eggplant is usually fried before baking, adding an additional step, more pans to wash and extra calories, all of which I try to avoid.  In this preparation,  I sliced the eggplant into 1/4 inch rounds instead of the traditional 1/2 inch, to make sure it gets cooked through.  Sometimes thicker slices of eggplant can be chewy unless it’s cooked or stewed for a long time.  I also salted the eggplant on papertowels on one side for fifteen minutes then turned them over onto fresh papertowels and salted again for another fifteen. It’s amazing how much water is drawn out of them!   Of course, you can always go the traditional route and fry them first which removes the excess water and cooks them at least half way.  Regardless, this is my new summertime favorite and I’m pretty sure it will be yours too…

20150728_210925 - Copy

TIPS:  If you still end up with extra liquid during cooking in spite of your valiant efforts to salt the eggplant, you can remove some of the liquid with a turkey baster.  Don’t remove too much though because you don’t want everything to dry out.  Another option would be to layer everything over a bed of tomato sauce which will incorporate excess liquid.

In case you’re wondering, those little leaves are  Basil Fine Verde (or Fino Verde) which I am growing in containers on my porch here in Maine.  This kind of basil is sweet and spicy and has small leaves which don’t need to be chopped which is kind of nice.

20150728_213106

ROASTED EGGPLANT CAPRESE

1 globe eggplant
2-3 ripe tomatoes
8 oz fresh mozzarella
1/3 cup olive oil
1 Tbsn balsamic vinegar
2 cloves garlic, minced
1 Tbsn fresh oregano or thyme (1 tsp dried)
1/2 tsp salt
1/4 tsp pepper

20150728_194128 - Copy - Copy

  • Slice eggplant into 1/4 inch rounds, place them in a single layer on papertowels and sprinkle salt liberally over them to draw out the excess water.  Let sit for about 15 minutes, replace the papertowels and salt the other side for another 15 minutes.  Then wipe off excess salt and water droplets and place in a large bowl.

20150728_200335 - Copy - Copy

  • Combine olive oil, vinegar, garlic and seasonings in a small bowl.  Pour half of the mixture over the eggplant slices and gently stir until all the pieces are coated.

20150728_201107 - Copy - Copy

  • Slice tomatoes into 1/4 inch rounds

20150728_200740 - Copy - Copy

  • Slice mozzarella into 1/4 inch rounds.

20150728_201041 - Copy - Copy


  • Oil a baking dish and start arranging the slices into two rows, if using a rectangular baking dish, or in circles if using a round baking dish.

20150728_201517 - Copy - Copy

  •  Alternate eggplant slices with mozzarella and tomato.  If you have very small eggplant or tomato slices, use two.

20150728_202227 - Copy - Copy

  • Complete second row until eggplant and tomatoes are used up.  Drizzle the rest of the marinade over the top taking care to get the tomato slices.  Bake 25-30 minutes at 450.  Turn oven to broil for about 10 minutes, or until tops are browned.


  • Top with fresh basil.

Roasted Eggplant Caprese

  • Servings: 4
  • Difficulty: easy
  • Print

20150728_210941 - Copy

1 globe eggplant
2-3 ripe tomatoes
8 oz fresh mozzarella
1/3 cup olive oil
1 Tbsn balsamic vinegar
2 cloves garlic, minced
1 Tbsn fresh oregano or thyme (1 tsp dried)
1/2 tsp salt
1/4 tsp pepper

  • Slice eggplant into 1/4 inch rounds, place them in a single layer on papertowels and sprinkle salt liberally over them to draw out the excess water.  Let sit for about 15 minutes, replace the papertowels and salt the other side for another 15 minutes.  Then wipe off excess salt and water droplets and place in a large bowl.
  • Combine olive oil, vinegar, garlic and seasonings in a small bowl.  Pour half of the mixture over the eggplant slices and gently stir until all the pieces are coated.
  • Slice tomatoes into 1/4 inch rounds
  • Slice mozzarella into 1/4 inch rounds.
  • Oil a baking dish and start arranging the slices into two rows, if using a rectangular baking dish, or in circles if using a round baking dish.  Alternate eggplant slices with mozzarella and tomato.  If you have very small eggplant or tomato slices, use two.
  • Complete second row until eggplant and tomato is used up.
  • Drizzle the rest of the marinade over the top taking care to get the tomato slices.  Bake 30 minutes at 400.
  • Turn oven to broil for 10 to 15 minutes, or until tops are browned.
  • Top with fresh basil.

Meatless Monday – Spicy Tofu and Mandarin Skewers

2

20150721_202206 - Copy

Grill marks are sexy!  Barbecue aficionados know what I’m talking about.  There is something completely satisfying about the getting that perfect sear, as evidenced by lovely straight grill marks.  Well vegetarians can have it too! Now that grilling season is in full force, non-meat eaters can be part of the fun. There are many goodies that can be thrown on the grill that are not slabs of meat.   These Tofu skewers are deliciously spicy and easy to make.  They only take a few minutes for assembly but require about an hour to properly marinate.  The sesame, soy, chili marinade is the key here, and tofu, which is normally fairly bland, is great at soaking up flavorful marinades.  So get your grill on!

20150721_194916 - Copy

The mandarin slices are not just to make the skewers look pretty.  When grilled, their flavor is intensified into a lovely smoky, sweetness and the rind chars, making the whole fruit good enough to eat.  I don’t normally eat citrus skins (except for Meyer Lemon) because they are tough and bitter – but I ate these charred little orange wheels and they were delicious!  They also add a dose of vitamin C, vitamin A and anti-oxidants, especially their skin which has higher concentrates of the nutrients!  If you don’t have access to small orange citrus like clementines, tangerines or satsuma, lemons would also be a good choice.

20150721_183000

Have you ever wondered what the difference is between oranges and the myriad other small orangish citrus fruits you see at the market? Oranges and Mandarin Oranges (also  known as Tangerines) are part of the citrus family. Tangerines are related varieties of oranges which are smaller in size than oranges, and have a loose, easily peelable skin (officially called the pericarp) and a sweeter juicy flesh (known as arils). They are also known as mandarin oranges in Europe and satsumas in Japan.  Here are a few more varieties on Tangerines:

  • Tangelos, also known as honeybell, are hybrid between tangerine and orange (Citrus sinensis) or grapefruit (Citrus paradisi). Tangelos, like tangerines, have loose skin and juicy sweet flavored segments. They are distinguished from oranges by a characteristic knob at the stem end of the fruit.
  • Tangors (Citrus nobilis) are cross between oranges (C. sinensis) and tangerine (C. reticulata). They feature large size, and sweet-tart flavor similar to oranges.
  • Clementines, another member of citrus family, are cross between mandarin and sweet oranges. They are smaller, have smooth glossy skin, and very sweet, juicy, almost seedless segments.

20150721_202154 - Copy

TIPS:  Tofu is great on the grill, just don’t forget to drain it on papertowels before putting it in the marinade or it won’t soak up the flavors properly.  Unlike meat and poultry marinades, which must be cooked or thrown away, this marinade is multi-purpose. The marinade can be reserved and used to brush the tofu skewers while cooking and then again as a dip.  If you prefer to serve the skewers with a thicker dipping/drizzling sauce, simmer marinade for several minutes in a small saucepan.  Enjoy!

20150721_194842 - Copy

SPICY TOFU AND MANDARIN SKEWERS

1 block extra firm tofu
3 mandarins (or other small citrus fruit)

MARINADE
1/4 cup soy sauce
2 Tbsn sesame oil
1/4 cup rice vinegar
3-4 cloves garlic, minced
2 Tbsn red chili paste

20150721_161059

  • Cut tofu block into 12 rectangular pieces.  Place on  double papertowels and cover with more papertowels.  Set something heavy on top to help press out the water.  Let sit about 15 minutes. If using bamboo or wooden skewers, let them s0ak in water for 20 minutes or so to prevent them from burning.

20150721_165232

  • In a bowl large enough to hold the tofu in a single layer, whisk together the marinade ingredients.

20150721_165530 - Copy

  • Add tofu and spoon marinade over tofu to coat. Cover and let rest for 1 hour (and up to to 24 hours).  For best results, turn the tofu so another side is down (in the marinade) every 10-15 minutes until all sides are coated (Or another option would be to marinate them in a ziploc bag).

20150721_183000


  • Slice mandarins into rounds, leaving skin on.

20150721_193617

  • Thread the tofu onto skewers adding a slice of mandarin between each piece. (reserve the marinade) Grill the skewers, turning once and basting frequently with the reserved marinade, until browned on both sides, 4 to 6 minutes total.

20150721_194842 - Copy

  • Serve with reserved marinade.

Spicy Tofu and Mandarin Skewers

  • Servings: 3-4
  • Difficulty: easy
  • Print

20150721_202206 - Copy

1 block extra firm tofu
3 mandarins (or other small citrus fruit)

MARINADE
1/4 cup soy sauce
2 Tbsn sesame oil
1/4 cup rice vinegar
3-4 cloves garlic, minced
2 Tbsn red chili paste

  • Cut tofu block into 12 rectangular pieces.  Place on  double papertowels and cover with more papertowels.  Set something heavy on top to help press out the water.  Let sit about 15 minutes.
  • If using bamboo or wooden skewers, let them s0ak in water for 20 minutes or so to prevent them from burning.
  • In a bowl large enough to hold the tofu in a single layer, whisk together the marinade ingredients.
  • Add tofu and spoon marinade over tofu to coat. Cover and let rest for 1 hour (and up to to 24 hours)
  • For best results, turn the tofu so another side is down (in the marinade) every 10-15 minutes until all sides are coated (Or another option would be to marinate them in a ziploc bag).
  • Slice mandarins into rounds, leaving skin on.
  • Thread the tofu onto skewers adding a slice of mandarin between each piece. (reserve the marinade)
  • Grill the skewers, turning once and basting frequently with the reserved marinade, until browned on both sides, 4 to 6 minutes total.
  • Serve with reserved marinade

Meatless Monday – Summer Vegetable Chowder – Fully Loaded (Vegan)

0

20150715_194729

Sometimes in Summer you just have to step away from the salad bar and belly up to a big bowl of creamy comfort food.  Last night, the Maine skies were filled with Mother Nature;s fireworks.  Lightening  made a dramatic light display across the night sky, quickly followed by booming thunder, while we sat and counted the seconds on our fingers. If my dog was here, she would have been hiding under my bed.  This was a perfect night for Summer Vegetable Chowder, fully loaded, or more specifically, topped with tasty brown onion bits (instead of bacon), scallions, flaked parmesan and cilantro.  Yum!   This thick, creamy chowder is filled with seasonal veggies; zucchini, summer squash, potato and sweet corn simmered in a light vegetable broth with creamy coconut milk.

20150715_191306

I have been trying to experiment with more vegan recipes and using fewer animal products in my cooking.  This recipe is vegan except for the addition of parmesan as a topping which, of course, is optional). When I was sauteing the onions and celery, I forgot to stir for a few moments and some of the onions turned brown on the edges.  I started to pick the brown bits out and then tasted one and realized I had hit paydirt!  The browned onions were just the flavor that my vegetarian chowder was missing, so I decided to take the other half of the onion and make them on purpose to use as a topping.  Loved them! I used to be a big bacon lover and I am always looking for good substitutes.  These onion bits don’t get crispy like actual bacon does, but they have that same umami that we love so much.  Of course, toppings are optional, but… why not?

TIPS:  I used unsweetened coconut milk (fresh from a carton not a can) but any kind of milk would work, vegan or regular.  I also made it creamier by pureeing half of the cooked vegetables and putting the mixture back into the soup.  It’s a great way to add creaminess without adding heavy cream.  If you prefer a more brothy soup with more vegetables, then skip this step.

20150715_194753

SUMMER VEGETABLE CHOWDER WITH BROWNED ONION ‘BACON BITS’

1/2 large yellow onion, diced
1/4 cup chopped celery, diced
2 Tbsn coconut or olive oil (or vegan butter)
2 large potatoes, peeled and diced
1 pound yellow summer squash, diced
1 pound zucchini, diced
3-4 ears fresh corn, cut off the cob
1 quart vegetable broth
2 cups coconut milk (or other milk)
1 teaspoon chopped fresh thyme or 1/2 tsp dried
1/2 teaspoon salt
1/4 teaspoon freshly ground black pepper
TOPPINGS (Optional):
Browned Onion ‘Bacon Bits’ (*See directions below)
1/2 cup chopped scallions
1/2 cup shredded extra-sharp cheddar cheese
20150715_141828
  • Saute onions and celery in olive oil or butter in a large stockpot for about 10 minutes or until tender.

20150715_182448

  • Add potatoes and vegetable stock and cook until softened, 15 to 20 minutes. Add squash, zucchini, corn, thyme and coconut milk and simmer until vegetables are soft.  Season with salt and pepper.

20150715_184734

  • For a thicker soup puree half of the potato/onion mixture in a blender or food processor and return to the stockpot. (This can also be done after cooking the potatoes instead if you want more chunky veggies.)

20150715_190504

  • While soup is cooking prepare Browned Onion ‘Bacon Bits’, if using, and set aside (Directions below).

20150715_191306

  • Prepare toppings, if using. In addition to the onion bits, I also served fresh herbs, shaved parmesan and sliced scallions.

20150715_194740

  • Ladle soup into bowls and allow guests to ‘decorate’ their dish with desired toppings.

BROWNED ONION ‘BACON BITS’

20150715_150120

  • Chop one half large onion and brown in 1 Tbsn olive oil or coconut oil and 1 Tbsn butter, vegan butter (optional) in a heavy saucepan over medium heat until browned, about 20 minutes.

20150715_155058

  • Transfer to a paper towel and let cool.  They won’t crisp like bacon but add that great salty, fatty flavor.

20150715_155219

  • Place in a small serving bowl when cool.

Summer Vegetable Chowder

  • Servings: 6
  • Difficulty: easy
  • Print

20150715_194729

1/2 large yellow onion, diced
1/4 cup chopped celery, diced
2 large potatoes, peeled and diced
1 pound yellow summer squash, diced
1 pound zucchini, diced
3-4 ears fresh corn
1 quart vegetable broth
2 1/4 cups coconut milk (or other milk)
1 teaspoon chopped fresh thyme or 1/2 tsp dried
1/2 teaspoon salt
1/4 teaspoon freshly ground black pepper
TOPPINGS (Optional):
Browned Onion ‘Bacon Bits’ (*See directions below)
1/2 cup chopped scallions
1/2 cup shredded extra-sharp cheddar cheese
  • Saute onions and celery in olive oil or butter in a large stockpot for about 10 minutes or until tender.
  • Add potatoes and vegetable stock and cook until softened, 15 to 20 minutes.
  • For a thicker soup puree half of the potato/onion mixture in a blender or food processor and return to the stockpot. (This can also be done after cooking the squash)
  • Add squash, zucchini, corn, thyme and coconut milk and simmer until vegetables are soft.  Season with salt and pepper.
  • While soup is cooking prepare Browned Onion ‘Bacon Bits’, if using, and set aside (Directions below).
  • Prepare toppings, if using. In addition to the onion bits, I also served fresh herbs, shaved parmesan and sliced scallions.
  • Ladle soup into bowls and allow guests to ‘decorate’ their own bowls with desired toppings.

BROWNED ONION ‘BACON BITS’

  • Chop one half large onion and brown in 1 Tbsn olive oil or coconut oil and 1 Tbsn butter, vegan butter (optional) in a heavy saucepan over medium heat until browned, about 20 minutes.
  • Transfer to a paper towel and let cool.  They won’t crisp like bacon but add that great salty, fatty flavor.
  • Place in a small serving bowl when cool.

Rustic Berry Tart

0

20150702_184453 - Copy

Dessert or Breakfast?  You decide.  This beautiful tart is my new favorite throw-together fruit dish, made with fresh summer berries, lemon zest and just a bit of sugar, folded into a whole grain crust made with white whole wheat flour.  For a tart it’s pretty healthy, so I have actually made it for breakfast when I’ve had guests.  Either way, it’s a crowd pleaser and you won’t have any leftovers!

20150702_161900 - Copy

I have made this tart three times now.  Twice with store bought crusts and once using the following recipe for white whole wheat crust.  The store bought crusts were perfectly fine and made it super quick – five minutes to prepare and right into the oven.  However, I really preferred the homemade crust, which was slightly thicker and had more of a rustic feel.  It also contained the juices better.  The crust was surprisingly easy to make but requires chilling time, which must be taken into account. I have also used coarse sanding sugar, which adds a ‘professional’ look to the tart and a nice, crunchy sweetness to the crust, but regular granulated sugar works fine too if that’s what you have.

.20150716_175956

So what is up with white whole wheat flour?  I love to use whole grain flour whenever possible for cooking but sometimes taste or texture is compromised because whole grains are often heavier and have a stronger taste. I have recently started using an unbleached white whole wheat flour from King Arthur.  The flour is milled from 100% organic hard white spring wheat, a lighter-colored and more mild tasting grain than traditional red wheat, which means that baked goods taste better but still have all of the nutrition and fiber of whole grains.

20150702_144208

TIPS:  This recipe can be personalized to your liking with almost any fruit.  Just use four cups of fruit:  whole small berries or thinly sliced peaches, apricots, pears, plums, apples or strawberries.  Or combine two fruits for an interesting combo.  Some fruits are sweeter than others, so adjust the sugar as necessary, and otherwise follow the recipe below.

You can easily make 4 individual mini tarts from this recipe instead of one large one.  When you’re finished mixing the dough, divide it into four equal pieces before pressing them into disks and wrapping them in plastic; refrigerate. Roll the dough into rounds about 7 inches in diameter and portion the fruit evenly among the rounds. Pleat the dough around the fruit to make a 1-inch rim. Bake as directed.

20150702_184453 - Copy

Recipe Adapted From Fine Cooking/Summertime Eats 2015, Rustic Fruit Tart

RUSTIC BERRY TART

2 cups fresh raspberries
1 cup fresh blueberries
1 cup fresh blackberries
1/4 cup granulated sugar
1 tsp lemon zest, finely grated
1 Tbsn flour
1/8 tsp salt
1 egg, beaten
1 Tbsn coarse sanding sugar, or granulated sugar

CRUST (Or your favorite pre-made crust)

1 1/2 cups white whole wheat flour (or all purpose flour)
2 tsp granulated sugar
1/2 tsp salt
5 1/2 oz cold unsalted butter (11 Tbsn), cut into 1/2 inch cubes
1 large egg yolk
3 Tbsn whole milk

20150702_150358

  • If using your own homemade dough, prepare that first.  Combine the flour, sugar and salt in a stand mixer or food processor.  Add butter and pulse on low until the mixture looks sandy and no large pieces of butter remain. The flour should hold together when you pinch it with your fingers.
  • In a small bowl, mix the egg yolk and milk.  With the mixer on low, add them to the flour mixture and pulse until the dough just comes together, about 15 seconds.  The dough will be somewhat crumbly and dry.
  • Dump dough onto a clean counter and work it with the heel of your hand until the dough comes together.  Press it into a flat disc, wrap it with plastic and let it rest in the refrigerator for 15 to 20 minutes before rolling it out.
  • Preheat oven to 350.  Remove dough from refrigerator and let it sit 10 to 15 minutes, or until it’s pliable enough to work with.  Roll it out on a floured surface into a 13 to 14 inch round.  Don’t worry about ragged edges.  They only make the tart look more rustic.

20150702_150558

  • Transfer the dough circle to a baking sheet that has been lined with parchment.

20150702_144746

  • In a large bow, toss the raspberries, blueberries and blackberries with the sugar.  Taste and add up to 2 Tbsn more or sugar, if needed.  Add lemon zest, flour and salt and gently combine.

20150702_151434

  • Heap the fruit mixture into the center of the dough circle, leaving a 2 inch border.
  • Fold the edges of the dough over the fruit, overlapping and pleating as you go.

20150702_151320

  • Brush the dough, with beaten egg (even under the folds) and sprinkle with sugar.

20150702_151505

  • Bake until the dough is golden brown, 40 to 55 minutes.  Let cool.

20150702_161735

  • Transfer to a serving platter and serve warm or at room temperature.


Rustic Berry Tart

  • Servings: 6-8
  • Difficulty: easy
  • Print

 20150702_184504 - Copy

2 cups fresh raspberries
1 cup fresh blueberries
1 cup fresh blackberries
1/4 cup granulated sugar
1 tsp lemon zest, finely grated
1 Tbsn flour
1/8 tsp salt
1 egg, beaten
1 Tbsn coarse sanding sugar, or granulated sugar

CRUST (Or your favorite pre-made crust)

1 1/2 cups white whole wheat flour (or all purpose flour)
2 tsp granulated sugar
1/2 tsp salt
5 1/2 oz cold unsalted butter (11 Tbsn), cut into 1/2 inch cubes
1 large egg yolk
3 Tbsn whole milk

  • If using your own homemade dough, prepare that first.  Combine the flour, sugar and salt in a stand mixer or food processor.  Add butter and pulse on low until the mixture looks sandy and no large pieces of butter remain. The flour should hold together when you pinch it with your fingers.
  • In a small bowl, mix the egg yolk and milk.  With the mixer on low, add them to the flour mixture and pulse until the dough just comes together, about 15 seconds.  The dough will be somewhat crumbly and dry.
  • Dump dough onto a clean counter and work it with the heel of your hand until the dough comes together.  Press it into a flat disc, wrap it with plastic and let it rest in the refrigerator for 15 to 20 minutes before rolling it out.
  • Preheat oven to 350.  Remove dough from refrigerator and let it sit 10 to 15 minutes, or until it’s pliable enough to work with.  Roll it out on a floured surface into a 13 to 14 inch round.  Don’t worry about ragged edges.  They only make the tart look more rustic.
  • Transfer the dough circle to a baking sheet that has been lined with parchment.
  • In a large bow, toss the raspberries, blueberries and blackberries with the sugar.  Taste and add up to 2 Tbsn more or sugar, if needed.  Add lemon zest, flour and salt and gently combine.
  • Heap the fruit mixture into the center of the dough circle, leaving a 2 inch border.
  • Fold the edges of the dough over the fruit, overlapping and pleating as you go.
  • Brush the dough, with beaten egg (even under the folds) and sprinkle with sugar.
  • Bake until the dough is golden brown, 40 to 55 minutes.  Let cool.
  • Transfer to a serving platter and serve warm or at room temperature.

Wheatless Wednesday – Roasted Beet and Tomato Salad

8

20150713_190356

If tomatoes are the star in summer, beets are a bold and intense showgirl.  Together they are a showstopper!   Fresh and easy, pretty enough for a party, this Roasted Beet and Tomato Salad is a Summer Showcase!  Sun-ripened tomatoes in reds and yellows paired with dark-ruby roasted beets, resting on a bed of mixed greens and topped with crumbled feta and fresh herbs is a pure delight.  I love the simplicity of this five ingredient salad drizzled with a simple vinaigrette.  Each flavor is strong enough to stand on it’s own, and tossed together they make a colorful and flavorful salad, good enough for company but tasty enough for family.

beets.jpg (1280×853)

Photo Credit: Dr Oz

Roasted beets are not to be compared to the tasteless canned variety.  Roasting them intensifies their flavor as none of the juice is lost in boiling water. Beets are very low in calories, contain no cholesterol and small amount of fat and they are loaded with fiber, vitamins, minerals, and anti-oxidants.  All of that glorious color has to mean something!

I feel like a word of caution is in order here.  As I mentioned, dark beets have a vivid color and when roasted with olive oil, some of the escaped juices are quite vibrantly red, which I found out looks remarkably like blood when spilled.  Yes, I tipped the foil and juices leaked out; on the counter, down the cabinet and on the floor.  Even my bare feet looked like they were splattered in blood.  It looked like someone cut off their arm in right in my kitchen.  Note to self for next gory Halloween costume…  Also, beet juice can stain wood cutting boards, so I recommend plastic washable cutting surfaces or a ceramic plate.  Otherwise, beets are lovely.

20150713_174105

Do we even need to talk about tomatoes?  If you aren’t convinced, click  HERE to read how eating tomatoes can make you healthier.  If you love beets but not tomatoes so much, here are a few other Goodmotherdiet salads that were also inspired by beets:

20150308_195202

Beet and Citrus Salad with Goat Cheese and Pine Nuts

Beets14

Layered Beet Salad with Glazed Pecans and Citrus Vinaigrette

Beet Peach Salad13

Roasted Beet Salad with Ripe Peaches and Goat Cheese

TIPS:  If you were lucky enough to buy beets with the greens still attached, don’t cut them off and discard them.  The greens are delicious raw, thinly sliced into salads or sauteed and stirred into pasta or prepared any way you would use chard, kale or any other dark leafy green.  They have a slightly bitter taste that mellows with cooking and adds flavor and nutrients to your meal.  Beets can be roasted a day or two ahead of time and refrigerated until ready.  Note that beet juice stains porous surfaces, like wood cutting boards.  Use non-porous surfaces for preparation and slicing.

20150713_190329

ROASTED BEET AND TOMATO SALAD

1 lb beets (3-4 medium)
2 lbs tomatoes, mixed
1 bunch arugula or mixed greens
3 oz feta, sliced or crumbled(optional)
1/4 cup fresh cilantro, chopped
1/4 cup fresh basil, chopped or sliced
1/4 cup olive oil+
1/4 cup apple cider or red wine vinager
salt and pepper to taste

20150304_171305.jpg (4128×2322)

  • Preheat oven to 400 degrees. Cut away beet greens without cutting into the skin and place beets on a large piece of foil, separately or together.  Drizzle with olive oil and tightly close foil packet. Roast on a rimmed baking sheet until tender, about 75 minutes.

20150713_173324

  • When cool, use a paper towel to remove skins.

20150713_173803

  • Slice into rounds on a plastic cutting board or plate.

20150713_174105

  • Slice large tomatoes into 1/4′ rounds, and halve cherry tomatoes.

20150713_174649

  • Place greens on the bottom of a serving platter and arrange the beets and tomatoes on top.

20150713_190329

  • Whisk together the olive oil and vinegar and season with salt and pepper. Top tomatoes with feta, cilantro, basil and drizzle with dressing.  Serve with more herbs and feta on the side.

Roasted Beet and Tomato Salad

  • Servings: 4-6
  • Difficulty: easy
  • Print

 20150713_190356

1 lb beets (3-4 medium)
2 lbs tomatoes, mixed
1 bunch arugula or mixed greens
3 oz feta, sliced or crumbled
1/4 cup fresh cilantro, chopped
1/4 cup fresh basil, chopped or sliced
1/4 cup olive oil+
1/4 cup apple cider or red wine vinager
salt and pepper to taste

  • Preheat oven to 400 degrees. Cut away beet greens without cutting into the skin and place beets on a large piece of foil.  Drizzle with olive oil and tightly close foil packet. Roast on a rimmed baking sheet until tender, about 75 minutes.
  • When cool, use a paper towel to remove skins and slice into rounds on a plastic cutting board or plate.
  • Slice large tomatoes into 1/4′ rounds, and halve cherry tomatoes.
  • Place greens on the bottom of a serving platter and arrange the beets and tomatoes on top.
  • Whisk together the olive oil and vinegar and season with salt and pepper.
  • Top with feta, cilantro, basil and drizzle with dressing.
  • Serve with more fresh herbs and feta on the side.

Meatless Monday -Broccoli Slaw with Cranberries and Toasted Almonds

0

20150703_205059

I am at my house in Maine for the month of July. My Maine kitchen is full of many cooks as friends from around the country show up to visit beautiful Maine.  Some nights we are positively bursting at the seams, even the bunkroom is full to the rafters.  One night such as that, I was lucky enough to have our friend, Evan Kendall, who is a student at New England Culinary Institute and working towards a BA in Culinary Arts, here for a visit. We all clamored for him to make his signature dish, Broccoli Slaw.   This lovely raw broccoli salad is a dish  I have had the pleasure of enjoying the last couple of summers in Maine. It features sliced broccoli, tossed together with cranberries, toasted almonds and red onion.  The creamy buttermilk dressing pulls all the flavors together.  This salad is delicious and good for you!  He originally got this recipe from Smitten Kitchen and has made a few small changes.  As happens with really good recipes, they get passed down again and again.   Yay, power to my fellow bloggers for making food better everywhere!

TIPS:  This recipe would be easy to make vegan by substituting vegan milk and mayonaise products. 

It was just my birthday weekend and I spent it hiking in the White Mountains.  The White Mountains, known as the most rugged mountains in New England, are beautiful but not for sissies!  We hiked to the Greenleaf Hut which is perched at the treeline on Mount Lafayette on the Appalachian Trail. The Greenleaf Hut, which is part of the AMC (Appalachian Mountain Club) Hut Network, offers bunk accommodations and a delicious hot dinner and hearty breakfast before hikers continue on their way. We followed ‘Franconia Loop’, a challenging almost 10 mile trail that climbs Mount Lafayette (5240′), Mount Lincoln (5089′) and Little Haystack (4780′) on Franconia Ridge and winds around seven waterfalls on the Falling Waters Trail.  It was a wonderful and challenging trip – off my bucket list.  My legs are still sore, just saying…

Anyway, I was nowhere near my kitchen for the last few days, making this is a great time to host a guest chef for your Meatless Monday. So without further ado…

Adapted from Smitten Kitchen, who “Adapted a little bit from family, a little bit from Apartment Therapy
20150703_205147

BROCCOLI SLAW COMPLIMENTS OF GUEST CHEF, EVAN KENDALL

Broccoli Slaw

  • Servings: 6 cups
  • Difficulty: easy
  • Print

 20150703_205110

2 heads of broccoli
1/2 cup thinly sliced almonds, toasted
1/3 cup dried cranberries
1/2 small red onion, finely chopped

Buttermilk Dressing

1/2 cup mayonnaise
1/4 cup buttermilk, or plain milk
3-4 tablespoons cider vinegar, to taste, use less with buttermilk
1 teaspoon toasted sesame oil
1 tablespoon sugar
3 tablespoons finely chopped shallot (or, you could just use a little extra red onion to simplify it)
freshly ground black pepper, to taste

Prepare the broccoli by cutting it into large chunks and then slicing them thinly. This can be done by hand with a knife, in a food processor with the slicing attachment, or on a mandoline. I really enjoy the stems of broccoli, give them a try if you don’t usually. The outer skin is tough and can be unappealing, so try peeling it off and slice thinly. In a large bowl, toss with the dried cranberries, toasted almond. You can include the red onion as well, or combine that in the dressing to temper the onion flavor.
In a small-medium bowl, whisk together the ingredients for the dressing. Season with a pinch of salt and ground pepper. Pour the dressing over the broccoli and other ingredients, and toss to combine. Adjust seasoning with salt and pepper, I like to make the pepper stand out.
 

Wheatless Wednesday – Warm Scallop Salad with Mango Vinaigrette

2

20150706_204421

Looking for something light and summery – and FAST to make for dinner?  How about a warm scallop salad with perfectly seared sea scallops over a bed of mixed greens, avocado and, I’m in Maine – so blueberries.  Top all of this with a spicy, sweet mango vinaigrette for a lovely summery taste sensation.  Best of all, you can whip this up in 20 minutes or less, depending on how fast you are at putting things together – five minutes or so to make the salad, another five to make the mango vinaigrette and then the scallops only take 3 minutes to cook.  Done and delicious!

20150706_204256 - Copy

Scallops are a great choice for seafood lovers.  They are not only delicious  but low in calories and high in protein.  They are excellent sources of Vitamin B12 and omega3 fats.  Sea scallops are also a good environmental choice.  According to  Seafood Watch, wild-caught scallops are a “Best Choice” or “Good Alternative,” depending on where and how they’re harvested.  Worldwide, farmed scallops are a “Best Choice” because farming methods have little impact on the surrounding environment, however, some countries have questionable farming methods, so I would check before buying.

20150706_194205

I happened upon this mango vinaigrette when I noticed I had some leftover sliced mango that needed to be used up and thought it would make a tasty salad dressing. I grew up with homemade dressing (Thanks Mom!) so I usually make my own.  You will rarely see me pulling a bottle of store-bought dressing from the fridge.  Truly spoiled. I just don’t like that bottled taste they all have. Making it fresh is so worth the extra few minutes, however, if you have a dressing you love, go for it.  With a fruity dressing, I like to pair something savory or spicy like jalapeno or, in this case, red Fresno chili pepper, which also adds a nice color to the vinaigrette.  This otherwise simple dressing also has oil and lemon juice with a sprinkle of salt and pepper.  It was great paired with the greens and warm scallops.  It would also be tasty on grilled shrimp or fish.  Sometimes simpler is better as you can taste each and every flavor.

TIPS:  If blueberries are not available where you are, substitute another fruit, like ripe peaches, or sliced red or yellow bell pepper.  You can use fresh or frozen (defrosted) mango slices or chunks.  If you are using a fresh mango, click HERE for a short video on how to cut a mango from cooking pro Martha Stewart, herself.  It’s easy and brilliant.  If you are still struggling to remove the large mango seed, you should check it out.

20150706_204725

WARM SCALLOP SALAD

1 large bunch of mixed greens, bib lettuce or baby spinach
3/4 cup fresh blueberries OR 1 red or yellow bell pepper, sliced
1 avocado, sliced
2-3 spring onions or large scallions, sliced
1 1/4 pounds+ dry sea scallops, (4-6 per person)
2 teaspoons unsalted butter
2 teaspoons olive oil
salt and pepper

20150706_195108

  • Place mixed greens in a large salad bowl along with the blueberries, scallions and avocado.

20150706_194551

  • Rinse and dry scallops with a papertowel, sprinkle with salt and pepper and set aside.

20150706_203741

  • Add the butter and oil to a wide saute pan on high heat until almost smoking.  Add the scallops in a single layer round side down, making sure they are not touching each other and sear for 1 1/2 minutes on each side. The scallops should be golden brown on both sides but still soft in the center. Don’t overcook or they will get tough and chewy. Cook in batches if necessary.

20150706_204016

  • Remove to a serving plate.

20150706_204256

  • Place a large spoonful of salad mixture on a serving plate and top with 4-6 warm scallops.

20150706_204412

  • Top with mango vinaigrette

20150706_194205

MANGO VINAIGRETTE

1/2 ripe mango, roughly chopped or mango chunks (frozen, thawed okay)
1 red Fresno chili pepper, roughly chopped or 1/4 tsp red pepper flakes
1/3 cup fresh lemon juice
3 Tbsn olive oil
salt and pepper to taste

20150706_192856

  • Place mango and chili pepper in a food processor or blender and pulse until it’s finely minced.

20150706_193119

  • Add lemon juice and olive oil and process until smooth. Add a bit more oil if necessary. Taste and add salt and pepper to taste

20150706_194233

  • Pour into a serving bowl.

Warm Scallop Salad with Mango Vinaigrette

  • Servings: 4
  • Difficulty: easy
  • Print

 20150706_204421

1 large bunch of mixed greens, bib lettuce or baby spinach
3/4 cup fresh blueberries OR 1 red or yellow bell pepper, sliced
1 avocado, sliced
2-3 spring onions or large scallions, sliced
1 1/4 pounds+ dry sea scallops, (4-6 per person)
2 teaspoons unsalted butter
2 teaspoons olive oil
salt and pepper

  • Place mixed greens in a large salad bowl along with the blueberries, scallions and avocado.
  • Rinse and dry scallops with a papertowel, sprinkle with salt and pepper and set aside.
  • Add the butter and oil to a wide saute pan on high heat until almost smoking.  Add the scallops in a single layer round side down, making sure they are not touching each other and sear for 1 1/2 minutes on each side. The scallops should be golden brown on both sides but still soft in the center. Don’t overcook or they will get tough and chewy.
  • Remove to a serving plate.
  • Place a large spoonful of salad mixture on a serving plate and top with 4-6 warm scallops.
  • Top with mango vinaigrette

MANGO VINAIGRETTE

1/2 ripe mango, chopped or mango chunks (frozen, thawed okay)
1 red Fresno chili pepper or 1/4 tsp red pepper flakes
1/3 cup fresh lemon juice
3 Tbsn olive oil
salt and pepper to taste

  • Place mango and chili pepper in a food processor or blender and pulse until it’s finely minced.
  • Add lemon juice and olive oil and process until smooth.
  • Taste and add salt and pepper to taste
  • Pour into a serving bowl.