Wheatless Wednesday – Jerusalem Chicken with Fava & Spring Vegetable Saute

0

bRoasted Chicken1

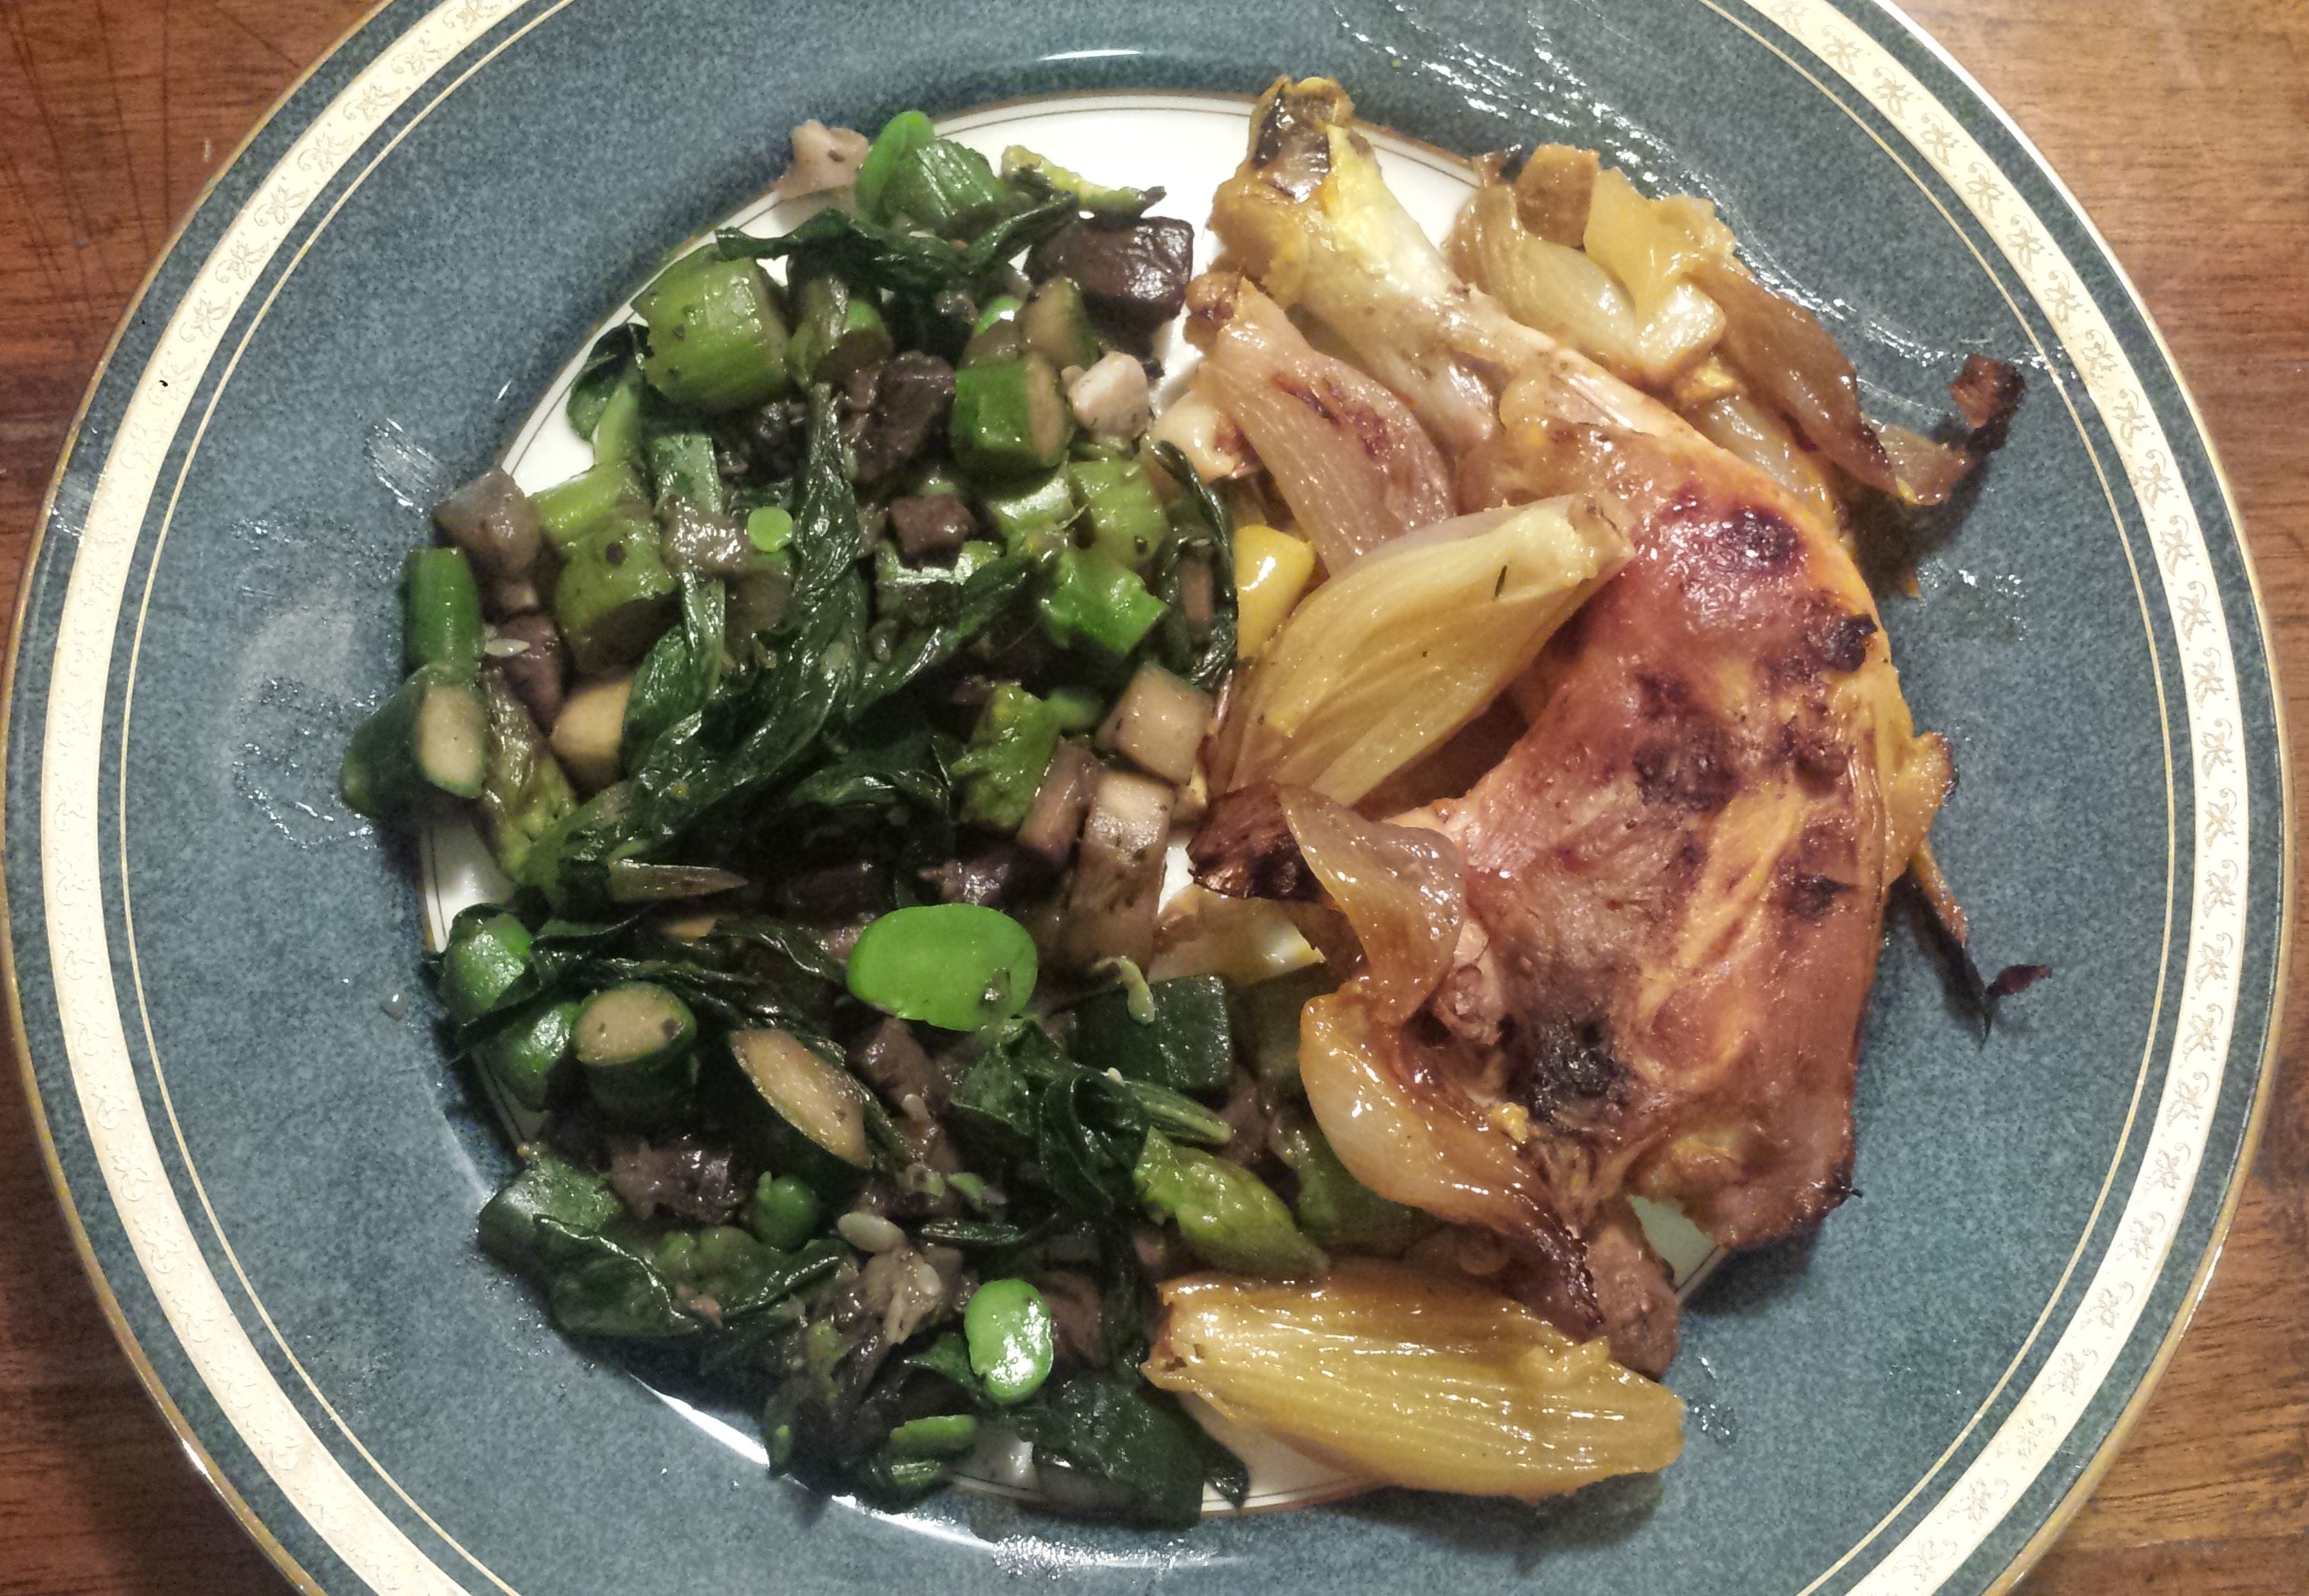
Can there really be a cookbook co-written by an Israeli and a Palestinian?  Yes, and it is a work of art!   Yotam Ottelenghi, from the Jewish West, and Sami Tamimi, from the Arab East, have written a gloriously beautiful book, “Jerusalem”, which is a cookbook with wonderful recipes but also gorgeous photos and personal commentary that portray life in Jerusalem where they both grew up, albeit in different parts of the city.  They didn’t know each other in Jerusalem but met later in London and became good friends and then business partners.  They now own many successful restaurants together. They claim that this book was a walk down memory lane for them, “a nostalgic trip into their pasts”.  More about “Jerusalem”

Jerusalem

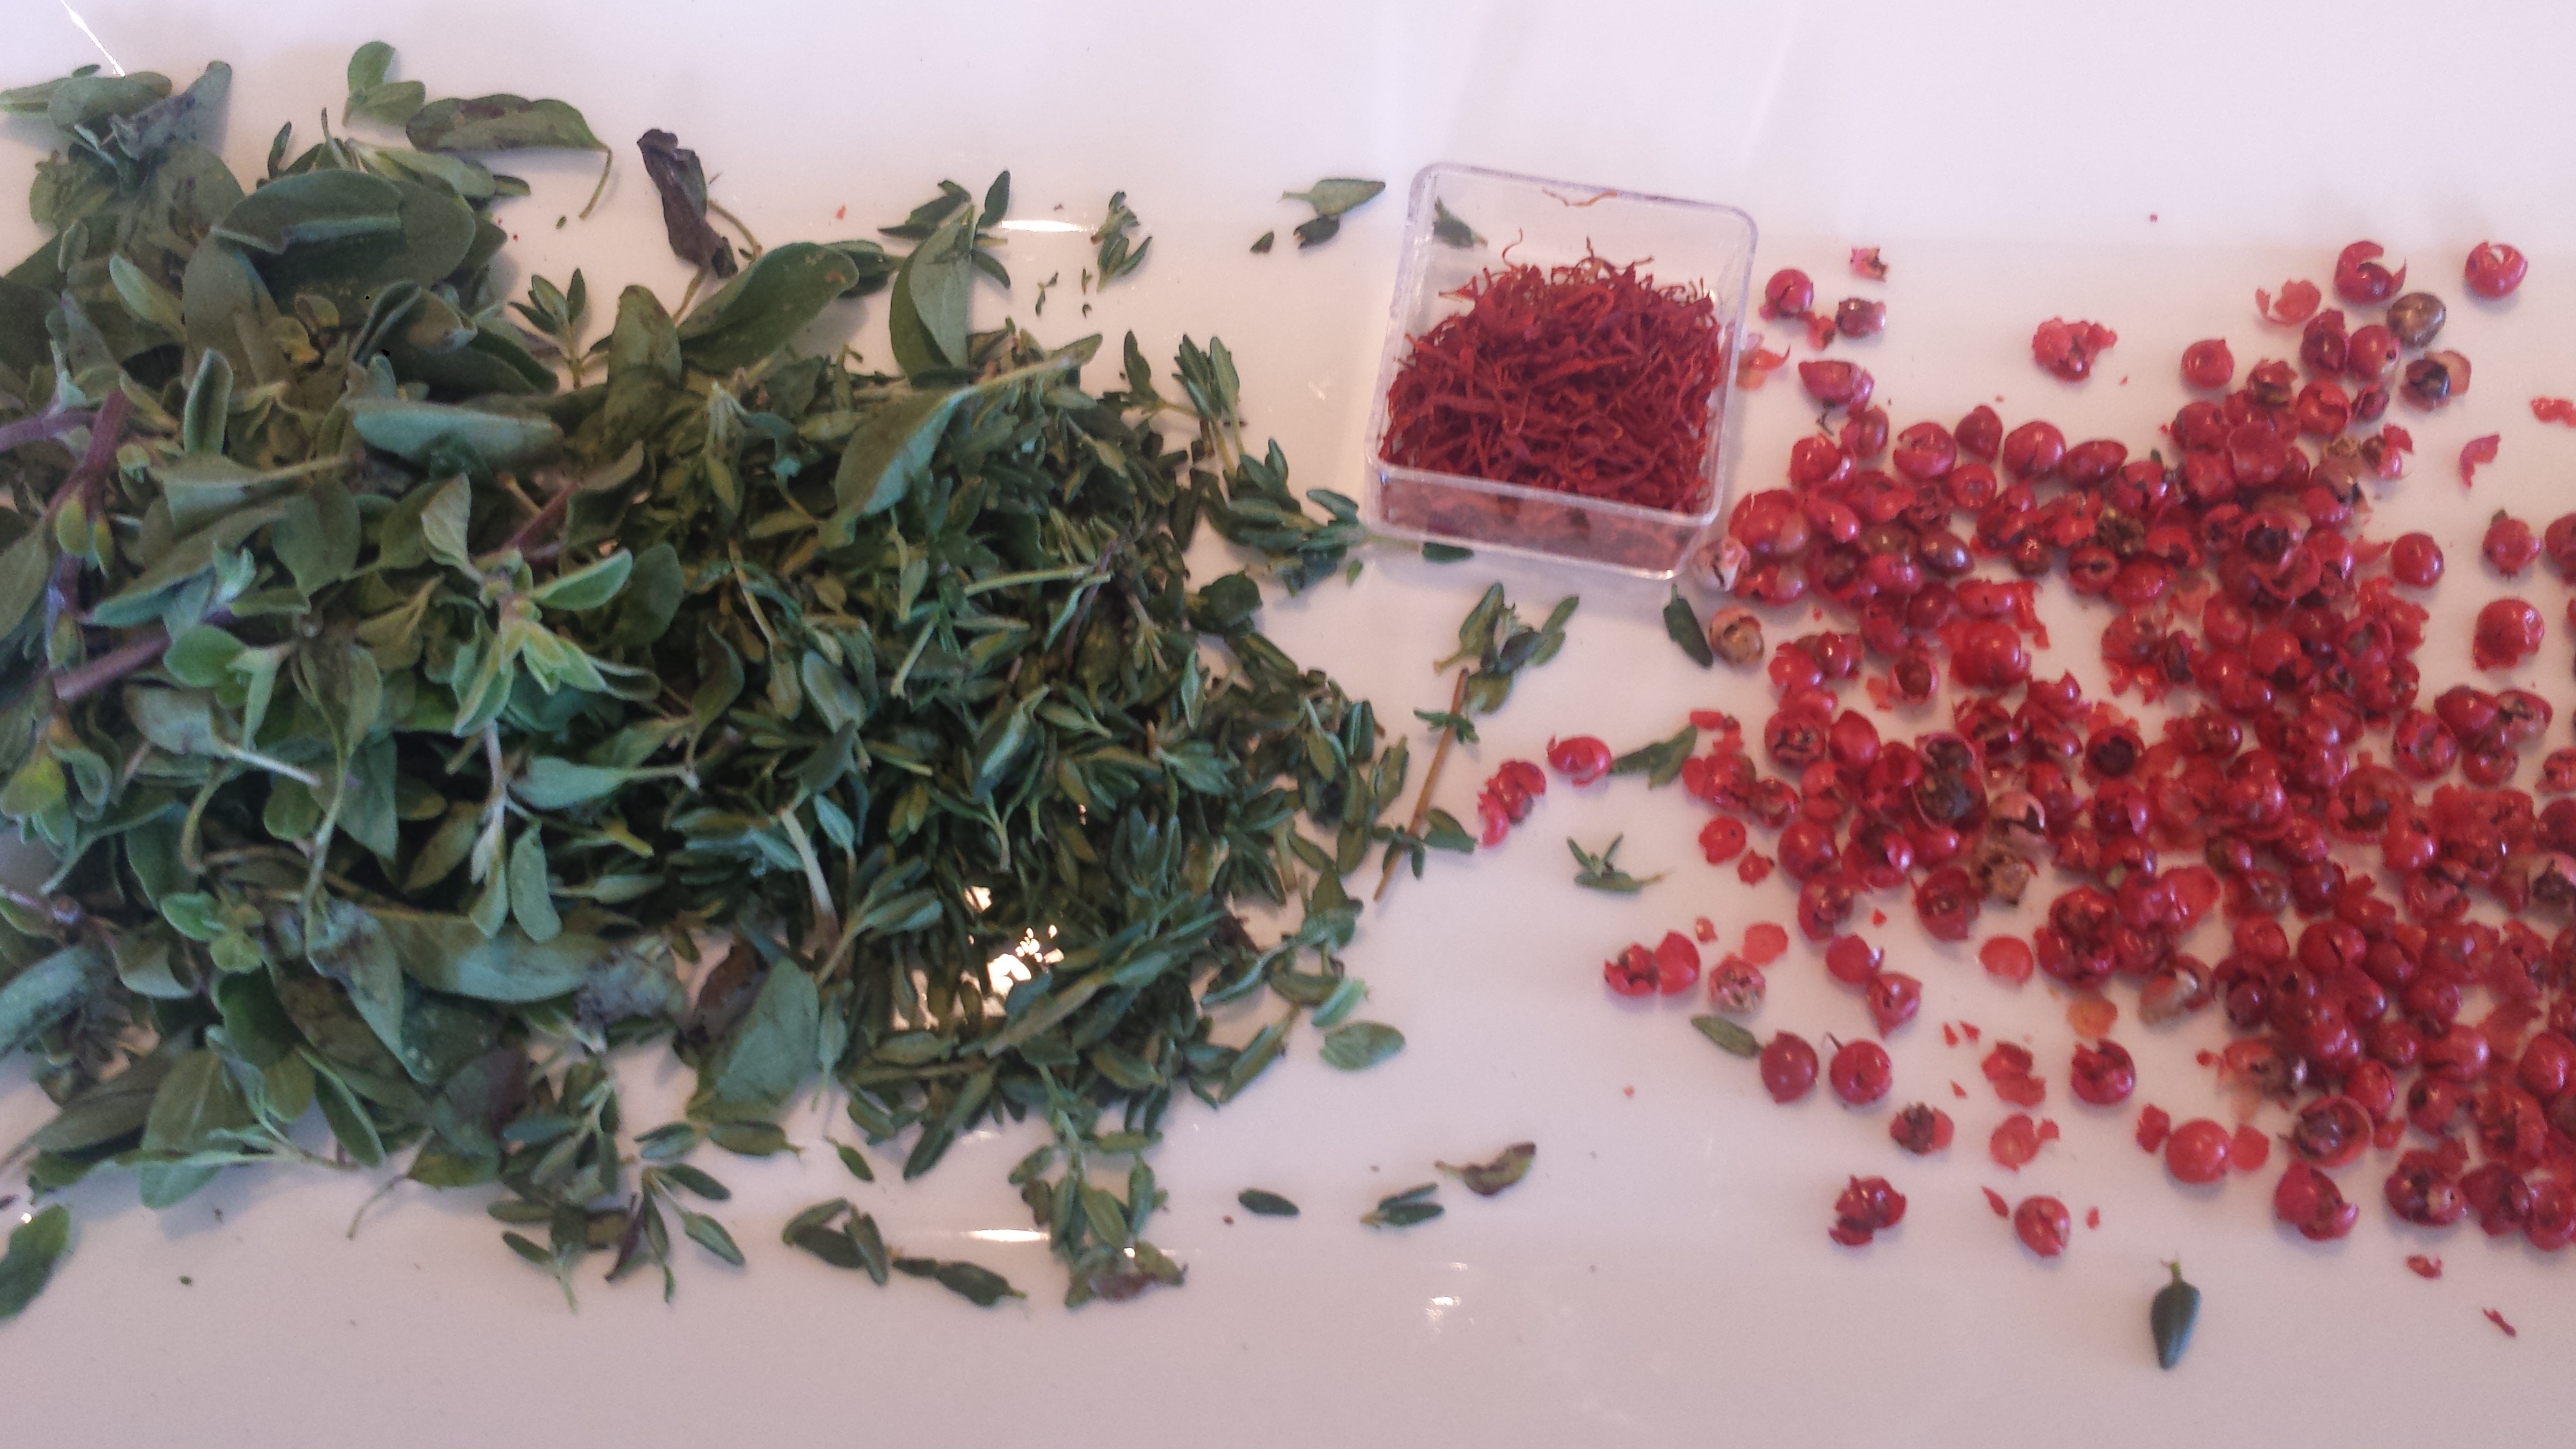
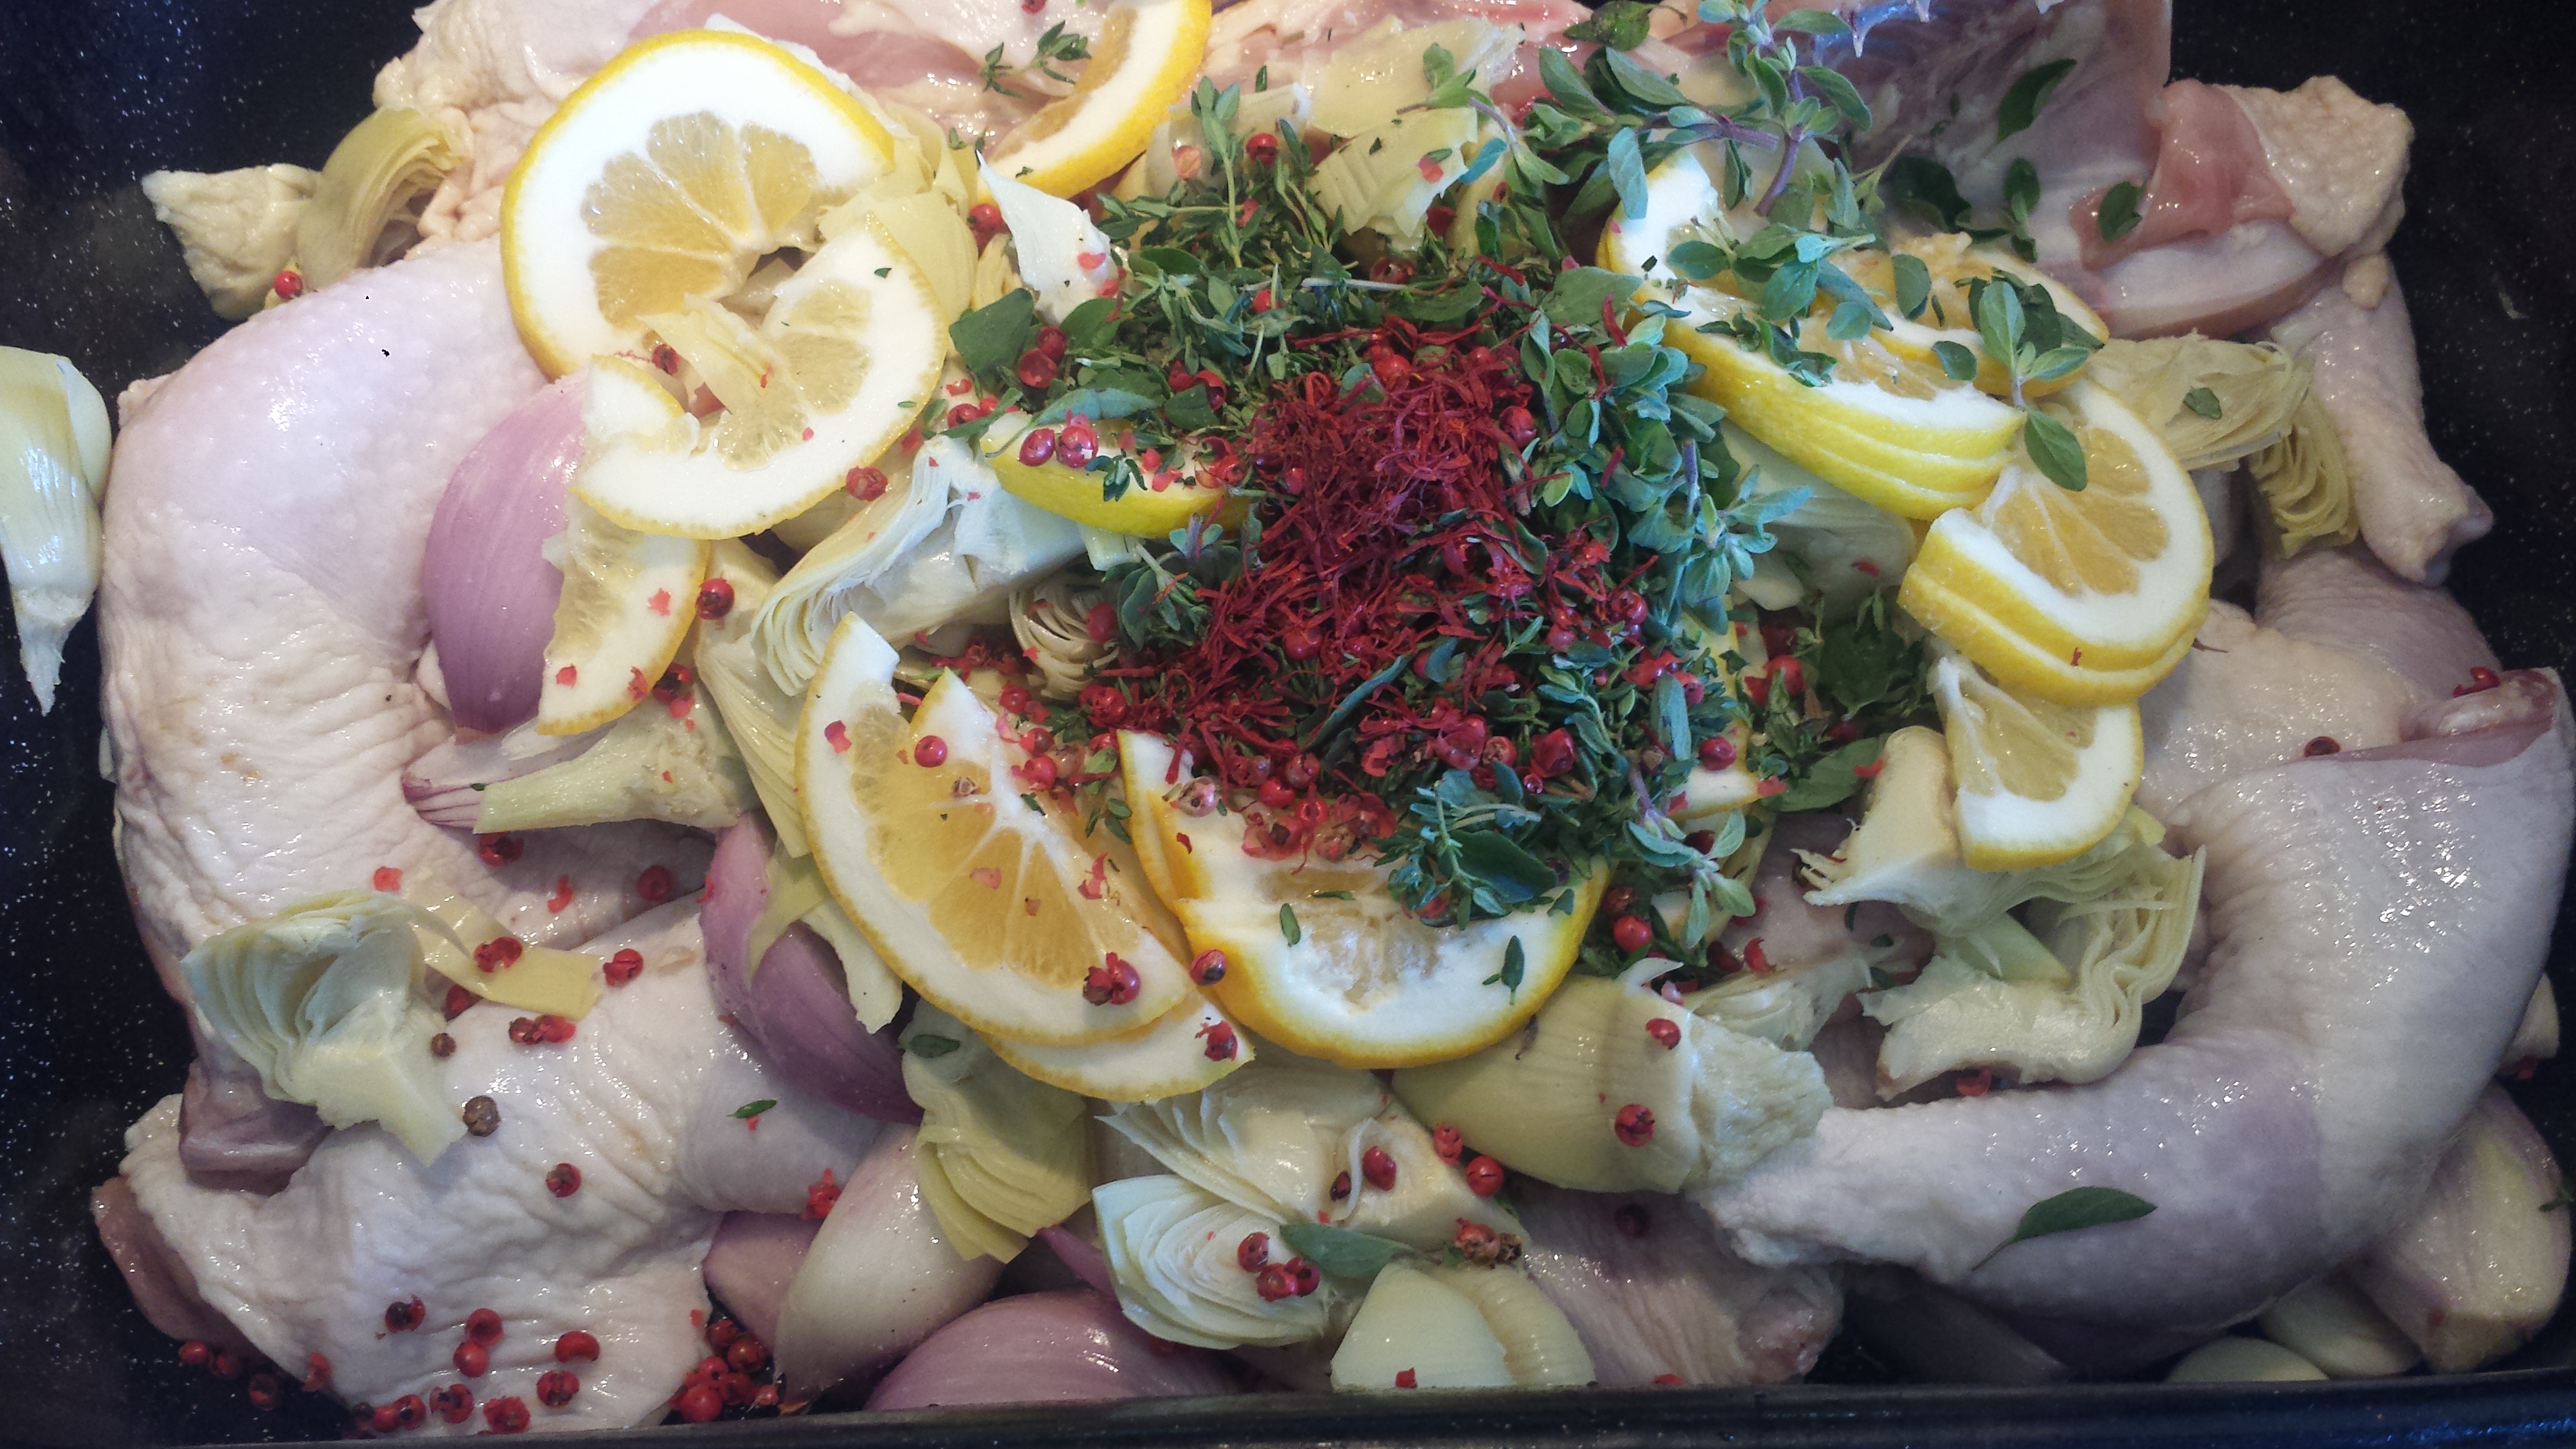
My friend, Stephanie, brought this book back from Israel for my birthday last year and I thought it appropriate to try one of it’s dishes for Passover.  I made their Roasted Chicken with Jerusalem Artichoke and Lemon which was delicious.  The combination of lemon, artichoke,  halved shallots, garlic and sliced lemon combined with saffron and fresh herbs was really flavorful.  I couldn’t find Jerusalem artichoke so substituted canned artichoke quarters packed in water.  I used local, free range chicken, herbs from my garden and lemons from my tree in an effort to make a smaller footprint (and frankly, to support the small local growers because if it’s a profitable to let chickens run around in the sunshine, maybe more will follow suit).

Roasted Chicken12

So now I know why fava beans are so expensive.  I had planted fava beans as a cover crop to introduce nitrogen into the soil for my summer tomatoes, not realizing that you are supposed to pull or plow under cover crops when they are flowering and not let them fruit or they pull all the nitrogen back out of the soil. ( More Info on Cover Crops Thank you Sean for all the cover crop info! )  I had already messed up on the cover crop thing since I had quite a few fava bean pods growing on my plants already, so I decided to let them go a bit longer and enjoy a mini harvest.  It seemed a shame to throw out such beautiful, healthy plants so I procrastinated a bit more.  Then we had dinner at a great local restaurant, Farmshop, which offered a roasted halibut on a bed of spring vegetables with fava leaves.  What?  You can eat the leaves?  I had to order the dish just to see for myself.  The dish was delicious but more importantly I now know what to do with my favas.  Finally I can feel good about pulling out my plants before their time.  So why are fava beans so expensive?  First, a big pile of fava beans in their pods shrinks into a small bowl of edible beans.  Secondly, they require a four step process before they are edible.  First they need to be shelled, then parboiled and put straight into an ice bath and finally their skins have to be removed.  Luckily I had two capable helpers, Veronica and Eric who made quick work of the favas.  How to shell fava beans.

I paired the chicken with a spring vegetable medley which includes fava beans, fava leaves, zucchini, asparagus and baby bella mushrooms all diced to be the same size as your average fava bean.  I was really wishing my Dad was in the kitchen to help out as well.  He is the world’s best sous chef.  He wields the paring knife like a master, cutting everything beautifully into  the perfect same size so everything cooks at the same rate.  Luckily, I learned from the best!.

Jerusalem Chicken aka Roasted Chicken with Jerusalem Artichoke and Lemon

  • Servings: 4-6
  • Difficulty: easy
  • Print


Roasted Chicken8 Roasted Chicken7

  • 1 lbs Artichokes, peeled and cut lengthwise so they are 2/3 thick
  • 3 tbsp lemon juice
  • 4 bone-in chicken breasts
  • 12 shallots, halved lengthwise
  • 12 large garlic cloves, sliced
  • 1 medium lemon, halved and thinly sliced
  • 1 tspn saffron threads
  • 3.5 tbsp of olive oil
  • 2/3 cup of cold water
  • 1.5 tbsp of crushed peppercorns
  • 1/4 fresh thyme
  • 1 cup of tarragon leaves, chopped
  • 1 tsp salt
  • 1/2 tsp ground black pepper

Roasted Chicken11 Roasted Chicken10

  • Combine artichoke, water and half of the lemon juice in a medium saucepan. Bring to boil, and then lower to simmer for 10-20 minutes. If you are using canned or marinated artichokes, this is not necessary.

Roasted Chicken6 Roasted Chicken5

  • Mix all ingredients (except the lemon juice and half of the tarragon) in a bowl. Cover and let marinade overnight, or at least 2 hours.

  • Preheat oven to 475degrees. Arrange chicken with the skin up in the center of the pan. Place the remaining ingredients around them.

  • Roast for 30 minutes uncovered.

  • Roast for additional 15 minutes, covered with foil or top, or until full cooked.

  • Add the reserve tarragon and lemon juice.

Stir, taste and add salt if necessary.

Roasted Chicken2

Fava & Spring Vegetable Saute

2 – 3 dozen fava bean pods
large bunch fava leaves (optional)
1/2  bunch asparagus
1 zucchini
6 large mushrooms
3 cloves garlic, minced
1/4 cup olive oil
1 tsp each  of fresh thyme and oregano
Roasted Chicken4 Roasted Chicken3
 
  • Dice all vegetables (except for fava beans and leaves) and set aside.
  • Heat oil in a heavy pan and sauté garlic and diced vegetables. 


  • Add herbs, fava beans and leaves and stir until leaves are wilted.
  • Salt and pepper to taste.


Wheatless Wednesday – Ginger Shrimp & Sugar Snap Peas

0

Shrimp & Sugar Snap Peas1

“What’s for dinner?”  That is the number one question asked when my boys are home.  The second most asked question?  “Have you seen my shoes/my phone/ my keys?”  It can be hard coming up with interesting and delicious meals, day after day.  I can remember my Mom saying “The cooking part is not hard, it’s coming up with the ideas and having all the ingredients that is so exhausting”.    “I hear you, Mom!”  I battle menu fatigue by keeping a pantry stocked with beans, grains and legumes and I try to have a lot of fresh produce around so I have more options without having to order takeout run out to the store with a long grocery list.  I also try to keep my freezer stocked with flash frozen raw shrimp and scallops that thaw quickly.

I often get dinner inspiration from wonderful produce I find at the farmer’s market, or if I’m lucky, right from my own garden.  Yesterday, my late fall gardening efforts were rewarded with  an abundance of juicy, fat sugar snap peas hanging off their vines.  I harvested a giant bowl of them and started to think about the best way to showcase these emerald gems.  Their color is fabulous so I decided to pair them with colorful bell peppers, mushrooms and shrimp for a very spring-like meal.  The beauty of this dish is that it is very simple, only a few really good ingredients, but delicious and pleasing to the eye.

Shrimp & Sugar Snap Peas2

I never learned to properly stir-fry. I understand the concept of starting with the vegetables that need to cook the longest and ending with those that are fastest cooking.  I just never really mastered the technique of pushing the cooked food up on the sides of the wok.  I’m sure it was operator error but everything always ended up down in the bottom in a big jumble.  I prefer to cook everything separately so I can more easily control the level of cooking, plus each vegetable maintains it’s distinct flavor and character.  I cooked the snow peas and peppers first, then the mushrooms and lastly the shrimp.  Then I threw all the vegetables back in the pot with the shrimp and tossed them together.   I served it over brown rice, but any grain, or even pasta, is a great setting for this dish.  A very simple way to add more flavor to rice, without resorting to heavy sauces,  is to cook it with vegetable broth instead of water and toss in a one inch piece of fresh ginger, peeled but not chopped.  Just remove the ginger before serving.

Shrimp & Sugar Snap Peas3

Ginger Shrimp and Sugar Snap Peas

  • Servings: 4
  • Difficulty: easy
  • Print

1 lb raw extra large shrimp

2 cups fresh sugar snap peas
1 red bell pepper
1 yellow bell pepper
8 crimini or baby bella mushrooms
2 Tbsn grated ginger
3 cloves garlic, minced
3 Tbsn coconut or olive oil
dash Creole Seasoning
Salt and pepper to taste

Shrimp & Sugar Snap Peas5

  • Using a sharp knife, shell and devein shrimp. VIDEO on how to shell and devein shrimp  Wash shrimp and dry with papertowels.
  •  Cut off the stem of the sugar snap peas and remove the string
  • Slice the bell peppers into strips, discarding seeds and pith.
  • Wipe mushrooms clean with a damp papertowel.  Cut off dry end of stem and slice.

Shrimp & Sugar Snap Peas4

  • Heat 1 tbsn of oil in a heavy pan (I love cast iron) on medium heat.  Saute sugar snap peas and peppers (together or separately)for 4 or 5 minutes  with half the garlic and ginger.  Transfer to a large plate or bowl and leave uncovered (so they don’t continue to cook).

Shrimp & Sugar Snap Peas8

  • Add a bit more oil if necessary and sauté the mushrooms with the rest of the ginger and garlic, 2 or 3 minutes or until slightly browned on the edges. Transfer to plate with vegetables.

Shrimp & Sugar Snap Peas7

  • Add a bit more oil if necessary and sauté the shrimp about a minute per side, or until pink and firm.  Sprinkle with creole seasoning or just salt and pepper.
  • Add vegetables back into the pan along with any juice made by the veggies and stir until hot. Add salt and papper to taste.
  • Serve over long grain brown rice, or any grain or pasta

Shrimp & Sugar Snap Peas1


Wheatless Wednesday – Rancho La Puerta Granola

4

Granola6

‘THE RANCH’, as it is affectionately called by those people who are lucky enough to have been there, is one of my favorite places in the world. Rancho La Puerta, basking in the shadow of rugged Mount Kuchumaa in Baja California, is a fitness and wellness oasis, and gorgeous retreat. I went for the first time when I had three little boys at home. It was the first time I had left my kids to go on a trip by myself and my mother and father in law came to help my husband. It was quite liberating to not have to worry about anyone else for a whole week, a rarity for most moms.   I loved everything about The Ranch; getting up at 6am to do the Pilgrim hike before breakfast; going to pilates, yoga, then circuit training before lunch; pool-time, spa treatments and naptime restorative yoga before dinner. Ahh, what a day –every day for a week!

Rancho La Puerta1

What I loved best though is the food, which is ovo-lacto vegetarian, with small amounts of seafood. The wonderful food made me realize that I really like vegetarian food when it’s done this well. Meals are flavorful, healthful and creative. Most of the produce comes from Rancho Tres Estrellas, the 6-acre organic farm on the property which is available to visit.  Foodies take note, a wonderful cooking school rests in the center of the farm, La Cocina Que Canta (“The Kitchen That Sings!”) which also takes advantage of the fresh produce. Classes are available to Ranch guests.

la-cocina-entry

I have been back several times, with friends and by myself. Every day I was there, I did something I had never done before; Crystal Bowls (Sound Healing), Silent Dinner, Tai Chi or even a walk through the labyrinth. It’s a magical place and I can’t wait to go back, for both the experience and the food.  So I thought I would share their most requested recipe, Rancho La Puerta Granola (which I have been wanting to make for the last 10 years or so).  It is lower in fat and sugar than most recipes and truly delicious. Upon arrival at the San Diego airport, we were each given a baggie of granola for the bus ride to The Ranch and with just one mouthful we were all hooked.   As I recall a bag of granola was one of the most coveted prizes at Bingo night, (The Ranch is not known for its rocking nightlife, although Bingo night is legendary).

morninghike5

I stayed true to the recipe with the following exceptions.  I am allergic to canola oil (and no longer think its so great anyway) and substituted coconut oil which I melted in the microwave on low power.  I also used a coconut oil spray to coat the pan. I made this recipe twice since the first time it turned brown too fast as my oven was too hot.  The second time I had the oven at 250 degrees, as recommended, not 350. Note to self:  “Do not attempt to make a recipe for the first time without your reading glasses.  I would recommend using the top rack in the oven as the granola turns from golden to brown pretty quickly even at 250, so start watching at the 60 minute mark.

labyrinth_0

Enjoy your little bit of The Ranch!  Even better, share with friends!  Rancho La Puerta Granola makes great gifts.  One batch makes four cup and a half servings.  Just bag, label and tie with a ribbon. (Check out my Canning and Preserving Page for more info on labels).  Voila!  Hostess gifts solved.

PHOTOS OF RANCHO LA PUERTA REPRINTED WITH PERMISSION FROM RANCHO LA PUERTA Rancho La Puerta Website

Granola5

Rancho La Puerta Granola

  • Servings: 4
  • Difficulty: easy
  • Print

  • Vegetable oil spray
  • 3 cups old-fashioned rolled oats
  • ½ cup chopped almonds
  • ½ cup sunflower seeds
  • ¼ cup whole wheat flour (or a nut flour, like almond flour to make gluten free)
  • ¼ cup oat bran
  • 1 tablespoon ground cinnamon
  • ¾ teaspoon ground ginger
  • ¾ teaspoon ground cardamom
  • ¾ cup honey
  • ½ cup unsweetened unfiltered apple juice
  • 2 tablespoons vanilla extract
  • 2 teaspoons canola oil
  • 2 teaspoons grated orange zest
  • 2 tablespoons fresh orange juice (optional)

Instructions:

1. Preheat oven to 250ºF.
2. Lightly coat a baking sheet with vegetable oil spray. (I love an extra coconut flavor so I used a coconut oil spray).
3. In a large mixing bowl, combine the rolled oats, almonds, seeds, coconut, flour, oat bran, cinnamon, ginger and cardamom.

Granola4Granola3
4. In another bowl, whisk together the honey, apple juice, vanilla and oil until the honey is thoroughly incorporated. Add the orange zest and the orange juice if desired.

Granola2
5. Pour the wet ingredients over the dry ingredients and mix well. Spread the granola evenly over the baking sheet and bake about an hour and a half, checking and stirring every fifteen minutes.  Take care that the outside edges do not burn. When golden and dry, scrape onto a plate or cool baking sheet and set aside to cool.

Granola8

Store in an airtight container until ready to use.
Calories per serving: 25, 1 tablespoon per serving
Granola6

Meatless Monday – White Bean & Kale Dip

0

White Bean and Kale Dip4

Kale is the current ‘It’ food. We have Kale Chips, Kale Smoothies, Sauteed Kale and Kale salads. I guarantee if you show up at a party bearing anything with Kale, you will be heralded as a hip Foodanista.  I don’t want to knock kale, because it really is a nutritional powerhouse definitely worthy of being the star of the latest food fad. It’s not called ‘The Queen of Greens’ for nothing!   “One cup of chopped kale contains 33 calories and 9% of the daily value of calcium, 206% of vitamin A, 134% of vitamin C, and a whopping 684% of vitamin K. It is also a good source of minerals copper, potassium, iron, manganese, and phosphorus. (www.webmd.com)

Combine kale with white beans which are high in minerals, fiber and protein and you’ve got a snack worthy of superman. White Bean and Kale Dip combines some of my favorite flavors, white beans (cannellini), kale, cayenne, cumin, lemon, tahini and pine nuts and has none of the fattening creams or cheeses (which I love but am trying to cut back on).  The creaminess in this dip comes from the white beans, pine nuts and a bit of olive oil, all healthy and nutritious.  More importantly, it is delicious! If you are looking for a yummy but healthy appetizer, then this is for you.  I served it with pita crackers but its also great with carrots and other raw veggies.  You can also spread it on toasted bread and add a sprig of arugula and tomato. Yum!

white Bean and Kale Dip5

There are a surprising number of recipes out there for White Bean and Kale Dip (or perhaps not so surprising given kale’s goddess status).  Variations include walnuts or cashews instead of pine nuts and spinach instead of kale.  I would recommend Lacinato (Dinosaur) Kale, which is sweeter and less tough(chewy) than the curly type, for this recipe since we are using it raw. If you include nuts, I would recommend running them through the food processor or blender to make a fine powder before adding the other ingredients. You could probably also use an almond or cashew butter if you have it  instead.  Otherwise, this dip only takes a few minutes to put together but it needs at least an hour to chill in the refrigerator to firm up. I actually thought it tasted better the next day.  So time to jump on the Kale Bandwagon if you haven’t done so already!

White Bean and Kale Dip

  • Servings: 8
  • Difficulty: easy
  • Print

kale-1

1 can white cannellini beans,- drained and rinsed
1 cup kale, roughly chopped
1/4 cup flat leaf parsley
1/4 cup pine nuts (optional)
2 Tbsp tahini
2 cloves garlic
1/3 cup olive oil
2 Tbsn balsamic vinegar
2 tsp lemon juice (1/2 lemon)
Zest from ½ lemon
1 tsp cumin (optional)
 1/2 tsp black pepper
½ tsp cayenne (or more to taste)
Salt to taste
1/4 cup water, if needed

White Bean and Kale Dip

Directions:

  •  If you’re using nuts, process them into a fine powder in the food processor before adding the other ingredients.
  • Add the rest of the ingredients and blend until smooth. Add water if needed to blend ingredients.
  • Pour into a serving dish and chill in fridge for 1 hour or more.  It will thicken quite a bit and the flavors will meld.
  • Serve with crackers or raw veggies.

White Bean and Kale Dip4


Wheatless Wednesday – Flourless Chocolate Brownie Cookies

3

Flourless Chocolate Brownie Cookie1

Chocolate is one of the world’s favorite foods and GoodMotherDiet  is not immune.  Sometimes we need a break from cauliflower, quinoa and butternut squash.  Can dark chocolate really be part of a healthy diet (and not just wishful thinking)?   There are reputable claims  that dark chocolate is good for your heart (lower blood pressure +),  brain (improved cognitive function), blood sugar (what?), teeth (no way!) and even your cells (antioxidants). Dark chocolate is also high in vitamins and minerals (copper, potassium, magnesium and iron).  For specific nutritional data (or if you don’t believe me that dark chocolate is good for your teeth) click here:  http://www.fitday.com/fitness-articles/nutrition/healthy-eating/6-health-benefits-of-dark-chocolate.html

Sometimes we do know what we need.  So now the question is Cookies or Brownies?  Why choose?  These tasty morsels are a cross between a fudgy brownie and a chewy chocolate chip cookie. Need I say more?  They are also flour free and gluten free (as long as you are using a powdered sugar that doesn’t have flour added for fluffiness – yes they do that so check the label).  Should I go on or do you just want to make them now?

Flourless Chocolate Brownie Cookie

  • Servings: 24
  • Difficulty: easy
  • Print

Flourless Chocolate Brownie Cookie2

3 cups powdered sugar
3/4 cup unsweetened cocoa powder
1 tsp kosher salt
2 large egg whites
1 large egg
4 oz. bittersweet chocolate or 2/3 cup bittersweet chocolate chips
3 Tbsn dark chocolate (70% or higher cacao)
 
Flourless Chocolate Brownie Cookie3
  • Chop chocolate into small pieces.
  • Mix powdered sugar, cocoa powder and salt in a large bowl, then whisk in egg whites and egg.

Flourless Chocolate Brownie Cookie4Flourless Chocolate Brownie Cookie5

  • Fold in chopped chocolate.

Flourless Chocolate Brownie Cookie6

  • Spoon batter by the tablespoonful onto parchment-lined baking sheets, spacing 2″ apart.
  • Bake  at 350 degrees until cookies are puffed, cracked, and set just around the edges, 14-16 minutes.
  • Transfer baking sheets to wire racks and let cookies cool before removing them from parchment.

Flourless Chocolate Brownie Cookie7

Wheatless Wednesday – Spicy Roasted Chickpeas

4

Roasted Garbanzos6

Warning – Highly Addictive! If you like Corn Nuts you’ve got to try these.   I got this recipe idea from my friend, Laura, who makes these snacks for her two teenaged boys, who gobble them up and ask for more without actually knowing what they are eating.  When they would first ask,  Laura’s answer was really vague (sudden attack of coughing) or evasive  (urgent phone call). She finally decided to call them Bean Pops. Clever Mama!  Regardless of the mommy maneuvering, she is getting her boys away from bad fat and preservative laden junk foods to protein and nutrient rich, yet still yummy chickpea snacks, or what I think of as healthy ‘corn nuts’ (if there can be such a thing).  Garbanzo beans are a source of several vitamins including vitamin C, B6 and folate. Many dietary minerals are also available from garbanzo beans, including manganese, phosphorus, copper, iron, magnesium, selenium, zinc and calcium. (www.livestrong.com )

Dieters take note!  ‘Furthermore, there is a recent study in which participants consumed fewer processed foods and less food overall when the diet was supplemented with garbanzo beans.  Research suggests that the fiber benefits of garbanzo beans may go beyond the fiber benefits of other foods’.  For more information on this study click here: http://www.whfoods.com/genpage.php?tname=foodspice&dbid=58

When I was a teenager, my Mom went through a garbanzo (also called chickpeas or ceci beans) phase where they showed repeatedly up in our salads and main dishes – even as flour in bread. (My Mom was way ahead of her time – by 25 years or so). I checked with my sister, Margaret, who also remembers the time when we had garbanzos coming out of our ears.  She admitted though that they are now her favorite bean and she puts them in everything she can, so I guess the apple doesn’t fall far from the tree.   I didn’t appreciate my Mom’s creativity at the time, especially since I wasn’t a garbanzo fan as a kid.  I am a huge fan now though (same apple tree, I guess).  I called my Mom to see what she had to say on the subject and she was about to start some garbanzo sprouts which nutritionally speaking is like garbanzos on steroids (increased vitamin content among a host of other benefits).  So there you go.  At 86, Mom  is still way ahead of everyone else!

Shameless PlugTIP: Spicy Roasted Chickpeas are particularly delicious when paired with a glass of red wine. I’m enjoying  the 2009 Paradisos Red Wine from my brother, Paul’s winery, Paradisos del Sol in Zillah, Washington.  It retails for $28 per bottle but if you mention my blog you will get the $14 family rate.  They deliver to Seattle too!  Check them out at http://www.paradisosdelsol.com/  Cheers!

Spicy Roasted Chickpeas

  • Servings: 3 cups
  • Difficulty: easy
  • Print

2 Tbsn olive oil
1 Tbsn ground cumin
1 tsp garlic powder
½ tsp chili powder
1 tsp salt (or to taste)
¼ tsp cayenne pepper (or more if you like spicy)
2 cans chickpeas/garbanzo beans (or 2 -3 cups cooked dry beans)

  • Preheat oven to 400  degrees
  • Rinse and dry garbanzo beans.  You can either air dry them on paper towels or pat dry with additional papertowels.

Roasted Garbanzos 1

  • Whisk the oil, cumin, garlic powder, chili powder, salt,  and red pepper together in a medium sized bowl.;

Roasted Garbanzos 2


  • Add the chickpeas and toss to coat.


Roasted Garbanzos 3

  •  Spread into a single layer on a baking sheet. Shake the pan back and forth a bit to disperse them evenly.

Roasted Garbanzos 4


  • Roast, stirring occasionally, until nicely browned and slightly crispy, about 40 to 45 minutes or until desired crispness.  They will continue to crisp a bit while cooling on the pan.


Roasted Garbanzos5

  •  Serve warm or cold.

Roasted Garbanzos6

Meatless Monday – Avocado Toast with Coconut ‘Bacon’

4

Avocado Toast 1

BACON – NEED I SAY MORE? I stopped eating meat last June and I must say I don’t really miss it. BACON, however, which really should be it’s own food group, is a different story… There is something about bacon’s crispy, fatty, salty deliciousness that is just so irresistible! I know people who are vegetarians, except for bacon.  I mean, there is a Bacon of the Month Club!   So when I stumbled upon a recipe for Sweet Smokey Coconut Bacon on Pintarest (via www.tohealthblog.wordpress.com ), I realized a stroke of brilliance was before me, bacon without the guilt.

I have been hooked on Avocado Toast for breakfast these past couple of weeks. I’ve been trying to recreate my favorite appetizer, Avocado Bruschetta, from Picco Restaurant in Larkspur, which has chorizo crumbled on top. I have been substituting dry toasted pine nuts and flakes of Maldon Sea Salt which I was pretty happy with -Until I heard about COCONUT BACON! I let my fingers do the walking (thank you google) only to find that there are many, many recipes for coconut bacon on the internet. How did I not know this? Two of my favorite flavors together sounds like a match made in heaven. The recipes call for varying combinations of coconut flakes, maple syrup, smoked paprika, cloves, Braggs Amino Acids, Liquid Smoke or Soy Sauce. For those, unenlightened folks like me, Braggs Amino Acids is a gluten free soy sauce substitute that has beneficial amino acids.  I tried one batch with liquid smoke and one without and I liked it better without, but that is a personal taste. I know a lot of men people love that smoky flavor .  So does it really taste like bacon?  Not really, but it makes a tasty substitute that is  mostly monosaturated fat and Omega-6 fatty acids, which are extremely beneficial for  the body.  For nutritional info on coconut click here:  (http://www.ehow.com/about_5304349_health-benefits-coconut-flakes.html)

Avocados have gotten a bad rap as a high fat, high calorie food when they  are actually quite healthy and are nutrient dense. (Calories that Count).   ‘Nutrient density is a measure of the amount of nutrients a food contains in comparison to the number of calories. One-fifth of a medium avocado (1 oz.) has 50 calories and contributes nearly 20 vitamins and minerals, making it a nutrient-dense food choice.  They are naturally sodium and cholesterol free and contain mono and poly unsaturated fats (good fats).’  For more information on the benefits of amazing avocados click here. (http://www.californiaavocado.com/avocado-nutrients/)

Avocado Toast 2Avocado Toast 3

Avocado Toast with Coconut 'Bacon'

  • Servings: 2
  • Difficulty: easy
  • Print


2 slices good bread (sourdough, ciabatta or whole grain )
1 Tbsn olive oil, coconut oil or butter (optional)
1 half ripe avocado
Salt (I like coarse or flaked sea salt)
2 Tbsn pine nuts (optional)
2 Tbsn coconut ‘bacon’ (recipe below)

  • Brush tops of bread with oil and broil for a few minutes until golden.  Or you can toast in a toaster and then brush with a bit of oil.
  • Dry roast pine nuts in a medium fry pan until golden.  Remove from heat.
  • Pit, peel and half avocado.  Slice.  Place half of slices on each piece of toast. Or you can ‘smash’ it on the toast with a fork.
  • Top with coconut bacon and pine nuts.  Sprinkle with salt.  Enjoy!

Coconut Bacon 5

Coconut ‘Bacon’

1 cup  coconut flakes
1 Tbsn liquid aminos (or soy sauce)
2 tsp liquid smoke (optional)
1 tsp maple syrup
1/2 tsp smoked paprika
4-6 cloves ground (or 1/4 tsp pre-ground cloves)
2 tsp  water
Coconut Bacon 1 Coconut Bacon 2
  • Mix the aminos, syrup, paprika, cloves, liquid smoke and water together in a bowl until well combined.  Gently stir in the coconut flakes, trying to coat them each thoroughly and soak up the liquid.  Let sit for 5 minutes, then stir again gently.

Coconut Bacon 3 Coconut Bacon 4

  • Preheat over to 300°F, then bake for 20 to 25 minutes.  Store them in a plastic bag or container.  Does not need to be refrigerated.

Coconut Bacon 5

Avocado Toast 1

[/recipe]

Wheatless Wednesday – Kusshi Oysters with Jalapeno Mignonette

0

Oysters2
I’m not sure if oysters really make you fall in love, or even lust, but the possibility is certainly a fun concept.  The last two times he’s been to the Farmer’s Market my husband has come home with fresh oysters. Hmmm…  ‘Oysters have always been linked with love. When Aphrodite, the Greek goddess of  love, sprang forth from the sea on an oyster shell and promptly gave birth to  Eros, the word “aphrodisiac” was born. The dashing lover Casanova also used to  start a meal eating 12 dozen oysters.” (www.globalgourmet.com)  Regardless of their effect on our love lives, oysters are at the very least  nutrient rich and low in fat and calories (57 for 6 medium for those counting).  High in protein and low in fat, oysters are an excellent source of vitamins A, B1(thiamin), B2 (riboflavin), B3 (niacin), C and D. Four or five medium size oysters supply your daily allowance of iron, copper, iodine, magnesium, calcium, manganese and phosphorus. Oysters also provide large amounts of zinc;  a mineral which boosts prostate health, so maybe there is a germ of truth to the folklore.  (Nutritional Data from www.hogislandoysters.com)

We bought two kinds of oysters from the Santa Rosa Seafood Company at the Marin Country Mart Farmer’s Market on Saturday.  Kusshi ( meaning precious in Japanese) is a West Coast oyster, grown in Deep Bay, British Columbia.  They are small, sweet and very clean tasting so we decided to serve them raw with a tasty jalapeno mignonette called “Hog Wash” by the Hog Island Oyster Company.  My husband has become quite an expert shucker, armed with an oyster knife and oven mitts to protect his hands from the sharp shells.  I would not suggest trying to shuck your own oysters without the proper tools.  Click here for a video on how to shuck oysters: http://hogislandoysters.com/kitchen/shucking-oysters

Oysters3

The other oysters, local Drake’s Bay, are very large and meaty, more than bite size, so we just popped them on the grill whole. Once you hear them ‘pop’, you can pry the top shell off and top them with barbecue sauce.   We used the rest of the yummy Chipotle Butter (also a  Hog Island recipe) left over from the  last time we made them. Since I have already posted that recipe I won’t repeat it.   To see that original post with complete recipe and directions click here:  https://goodmotherdiet.com/2013/12/21/grilled-oysters-with-garlic-chipotle-butter/

Oysters4

Jalapeno Mignonette

  • Servings: 3/4 cup
  • Difficulty: easy
  • Print

Jalapeno Mignonette (aka Hog Wash)

1/4 cup seasoned rice vinegar
1/4 cup natural rice vinegar
1 large shallot, peeled and roughly chopped
1 large Jalapeno pepper, seeded and roughly chopped
1/2 bunch of cilantro
juice of 1 lime
  • Put all ingredients in a food processor or blender and process until smooth. For a chunkier mignonette, just dice the shallots, jalapeno and cilantro finely and combine ingredients.  This is mildly spicy, so for more spice, include some or all of the jalapeno seeds.

Oysters6Oysters2

Wheatless Wednesday – Mushroom & Barley Soup with Cannelini Beans

1

Mushroom Barley Soup 1

Is Barley the smarter but less popular sister? Back in Medieval times barley was widely consumed and was one of the first grains cultivated by humans. Barley beer was thought to be one of the first alcoholic drinks developed by Neolithic humans. (Yes, that long ago)  Barley later on was used as currency which makes me think it was pretty important back then. (Wikipedia)  Barley is a nutritional powerhouse.  According to the FDA, barley’s soluble fiber reduces the risk of coronary heart disease and can lower cholesterol. Barley also contains insoluble fiber, which reduces the risk of Type 2 diabetes and colon cancer. Barley is virtually fat-free, cholesterol-free and gluten free.  Who knew our ancestors were so smart?

Did you know that barley is the number 4 produced grain in the US (behind wheat, rice and corn)? It is grown in more than half of US states, so why is barley not thought of as a regular rice, potato, wheat option at our dinner table?    Where is it going?  According to the Barley Growers Association  over half of barley goes to feed animals sold for food, 44% is made into malt for beer and whisky, 3% is for seed and just 2% is food for humans.  I guess we are more likely to be drinking our barley than eating it.

I admit that I’m guilty.  I have never made anything with barley.  My son and creative chef, Eric, who knows I have a new-found quest to seek out wheat free options, suggested I make a version of his barley soup (and  I just happened to have a package of Black Barley in my pantry that I didn’t know what to do with). Now that California is finally getting our winter (read seven days in a row of much needed rain) the thought of a big pot of soup bubbling away in my kitchen sounds pretty appealing.  It warms up your house and your heart from the inside out.

Black barley is a whole grain that has been prized for generations in Ethiopia. It has a chewy texture and dark purplish black appearance. It can also take 3 or 4 hours to cook so be forwarned.  Pearl barley, which is the variety typically found in supermarkets, is processed to remove some of the outer bran layer, but unlike with processed rice which has lost most of it’s food value, barley retains significant amounts of fiber and nutrients because the fiber in barley is located throughout the entire kernel and not just in the outer layer. Pearl barley cooks in about 30 to 40 minutes. I have also heard that there is a fast cooking barley but I don’t know where you can get it.  Regardless of which kind you use, follow the cooking instructions on the package and then incorporate it into the recipe.  You can substitute any bean or legume for the cannellini beans which adds a little protein boost. I think Eric often uses lentils which sounds like a good combination.  Feel free to use beer instead of sherry for twice the barley power. Stay warm and dry…
BarleyLarge2

Mushroom and Barley Soup with Cannelini Beans

  • Servings: 4-6
  • Difficulty: easy
  • Print

1 cup barley, black, pearled or quick cooking
1 cup cannellini beans, cooked
1 Tbsn olive oil
1 small or 1/2 large onion, diced
1 garlic clove, minced
1 large carrot, chopped
1 small zucchini, chopped
10 ounces sliced mushrooms, any kind
1/2 tsp dried thyme
1 tsp dried oregano
1 quart vegetable broth
2 tbsp dry sherry
  • Rinse barley to remove any lingering dust or debris and cook according to directions, as different types of barley require varying cooking times.
  • Heat oil in a soup pot or Dutch oven. Cook onion, garlic and carrots on medium heat until softened
  • Add dried herbs, vegetable broth, beans, barley, sherry, zucchini and mushrooms and simmer for about 20 minutes.
  • Salt and pepper to taste.

.

Orange-Kissed Seed Crackers with Red Pepper & Rosemary Spread

8

Seed crackers10

I was saved from a Cambazola guilt trip a few days ago when my dog ate almost an entire wedge on the way home from the store. I can’t really blame her as it fell out of the bag as I turned the corner and landed at her feet. I’m sure she couldn’t believe her luck -like manna from heaven! Of course, I had to find something else to serve our guests, but it meant I didn’t get any either.

seeds1

When it comes to appetizers I am a cheese and crackers girl. I will walk straight by the fancy hors d ‘Oeuvres and head right to the cheese platter, especially if it includes Cambazola or some other soft, aromatic (read stinky) cheese or spread. I may hang out at the veggie platter for a while too but I have been known to make crackers with cheese or dip most, if not all of my dinner. Unfortunately, cheese, while delicious, is pretty fat laden and high calorie (especially if you can’t step away from the table) and crackers don’t usually add much nutrition. Knowing my weakness, I am always looking for a healthier alternative and I think I’ve found one!

While perusing the ‘Vegetarian Everyday’ cookbook by Frankiel and Vindahl, I stumbled upon the Orange-Kissed Seed Crackers. The photo was beautiful and the name, oh so cute. They are gluten free and nut free multi-seed crackers that are really good for you. You can use amaranth, quinoa or almond flour, all of which are highly nutritious and make a good cracker base. Three pages later I spotted the Red Pepper & Rosemary Spread, gorgeous orange-red in color, made from roasted red peppers and sunflower seeds with a bit of spice from cayenne pepper and fresh rosemary. This spread uses no oil and gets it’s creaminess from blending the peppers in a food processor with sunflower seeds. The combination of these two is pretty addictive, although the crackers would be pretty good with Cambazola too. 🙂

seed crackers2

The cracker recipe calls for many seeds that I have never used and I wasn’t sure how easy they would be to find. I didn’t find hemp seeds so substituted poppy seeds but I’m sure other seeds can be substituted as long as the total quantity is the same. Here is the rundown on what each seed has to offer from a nutritional standpoint.  Flax seeds are rich in omega-3 fatty acids, fiber, zinc, iron, calcium, and Vitamin E. Pumpkin seeds, also known as pepitas, are chock full of magnesium, manganese, phosphorus, tryptophan, and iron. They’re also a good source of copper, zinc, and Vitamin K. Sesame seeds are loaded with copper and manganese, and also have plenty of calcium, magnesium, tryptophan, and iron. Sunflower seeds are a tremendous source of Vitamin E and are also rich in Vitamin B1.  Hemp seeds are rich in protein, calcium, fiber, and omega-3 fatty acids. (www.qualityhealth.com).  Throw in quinoa flour and you’ve got a grain free, gluten free, protein and vitamin packed and very savory cracker you can gobble up guilt free.  You may not even have to make dinner…

Seed crackers11

Orange-Kissed Seed Crackers

1/2 cup sunflower seeds
1/2 cup sesame seeds
1/2 cup flax seeds, ground
1/2 cup hemp seeds
scant 1 cup amaranth, quinoa or almond flour
1 1/2 tsp sea salt
1/4 cup olive oil
2 Tbsn freshly squeezed orange juice (optional)
1 Tbsn honey or maple syrup(optional)

  • Preheat oven to 300 degrees
  • Combine all the seeds in a medium bowl.  Scoop out about a quarter of them and reserve for the topping.

Seed crackers3

  • Add flour, salt and olive oil with 1 1/4 cups water and stir to combine.  It should be loose.  Add more water if it seems thick.  It will evaporate during cooking.
  • Line 2 12 x 24 in. baking sheets with parchment paper.  Pour half the batter over the paper onto each pan and use a spatula to spread the batter as thinly as you can.

Seed crackers4Seeds7

  • Bake for 25 minutes.
  • Whisk together the honey and orange juice (if desired) in a small bowl.
  • Remove the baking sheet from the oven and brush the cracker with the glaze and sprinkle with the reserved seeds
  • Cut into 2 inch pieces and bake for 30 minutes more or until they are crunchy.
  • Cool on a wire rack.

NOTE:  I followed the recipe pretty closely but next time I would add a bit more maple syrup or honey to make the seeds stick better.   I will also try another type of flour with a less earthy taste and sprinkle some  coarse or flaked sea salt on top as well.

Seed crackers8

Red Pepper & Rosemary Spread

3 large red  bell peppers, halved and seeded
2/3 cup sunflower seeds
pinch of cayenne pepper
sea salt
juice of 1/2 lemon
2 sprigs of rosemary
 Seed crackers5 Seed crackers6
  • Roast the peppers on a baking sheet and roast for about 40 minutes, or until slightly charred.  Remove from the oven and leave to cool.
  • Meanwhile, toast the sunflower seeds, cayenne and salt in a dry frying pan over medium heat for a few minutes.
  • When the peppers have cooled, peel away the skin and roughly chop.
  • Place all ingredients in a food processor or blender and puree until smooth.  Adjust seasoning if necessary.
  • Will keep in an airtight container for 2 weeks.

NOTE:  You can also roast the peppers on broil or on the grill.  They peel more easily if you put them in a paper bag while they cool.

Meatless Monday-Warm Lentil Salad with Roasted Squash & Shaved Brussels Sprouts

2

lentils1

Is it really still winter?  You would never know it by the sun shining outside on this beautiful morning. (Sorry my East Coast friends…)  I’m still hoping for more than four days of rain before I will admit to Spring. Days are still short though,so there isl a chill to the air by dinnertime calling for hearty dishes to fill the belly.   Winter vegetables like gorgeous butternut squash and Brussels sprouts are abundant and so delicious!  Each one of these dishes is great on its own but combine them with lentils and you’ve got a winner.

I am pretty passionate about lentils.  They come in many colors and sizes and I love them all.  Brown and red lentils are great in soups and stews but my absolute favorite is the French green lentil (Le Puy) which is considered the top dog in the lentil world.  Lentils are actually named for their lens shape (Lens culinaris) and green lentils maintain this shape when cooked which is why they don’t get mushy.   Green lentils are delicious  and can transform a salad or side dish into a protein packed meal.   Lentils have the third highest amount of protein of any legume or nut (after soybeans and hemp) and contain dietary fiber, vitamins and minerals, including iron. For this recipe I added roasted red pepper which gives the lentils a distinctive flavor.  Roasting peppers is very easy but in a pinch you can also buy them in jars already roasted.  They can be roasted in the oven on high heat, on your grill or over an open flame on your stove.  I just put the whole pepper on the lowest rack in my oven while preheating it for the squash and turned it every 5 minutes or so to char on all four sides.  Then let it cool in a paper bag and the skin slips off really easily.  Tossing the lentils in vinaigrette is the final touch and gives you a chance to add fresh herbs and spices.

Butternut squash is another versatile and nutrient rich food.  It can be roasted, mashed, stuffed, pureed and baked into muffins and casseroles.  My favorite way to prepare squash is very simple, drizzled with olive oil and roasted with salt and pepper.  Sometimes I splash a bit of balsamic vinegar over it before cooking to intensify the gorgeous orange color and bring out its natural sweetness.

My husband loves Brussels sprouts and I am always looking for new ways to prepare them. Right now they are in season so its a good time to add them into your diet if you haven’t already.   Brussels sprouts are another food powerhouse, in the cruciferous family like broccoli and kale. They contain sulforaphane which is believed to have anticancer properties and indole-3-carbinol which boosts DNA repair and is thought to block the growth of cancer cells.  Boiling Brussels sprouts somewhat lessens their cancer fighting potency (probably the good stuff gets thrown out with the water) but roasting and sautéing does not.  (Wikipedia)  In this dish, I have paired them with sliced shallots, garlic and toasted pumpkin seeds for a tasty and pretty dish.

Warm Lentil Salad

  • Servings: 6
  • Difficulty: easy
  • Print

1 cup green lentils
2 1/2 cups vegetable broth
1 red bell pepper or  4 oz jar roasted red peppers
2 tablespoons coarsely chopped fresh cilantro
1 shallot, finely diced
1 clove garlic, chopped fine
1/2 teaspoon ground cumin
1 Tbsn red wine vinegar
1 tsp balsamic vinegar
1/2 tsp dry mustard
3 tablespoons extra virgin olive oil
Salt and pepper to taste
2 Tbsn crumbled feta(optional)
Lentils11
  • Roast whole red pepper in a hot oven or over an open flame turning to char all four sides.  Put in a paper bag and let cool.  Remove peel and seeds.  Cut into small dice.

Lentils6Lentils4Lentils3

  • Saute shallot and garlic in 1 tablespoon oil.  Add vegetable broth and lentils and  simmer lentils 15 or 20 minutes, or until just soft but not mushy. Set aside with lid off to stop the cooking process.
  •  To make vinaigrette, combine red wine vinegar, balsamic, 2 tablespoons olive oil,, garlic, mustard and cumin in a medium bowl with a fork or whisk. Season with salt and pepper to taste.
  •  Place the lentils, peppers and cilantro in a medium bowl.
  •  Toss with vinaigrette and top with feta if desired.

Lentils10

Roasted Butternut Squash with Cumin and Balsamic

1 butternut squash
2 Tbsn olive oil
1-2 Tbsn balsamic vinegar
1/2 tsp cumin
salt and pepper to taste
Lentils9
  • Peel and seed squash.  Sometimes this is easier if you cut it in half and then crosswise in  half again. Cut into 1 inch dice.
  • Place in a glass pan and drizzle with olive oil.  Sprinkle with cumin, salt and pepper and a splash of balsamic vinegar.
  • Roast in a 400 degree oven for about 30 minutes, stirring several times, until soft.

Lentils7

Shaved Brussels Sprouts and Shallot Saute

  • Servings: 4
  • Difficulty: easy
  • Print

1 3/4 pounds brussels sprouts
2 tablespoons butter
3 tablespoons olive oil
12 medium shallots, thinly sliced (about 2 cups)
6 garlic cloves, thinly sliced
4 tablespoons pine nuts or pepitas (shelled pumpkin seeds)
2 tablespoons fresh lemon juice
  • Thinly slice brussels sprouts into circles.  Easiest done with a food processor or mandolin. Don’t worry if you end up with some loose pieces.
  • Roast pine nuts or pepitas in a small dry pan for several minutes until they turn golden.  Remove from heat and set aside.
  • Saute shallots in butter and olive oil in large pan over medium heat.  about 3 minutes. Add garlic and cook 1 minute.
  • Increase heat to medium high and add brussels sprouts, sauté until tender, about 8 minutes.
  • Add pine nuts and lemon juice.  Season with salt and pepper to taste.  Serve warm.

Lentils2

Wheatless Wednesday – Bittersweet Chocolate Mousse

7

Chocolate Mousse10

This week it’s all about Valentines Day, which means………………chocolate!

Dark Chocolate is known to make people happy by releasing hormones that create euphoria.  Chocolate can relieve a host of ailments, including depression, fatigue, pain and PMS, as well as rev up your sex drive!  Sounds like something we should be eating every day!  So make this decadent dessert for your sweetie and feel free to indulge knowing its all good…

Bittersweet Chocolate Mousse was the first fancy dessert I ever made.  Back in the 80’s  I signed up for a series of cookbooks from Time-Life, Great Meals in Minutes.  I received a different cookbook every month through the mail, each with a theme and wonderful, quick and easy to follow recipes.  I really enjoyed thumbing through each new book and getting great ideas. (This was before we could google everything). As a new cook, I learned how to put together a complete meal and end up with everything ready at the same time, which is really the biggest challenge in cooking. Looking up the recipe again was a bit of a walk down memory lane.  The page is now adorned with a big circle of chocolate, as if a young cook in a hurry put the Cuisinart lid down on top of the open cookbook. Another page with a favorite pasta recipe is splattered with red wine vinegar, remnants from a meal long past.

Many of the recipes I still use came from these books even though over the years I’ve made them my own.  I rarely go back and follow a recipe twice (unless I’m baking and every drop and crumb makes a difference). The Bittersweet Chocolate Mousse recipe by Helen Witty came from the Great Meals in Minutes, “Pasta Menus” cookbook.  I was a newlywed at the time and figuring out what to cook for my new husband.  I came from a large family where chili and casseroles were king and he grew up with meat and potatoes.  To make it even more of a challenge, he doesn’t like foods with mayo or any kind of cream, so it was hard to find recipes that worked for him that were still yummy to me.  I remember feeling lucky to find a dessert recipe at all that isn’t loaded with heavy cream or cream cheese.  I have made this bittersweet mousse several times since then when I’m looking for a special dessert.  It has a nice creamy texture and wonderful flavor.  It looks very elegant, yet it’s deceptively simple.
Chocolate Mousse1
Although this recipe needs several hours in the refrigerator to chill, you can prepare it in just a few minutes with a food processor or blender. The recipe only makes about 2 1/2 cups (2 large or 4 small servings) so chocolate lovers may want to double the recipe.  When I made this so many years ago, I used regular semi-sweet chocolate chips, because that was what was available,  and it was delicious.   You can use regular chocolate chips but a dark chocolate with at least 60% cacao will make it even more divine, as will using real vanilla and a good quality coffee or espresso.  There are so many high quality chocolates available now, Green & Black’s, Divine, CocoaVie and one that is perfect for Valentine’s Day, Chocolove xoxox that even comes with a love poem inside (to name only a few of the many).  Ghirardelli now makes a 60% Cacao bittersweet chocolate chip that is perfect for baking. I made this mousse twice, once with Ghirardelli 60% chips and then with Green & Black’s Dark 85% bar (3.5oz).  Both batches were pretty good but the Green & Black mousse was slightly less sweet and a little more bittersweet.  My taste testers this time (the Zubers) declared the first better with fruit and the second with a bit of whipped cream.  This recipe goes fast so I would recommend having everything pre-measured and ready at room temperature, especially the eggs which are more elastic and create more volume at room temperature.

This mousse would be delicious in a regular dessert dish, but the proper presentation will elevate it to something special.  You can make an exquisite dinner  but slop it on the table and it won’t get the credit it deserves, or conversely, you can beautifully arrange a few random things you have in your kitchen into a pretty nice looking tray for an impromptu gathering and people will think you’re an amazing hostess.  For this romantic and sentimental holiday, I have prepared my husband’s dessert in one of the wedding goblets in which I served the original mousse and mine in one of the beautiful crystal and gold dessert cups that I recently received from my mother in law.  These beautiful crystal dishes belonged to my husband’s grandmother, Nana Rosella and  I thought it perfect, in a time of love to remember  “Big Nana” as she was called among our family, even though she was  4’10” on a good day, because she was very generous and loving and we keep her in our hearts. As we all know, Valentine’s Day is a holiday of hearts.

Bittersweet Chocolate Mousse

  • Servings: 4 small
  • Difficulty: easy
  • Print

Chocolate Mousse9

Bittersweet Chocolate Mousse

 2 Tbsn sugar
1 1/2 Tbsn unsweetened baking cocoa
2 tsp powdered instant coffee or espresso
3/4 cup semisweet chocolate pieces or dark chocolate bar, chopped
1/2 cup boiling water
1/2 tsp pure vanilla extract
2 eggs
strawberries or raspberries for garnish
pirouette cookies (optional)
Chocolate Mousse3
  • Pre-measure everything and have sitting out at room temperature, including the eggs.  Get a couple of cups of water boiling

Chocolate Mousse4

  • In this order, place sugar, cocoa, coffee powder and chocolate pieces in blender or food processor.  Flick motor on and off until ingredients are completely powdered.

Chocolate Mousse5

  • Turn motor on, then pour boiling water through opening in cover and process until it shows no solid bits

Chocolate Mousse6

  • Turn on motor again and add vanilla and eggs.  Process about 15 seconds.

Choclate Mousse7

  • Pour mousse mixture into 4 individual glass dessert cups.  Cool, then chill about 3 hours or until firm.

Chocolate Mousse7 Chocolate Mousse8

  • To prepare strawberries, wash and dry keeping the stem intact.  Turn it on it’s stem and make three slices, vertically, not cutting all the way through the stem.  Gently spread into a ‘flower’ shape.
  • To serve, garnish with berries and a pirouette cookie, if desired.

  valentine_heart_1-929px

Happy Valentine’s Day!


Wheatless Wednesday – Fish in Parchment

0

Fish in Parchment13

Do you ever have days where dinner seems impossible?  One kid has basketball practice and another is at play rehearsal, both done at different times. Your spouse is working late and you just walked in the door.  Sometimes the concept of a healthy family dinner is just that, a concept.  Before you pick up the phone to order Chinese takeout (again) check out my very easy fish in parchment which can be assembled in minutes or pre-assembled and cooked whenever you are ready. This has been a go-to dinner for me over the years because it is just so convenient and I can easily cater to each family members’ personal tastes. I pre-assemble each piece of fish in a square of parchment or aluminum foil and write each person’s name with a sharpie and throw them into the oven as needed.  By far the fastest side is couscous (a huge hit with my kids) which only takes 5 minutes, but since this is Wheatless Wednesday, I will be serving my fish over brown Jasmine rice. Most grains can be cooked ahead of time and will sit and wait until you’re ready and they make a perfect pairing with fish in parchment as the delicious juices add a boost of flavor to what is normally a fairly bland side dish.  The best part of this meal though is the presentation.  I love a ‘pretty plate’ and this is certainly nice enough to impress your dinner guests, plus you can prepare everything ahead of time and clean up is easy.

When they were little boys, my kids’  tastes were very finicky, so I was limited to what vegetables or seasonings I could include. Dylan was a purist, butter and salt only. Jackson liked thinly sliced zucchini circles on his and Eric was more adventurous with red peppers.  As they got older their palate grew right along with them, and I started adding jalapenos, sliced red onions, mushrooms, capers, tomatoes, olives, cooked eggplant, pretty much anything I had available.  The trick is to know your customer and prepare with them in mind.  Parents with picky eaters, take heart.  My boys, who at one time couldn’t have any food touching on their plate, have moved on to gourmet and exotic foods like seared ahi, sushi and escargot.

A light fish like red snapper, tilapia or sea bass are very mild and suit themselves to cooking in parchment.  Cooking in parchment is really steaming the fish in its own juices which is a healthy and tasty way to cook.  The juices also pick up the flavors of any vegetables and seasonings you include and create a delicious ‘broth’.  You can use parchment or aluminum foil but foil cooks a bit hotter, so fish might get done more quickly, and some ingredients will react with it, especially lemon juice and wine.

Fish in Parchment

  • Servings: 4
  • Difficulty: easy
  • Print

Fish in Parchment1

4 – 6 oz pieces of fish (red snapper, tilapia or sea bass)
4 Tbsn butter or coconut oil
4 12″ squares parchment or aluminum foil
1 red pepper, thinly sliced
several cloves garlic, chopped
1 small zucchini, thinly sliced
1 – 2 jalapeno peppers, chopped
1 Tbsn capers
1/2 tsp ground oregano
 
  • Preheat oven to 400 degrees.
  • In a small saucepan, dry saute the red peppers with oregano for a few  minutes.  Remove from heat and let cool. (Optional)

Fish in Parchment2Fish in Parchment3

  • Wash and dry fish.  Place each piece of fish in the center of a square of parchment.
  • Dot each piece with butter and sprinkle with a dash of salt.
  • Add jalapenos, garlic and capers.

Fish in Parchment5 Fish in Parchment6

  • Top with onion, zucchini and redpeppers
  • Fold parchment in half the length way of the fish and fold to seal the edges together.  Crimp the sides carefully to keep liquids and steam inside.

Fish in Parchment7 Fish in Parchment8

  • Label your parcels with a sharpie and place on a cookie sheet
  • Bake or broil for 12 to 17 minutes, depending on the thickness of the fish and how many vegetables you include.

Fish in Parchment9 Fish in Parchment10

  • To serve, spread jasmine rice in a circle on the plate.  Place fish parcel in the center and open carefully (It will be steamy).  Rip the parcel in half, lengthwise and slide fish onto the rice.  Be creative and enjoy!

Fish in Parchment11 Fish in Parchment12

Buffalo Wings Two Ways

0

Buffalo Wings 14

SUPERBOWL XLVIII. Looking for the perfect SUPERBOWL SUNDAY appetizer for game day? Look no further. I am posting my Buffalo Chicken Wing recipe by request, which is pretty basic but oh so good! They never make it past the first half.  While I was at it I decided to throw in a vegetarian Buffalo “Wing” recipe for our vegetarian friends or our friends who are counting their calories, although these are pretty yummy, but that could have something to do with the buffalo sauce and blue cheese dressing. You may find yourself guarding the platter to save some for yourself. The “Wings” are really cauliflower dipped in batter then baked on high heat. They are a fun alternative to regular buffalo wings but without the extra fat and calories (or bones). After all it is cauliflower which is loaded with nutrients and naturally low in fat. ‘ Cauliflower heads also contain numerous health benefiting phtyo-nutrients that help prevent prostate, ovarian and cervical cancers’. (Nutrition-and-You.com). Okay, I have to admit that my house is divided for this superbowl game. Now that the Niners are out, I have to root for my home state, and the Seahawks, but my husband is nursing a grudge and going for the Broncos. It’s always fun to be on opposing sides! Even if you’re not a SEAHAWKS or a BRONCOS fan (or a football fan at all) you can check out the adorable Puppy Bowl on the Animal Planet channel, or at the very least, there are always the commercials…

SHOPPING TIPS:  I don’t eat chicken very often but when I do I try to find organic, farm raised chicken. It is a bit more expensive but you are getting less of the bad stuff, like preservatives and additives and more of the healthy nutrients found in animals fed real food. Plus I don’t like to promote the factory farms. I would rather support the Mom and Pop farms whenever possible.  Wouldn’t it be nice if chickens running around outside pecking at bugs on the ground was the norm and not the other way around?  I  found organic free range chicken wings at Whole Foods, although, they weren’t at the counter. I had to ask for them.  Blue Cheese dressing is traditionally served with buffalo wings and I have provided a recipe for homemade, however, there are some good commercial brands available, like Bob’s and Litehouse.  A shortcut is to buy a commercial dressing (the refrigerated dressings are usually best) and add some fresh, crumbled blue cheese.  My favorite wing sauce is Frank’s Buffalo Wing Sauce but you can also make your own by combining hot pepper sauce and melted butter. (Several recipes say not to use Tabasco, not sure why, just passing it along)  The cauliflower recipe can easily be made vegan.  Just replace the melted  butter with vegan margarine.

Buffalo Chicken Wings

  • Servings: 6-8
  • Difficulty: easy
  • Print

2-3 lbs of chicken wings
Cooking spray for pan
1/2 tsp cayenne pepper
1/2 tsp chili powder
1/2 tsp garlic powder
1/2 tsp onion powder
1 cup Buffalo sauce or 2/3 cup hot pepper sauce mixed with 1/3 cup melted butter
  • Wash and dry chicken wings. (Whole wings have to be cut apart at the joint, tips removed. “Party wings”, if you can find them, are already cut for you).
  • Lightly spray bottom of pan to prevent sticking.
  • Mix dry spices together in a small bowl.
  • Place chicken pieces in bottom of pan a single layer.  Sprinkle with half of dry spices.

Buffalo Wings 1

  • Broil for 8 or 10 minutes or until golden brown.  Turn them over and sprinkle with remaining spices.  Cook another 8 or 10 minutes.

Buffalo Wings 2Buffalo Wings 3

  • Brush wings with buffalo sauce and cook another 5 minutes.  Turn and repeat on the other side. (If too many drippings have accumulated in the bottom of the pan, you can remove some of it with a turkey baster before you turn them, so you don’t lose your sauce into the drippings)
  • Serve with blue cheese dressing and celery sticks

Buffalo Wings 10

Buffalo Cauliflower Wings

  • Servings: 6-8
  • Difficulty: easy
  • Print

1 cup water
1 cup flour (any kind will work)
1 tsp. garlic powder
1/4 tsp cayenne pepper
1/4 tsp chili powder
1/4 tsp salt
1 head of cauliflower, cored and cut into florets
1 cup buffalo sauce or 2/3 cup hot sauce mixed with 1/3 cup melted butter)
Buffalo Wings 5 Buffalo Wings 6
  • Preheat the oven to 450°F.
  • Spray a baking dish with non-stick oil.
  •  Combine the water, flour, and  spices in a large bowl and stir  to make a paste. I used coconut flour which is very absorbent so had to add more water.
  • Add the cauliflower pieces and stir to coat.  Place in a shallow  baking dish in a single layer. Bake for 18 minutes.

Buffalo Wings 9Buffalo Wings 12

  • Brush the buffalo sauce on the baked cauliflower and continue baking  for a few more minutes. Turn and repeat.

Blue Cheese Dressing

  • Servings: about 2 cups
  • Difficulty: easy
  • Print

3/4 cup sour cream
1 1/3 cups  mayonnaise
4  ounces blue cheese, crumbled
1/2 teaspoon dry mustard
 1  teaspoon Worcestershire sauce
 1/3 teaspoon garlic powder
1/2 teaspoon  salt
1/2 teaspoon  ground black pepper
  • Whisk all ingredients together in a medium sized bowl. For a smoother dressing, mix in a blender or food processor. Cover and refrigerate.  Best if made the night before.

Buffalo Wings 13

Wheatless Wednesday – Oat Nut Bars

11

Oat Nut Bars

WARNING – HIGHLY ADDICTIVE!  I am often looking around the kitchen for something quick to eat with my morning coffee without making a whole production.  Most  convenience foods are not very good for you, even if the packaging tells you otherwise.  So when I saw this recipe in Bon Appetite (January, 2014) I thought it could be just the thing.  Boy was I right (or wrong)!  These are so delicious that its hard to eat just one.  Luckily, they are loaded with nutrition.  They are made with 100% whole grains, seeds and nuts which means the bran and the germ are left intact which is where most of the nutrients are. I used whole almonds, sesame seeds and added coconut flakes, since I love all things coconut, and really like the result.  I would also recommend having coconut oil in your pantry as one of the ‘good’ oils with many health benefits.  The maple syrup, even though it’s natural, is mostly sugar, but unlike white sugar it is also a very good source of zinc and Manganese and the dates add multiple vitamins and minerals.

When I first tasted them, I thought chewy was the way to go, until I re-baked half of the slices and tried them crunchy.  Wow, they got even better!!  My taste testers also preferred the crunchy over the chewy by a slight margin.  I can easily see these oat nut bars becoming an easy breakfast go-to as well as a great energy boost to get through the afternoon slump.  Try them toasted and topped with yogurt or cream cheese or my favorite way, just on their own.

Oat Nut Bars

  • Servings: 16-18 bars
  • Difficulty: easy
  • Print

Oat Nut Bars 9

Oat Nut Bars with Coconut

Nonstick vegetable cooking spray

6 large Medjool dates, pitted and finely chopped

1 cup pure maple syrup

2 Tbsp unsalted butter or coconut oil

2 cups old-fashioned oats

1/2 cup raw almonds, hazelnuts, pecans, walnuts or cashews

1/2 cup shelled pumpkin seeds (pepitas)

2 Tbsp amaranth or sesame seeds

1 cup unsweetened coconut flakes (optional)

1/2 tsp kosher salt

  • Preheat oven to 350 degrees.  Lightly coat an 8 1/2×4″ loaf pan with nonstick spray and line with parchment paper, leaving an overhang on long sides. Spray parchment.

Oat Nut Bars 10Oat Nut Bars 7

  • Bring dates and maple syrup to a boil in a small saucepan, reduce heat to medium-high, stirring often, until dates are very soft and maple syrup is slightly reduced, 8-10 minutes.  Remove from heat and stir in butter/coconut oil until it is melted.  You can mash the dates with a fork or blender if desired.

Oat Nut Bars 6Oat Nut Bars 5

  • Toss all other ingredients in a large bowl.  Pour date mixture over the top and mix until evenly coated.  Scrape half of the mixture into prepared pan and press very firmly and evenly with a wooden spoon or spatula to compress it as much as possible (Important)
  • Add remaining oat mixture and press until very tightly packed into pan.
  • Oat Nut Bars 2 Bake until loaf is darkened in color and firm around the edges, and center gives just slightly when pressed, 45-50 minutes. Tent with foil if browning too quickly.

Oat Nut Bars 3

  • Transfer pan to a wire rack and let cool in pan before turning out (it can even sit overnight).  Cut into 1/2’thick slices with a serrated knife.

Oat Nut Bars 11

  • For crisp bars, lay slices on a baking sheet and bake at 350 degrees until golden brown 8-10 minutes (turning once), or toast in a toaster oven.
  • Makes about 16 bars.  Bars should keep five days, tightly wrapped at room temperature (if they last that long!)