Wheatless Wednesday – Scallop Ceviche with Avocado and Tomatillo

2

Scallop Ceviche2

Summer officially begins on Saturday and you know what that means- long lazy days spent at the lake, cool, refreshing drinks by the pool and the return of brilliant pink and red sunsets!  It also means salads or cool foods that don’t heat up your body or your kitchen.  Ceviche is popular in South and Central America where temperatures are warm most of the year.  For the uninitiated, Ceviche is a delicious taste sensation.  Various fish or shellfish is marinated in a citrus-based mixture, usually lemons and limes. In addition to adding flavor, the citric acid causes the proteins in the seafood to become denatured, which is what makes it firm and gives it the taste and feel of being cooked.  Recipes for ceviche vary among countries but adding onions and chili peppers or other herbs and vegetables is fairly common.

My ceviche was inspired by the ingredients I had on hand (tomatillo, serrano peppers, red onion, cilantro and the first tomatoes from my garden), which give it a more Mexican flavor.  I had never used tomatillos before and bought them on a whim the other day. Tomatillo, (in Spanish “green or little tomato”) is not really a tomato but a part of the nightshade family.   If you don’t have access to tomatillos, then you can omit them from the recipe or put some of those ‘not quite ripe tomatoes’ to work for you for a similar flavor.

The ceviche needs at least 3 hours or over night to “cook” but can be assembled in less than 10 minutes.  The flavors combine for a tasty, slightly spicy and refreshing dish that is loaded with vitamins and minerals plus healthy fats.  This is perfect for when you don’t want to turn on your oven.  It makes a great appetizer served in small glasses with chips or crackers or as a main or side dish.


Scallop Ceviche4

Scallop Ceviche with Avocado and Tomatilla

  • Servings: 4
  • Difficulty: easy
  • Print

Scallop Ceviche1

2 lbs bay scallops
4-5 cloves garlic, minced
1 tsp salt
1/2 cup fresh cilantro, finely diced
2-3 Serrano peppers(or other hot pepper), seeded and diced
6 limes, 2 lemons freshly squeezed (should be enough to cover scallops)
1/2 red onion, finely diced
3-4 tomatillas
2-3 ripe tomatoes, diced
2 avocados, peeled, seeded and diced

Scallop Ceviche5

  • Rinse scallops and pat dry.  Place them in a ziplock bag or container with a lid.
  • Add garlic, lime and salt.
  • Dice peppers, onion and cilantro and add to scallops.
  • Remove papery skin from tomatillas and rinse to remove the sticky residue. Dice and add to the scallop mixture.
  • Gently comgine.  The scallops should be covered by lime juice.  Add a bit more if necessary.  Refrigerate at least 2 or 3 hours or overnight while the scallops “cook”.
  • Before serving pour off excess liquid, leaving a bit to keep it moist.  Add tomatoes and avocados and gently combine.

Scallop Ceviche6

  • Serve with crackers or tortilla chips (my fave)..

Scallop Ceviche3


Meatless Monday – Roasted Tofu with Miso Glaze and Black Barley, Fennel & Radish Salad

2

Tofu and Barley9

Game of Thrones Season Finale meets Father’s Day meets GoodMotherDiet!  So the long anticipated Game of Thrones Season Finale happened to fall on Father’s Day (No spoilers for those that haven’t seen it yet, except to say that the show did have an interesting Father’s Day theme). In order to honor both of these important events, we decided to create a feast that was Father’s Day worthy as well as authentic to GoT. We were even lucky enough to have “Daenerys, The Mother of Dragons” show up for dinner.

Tofu and Barley3

For inspiration I went, of course, to the Game of Thrones Food Blog (Yes, there really is such a thing!)  to find many dishes shown, discussed or inspired by the show or books.  As you might expect, much of the food is heavy with meat and not on the Goodmotherdiet,  so my son, Eric, is cooking a more authentic GoT menu including miniature pork pies and leg of lamb.  For the non meat eaters, I thought to attempt a Game of Thrones imagined meal, or rather what would they do with tofu if they had it.

Tofu and Barley1

I marinated extra firm  tofu in a thick and flavorful sauce overnight and then broiled it on high heat.  I paired it with black barley which was widely consumed in Medieval times, (more on that if you’re interested in the history of medieval barley in my Mushroom Barley Soup Blog Post). We know that GoT is not really set in Medieval times, nor is it even set on this planet or in any time but it seems most similar to Medieval times than any other. In preparing the barley, I tried a recipe for Black Barley, Fennel and Radish Salad from Bon Appetite.  This is a large and hearty salad. Next time I make it I will half the amount of barley (1 cup).  Black Barley is a substantial grain, chewy and flavorful but pearl barley, which is lighter and softer, can be substituted.

Tofu and Barley4

Roasted Tofu with Miso Glaze

  • Servings: 6
  • Difficulty: easy
  • Print

2 containers extra firm, organic tofu
1/4 cup Miso paste
1/4 cup Mirin (or Rice Wine Vinegar with a bit of sugar or honey added)
1/8 cup soy sauce (wheat free if necessary)
1/8 cup water (if needed to mix the paste in)
1/2 tsp salt
1/2 tsp sugar
1 Tbsn fresh ginger
1/8 tsp chili powder
1/8 tsp red pepper flakes (or more to taste)
Tofu and Barley8
  • Drain tofu and slice lengthwise into 1 inch rectangles.  Cover with papertowels and place a heavy object on top to help press out the liquid. Let drain 10 minutes or so.
  • Put tofu in a zip lock bag or container with a lid.

Tofu and Barley6

  • Combine all other ingredients and pour over tofu, making sure to coat all sides of every piece.  Refrigerate several hours or overnight.

Tofu and Barley2

  • Place marinated tofu  in a single layer on an oiled baking sheet and broil 5 – 10 minutes, or until browned.  Turn and broil the other side
  • Serve hot or room temperature


Black Barley, Fennel and Radish Salad

  • Servings: 8
  • Difficulty: easy
  • Print

Tofu and Barley4

2 cups black or pearl barley, rinsed
Kosher salt
1 large  or several small fennel bulbs (about 10 ounces), 2 tablespoons fronds set aside, bulb cut lengthwise into 1/4-inch slices
2 tablespoons plus 1/2 cup olive oil
Freshly ground black pepper
1/3 cup fresh orange juice
1/4 cup fresh lime juice
1 small shallot, minced
2 tablespoons chopped fresh dill plus 1/2 cup dills prigs, divided
1 teaspoon finely grated orange zes4 large radishes, thinly sliced, divided
1/4 cup oil-cured olives, pitted, halved lengthwise(optional)
  • Place barley in a medium pot and add water to cover by 1 1/2 inches. Season with salt. Bring to a boil; reduce heat and simmer uncovered until barley is tender and water is absorbed. Depending on the type of barley and your taste preferences, this can take anywhere from 45 minutes to a couple of hours.  Add water if necessary. Spread out barley on a large rimmed baking sheet; let cool.
  • While barley is cooking, toss fennel slices and 2 Tbsp. oil in a medium bowl to coat. Season with salt and pepper. Spread fennel slices out in a single layer on another rimmed baking sheet. Roast until fennel is crisp-tender and beginning to brown in spots, about 18 minutes. Let fennel cool on baking sheet.
  • Whisk orange juice, lime juice, shallot, 2 Tbsp. dill, and zest in a medium bowl. Gradually whisk in remaining 1/2 cup oil; season orange vinaigrette with salt and pepper.
  • Transfer barley to a large bowl; add roasted fennel, along with any accumulated juices on baking sheet. Add half of radishes, olives, and 1/4 cup dill sprigs. Drizzle 1/2 cup orange vinaigrette over and toss to coat; season with salt and pepper. Arrange salad on a large platter.
  • Scatter remaining radishes, reserved fennel fronds, and remaining 1/4 cup dill sprigs over salad. Pass remaining orange vinaigrette alongside for drizzling over.

TIPS:  You can halve the amount of barley for a lighter, smaller dish with more veggies and flavor.  You can also substitute pearl barley if you can’t find black barley or you prefer a softer dish.  If you don’t have dill, the fennel fronds make a good substitute.  Enjoy!


Wheatless Wednesday – Shrimp Lettuce Wraps with Coconut Rice & Bok Choy

0


Shrimp Lettuce Wraps11

They’re Back! ( in sing song voice) With graduations and summer approaching, we have gone from being empty nesters to having a full house again. One of the biggest adjustments this time has been for the ‘kids’ because of my meatless diet.  They are more likely to cater to my diet now, which is a complete switch from when I used to plan meals around them. Back in the day I had to make many allowances for my picky eaters.    Even when my boys were young and ate only five or six things in the world, there was always the odd food, like flying fish roe sushi, that they would eat along with their plain pasta with butter and cucumber circles.  I lived in fear that they would figure out what flying fish roe was and then even that would be out.  Luckily for me, as they grew older their tastes expanded in the same proportion as their desire for ‘plain food with no sauce, nothing on the plate touching’ diminished.  Some of you still may be there but don’t worry, they do eventually grow up and eat real food.   I knew we were there when the last one crossed over into  the light ‘salads’.  My life was so much easier once I no longer had to hide veggies somewhere on their plates and could just serve them right out in the open, no secret dips or funny mashed potatoes.  Whew!

Shrimp Lettuce Wraps12

My boys (young men now) still have an affinity for Asian food, and although they still eat flying fish roe sushi, their tastes for the exotic have also expanded.  One of our favorite appetizers is Miang Kam (literally meaning Tasty Leaf Wrapped Tidbits) in which several ingredients, usually coconut, ginger, lemon, dried shrimp, peanuts and green onions, among many other interesting bits of food, are hand assembled in a leaf, topped with a yummy sauce, folded over and popped in the mouth where the ingredients combine for a burst of flavor.  These Shrimp Lettuce Wraps are loosely inspired by Miang Kam, although I took many liberties with the selection of ingredients.  The wraps themselves are reminiscent of the Thai dish with the garnishes of ginger, red chili pepper, toasted coconut, scallion and sliced lemon which provide an explosion of flavor.  I added Sriracha to mine since I love spicy but a plum or sweet ginger sauce would be tasty too.

Shrimp Lettuce Wraps13

No meal is complete in my book without some kind of veggies, so I sliced up fresh bok choy and sautéed it with a bit of garlic and ginger and added mung bean sprouts, which were in my refrigerator, for good measure.  I also made  Coconut Rice with brown Jasmine rice, ginger, turmeric and cumin which came out a deliciously lovely yellow (thanks to the Turmeric, which I’m sure you’ve heard is the new wonder spice that provides antioxidants and health benefits to your food along with it’s unique flavor).  Both side dishes are great as a base for the shrimp in the lettuce wraps or can be simply served on the side.

Shrimp Lettuce Wraps

  • Servings: 4
  • Difficulty: easy
  • Print
1 head Butter or Boston lettuce (whole leaves)
1 lb raw shrimp (shelled, tail removed)
4  Tbsn olive or avocado oil (divided)
4 cloves garlic, finely minced (divided)
1/4 tsp red pepper flakes
1/4 tsp chili powder
3-4 heads bok choy
1 cup bean sprouts(optional)
Shrimp Lettuce Wraps8

GARNISHES:

1/3 cup dried unsweetened coconut
1 fresh red chili pepper, minced
1 thumb-size piece of ginger, minced
3 green onions, minced
1 lime cut into small wedges
Sriracha Sauce, Plum Sauce or Sesame Chili Oil (Optional)


Shrimp Lettuce Wraps5

  • If you are using peeled and deveined shrimp, rinse them in cold water and pat them dry.  If your shrimp still have the shells, remove the legs, shell and tail or watch this video for instructions on peeling shrimp.
  • Dry toast coconut into a pan (preferably cast iron) on medium high heat until golden brown. (1-2 minutes). Remove from pan and let cool
  • Wash and dry lettuce leaves and arrange on a platter with toppings.

Shrimp Lettuce Wraps3

  • Reheat pan and saute bok choy on medium heat in half the oil and garlic for several minutes.  Add the bean sprouts, if using, and heat another minute or so.  Remove from heat and place in a serving bowl.

Shrimp Lettuce Wraps4

  • Reheat pan on medium high and add the remaining oil, garlic, chili powder and red pepper flakes.  Sautee the shrimp until it turns pink, 2-3 minutes. Remove from heat.  Serve in hot pan or place in a serving bowl.
  • Assemble lettuce wraps with coconut rice (see recipe below), bok choy and shrimp topped with your preferred condiments.  Or serve rice and bok choy on the side.


Coconut Jasmine Rice

  • Servings: 4
  • Difficulty: easy
  • Print


Shrimp Lettuce Wraps2
Coconut Jasmine Rice

1 cup brown or white jasmine rice
1 can coconut milk
1 cup vegetable stock
1 tsp turmeric
1 tsp cumin
pinch of saffron threads (optional)
1 clove garlic, minced
1/4 cup dry shredded or flaked coconut, unsweetened

  • Heat coconut milk and stock to boil.  Add rice and spices and simmer for about 15 minutes, or until the water has evaporated.  Remove from heat and let sit covered.
  • Dry toast the coconut in a pan on medium high heat for one or two minutes until golden brown.  Remove from heat and let cool.
  • Fluff the rice with a fork.  Serve topped with toasted coconut.

Wheatless Wednesday – Black Bean Quinoa Salad

6

Black Bean Mango Quinoa Salad4

Tired of green salad?  This flavor filled quinoa salad with mango and avocado topped with an orange cumin vinaigrette is my new favorite!  I promise you won’t be bored. It’s a little bit spicy from the jalapenos, a little bit sweet from the mango, the black beans add a rich salty flavor and fresh avocado, purple onion, bell pepper and cilantro make it salad worthy.  Yum!

Quinoa is the perfect backdrop for these beautiful flavors.  It also happens to be a nutritional powerhouse, high in protein, low in fat, gluten free and loaded with lovely vitamins and minerals (but you don’t have to tell your family that).  What I didn’t know is that Mango is also a superfood, providing over 20 vitamins and minerals in every delicious bite. ( This puts a whole new light on my recipe for Mango Margaritas!)  Black beans add another protein and nutrient boost and their high fiber content helps keep your tummy full. Then there is the Avocado, which we now know is a good fat that is highly nutritious.   The best part of this salad though, is how great it tastes!  I can’t wait to have it again for lunch…

This is the perfect dish to throw together for an easy dinner or bring to a potluck, especially if you have leftover quinoa on hand (or you make it ahead), then it’s only about ten minutes of chopping, mixing and you’re done!  This salad can be made a day ahead, without the avocado.  Bring to room temperature then gently toss in the avocado, if using, before serving.

TIP:  You can buy mango pre-cut but it’s very easy to do it yourself (and less expensive) if you know the right technique.  How to cut a Mango

VARIATIONS:  If you don’t have, or like, mango, you can substitute orange or nectarine segments (or even canned or frozen corn).  Use a combination of yellow, orange, red and green bell peppers for lots of color.  This recipe is only mildly spicy using one red jalapeno pepper so double the amount of jalapeno peppers and add a bit more cumin if you like it hot.

Black Bean Mango Quinoa Salad

Black Bean Quinoa with Cumin Orange Vinaigrette

  • Difficulty: easy
  • Print

 Black Bean Mango Quinoa Salad4

1 cup quinoa
1 cup mango, diced
1 red bell pepper, diced
1 red or green jalapeno, seeded and diced
1 cup canned black beans, drained and rinsed
1/2 red onion, diced
1/3 cup fresh cilantro or parsley leaves, chopped
1 avocado, peeled, seeded and diced
 
 vinaigrette
1/4 cup olive oil
1/4 cup apple cider vinegar
1/4 cup freshly squeezed orange juice
1 tsp cumin
1 tsp salt

Black Bean Mango Quinoa Salad3

  • Rinse quinoa to remove bitterness and cook according to package instructions; set aside and let cool.
  • To make the vinaigrette, whisk together olive oil, apple cider vinegar, orange juice, cumin and salt in a small bowl; set aside.
  • In a large bowl, combine quinoa, mango, bell pepper, jalapeno, black beans, avocado, onion and cilantro. Pour the vinaigrette on top of the salad and gently toss to combine.
  • If you aren’t serving immediately, place the avocado pit on top of the salad to keep the avocado from turning brown, or add the avocado right before serving .  Serve at room temperature.

Black Bean Mango Quinoa Salad8


Wheatless Wednesday – Quinoa Crust Pizza with Goat Cheese, Meyer Lemon and Basil

4

Quinoa Pizza1

QUINOA CRUST PIZZA – YOU HAD ME AT PIZZA!  Those that have been following GMD, know that I am in constant search of great pizza recipes, especially those whose ingredients stretch conventional thinking (read not white flour). My Meyer Lemon tree outside is still loaded with lemons and I now have two pounds of freshly made goat cheese (click HERE to learn how to make goat cheese which is surprisingly easy), so when I saw this recipe from Cafe Johnsonia using quinoa instead of white flour for the crust, I knew we had a new Wheatless Wednesday contender.  The quinoa crust is fantastic!  I really like it and will make it again and again.  Its less heavy than a cornmeal crust and has a great consistency.  In fact, I experimented with thick vs thin crust and think this recipe would also make a great cracker, so you may be seeing Quinoa Crackers in a post coming soon.

Quinoa Pizza9

You could top this pizza crust with your favorite toppings if lemon and goat cheese are not your thing.   It will hold up well, even with wet toppings like tomato sauce or heavy cheeses.   The combination of tangy goat cheese and tart meyer lemon, topped with fresh basil and shallots is a wonderful explosion of flavors.  If you want the same flavor combination but a less intense version, substitute strips of lemon zest in place of the lemons.  My favorite variation includes thinly sliced zucchini circles, garlic and lemon zest cooked with the lemon goat cheese, then topped with fresh basil, shallots (or scallions) and a handful of arugula.  Delish!

Quinoa Pizza10

Quinoa is one of the reigning superfoods, but do you know why?  According to Forbes, quinoa is one of the most protein rich foods available and has twice as much fiber as other grains.  It is rich in vitamins and minerals, including iron and vitamin B2 and gluten free.  Making a crust out of quinoa is not only way more nutritious than one out of white flour, it is easier as it doesn’t have to rise or be handled in any way.  The quinoa does have to soak for 8 hours or overnight but other than that, it only takes about 45 minutes and the prep is easy. For those that also like alternative pizzas, check out some others I have done in the past with good results:

Cauliflower Crust Pizza
Margherita and Pesto Chicken Pizzas on White Whole Wheat Crust
Zucchini Crust Pizza with Grilled Eggplant and Roasted Red Pepper


Quinoa Crust Pizza with Goat Cheese, Meyer Lemon and Basil

  • Servings: 4
  • Difficulty: easy
  • Print

Quinoa Pizza2


1 cup quinoa
water, for soaking and blending
1 clove garlic
½ teaspoon salt
2 Tablespoons avocado oil (or another high-heat oil)
5-6 ounces fresh goat cheese (chèvre)
1 Meyer lemon, very thinly sliced (seeds removed)
2 teaspoons fresh lemon juice
1 shallot, thinly sliced
small handful fresh basil leaves, cut into ribbons
2 Tablespoons pine nuts ( toasted)
coarse ground black pepper
coarse sea salt
olive oil, for drizzling(optional)

  • Place quinoa in a medium bowl and cover with water by several inches. Let stand at room temperature for 8 hours or overnight.
  • Preheat oven to 450 degrees F. Drain the pre-soaked quinoa in a fine mesh sieve and rinse well to remove the bitter saponins (a naturally occurring residue). Place in a food processor or blender with a little water (about ¼ cup), garlic clove, and salt. Puree until smooth. Add more water if needed. The mixture should be the consistency of thick pancake batter but still pourable.
  • Place a 10-inch cast iron skillet into the hot oven. Allow to heat for 5-10 minutes. Carefully add the 2 Tablespoons of oil to the skillet and heat for another 3 minutes. Remove the pan from the oven carefully. Tilt the pan to evenly distribute the hot oil. Make sure pan and oil are hot or quinoa will stick.

Quinoa Pizza4o

  • Pour the batter into the center of the pan and tilt it to create an even layer on the bottom. Place back into the oven. Bake for 20 minutes, then remove pan from oven, turn crust over, and place back in oven for another 10. Remove from oven and transfer the crust to a pizza pan, if desired. (At this point you can also place it on a cooling rack and let it cool completely, then prepare the pizza at a later time.)
  •  Mix the goat cheese with the lemon juice. If the cheese is very crumbly, add a little milk or water to make it spreadable.

Quinoa Pizza6

  • Spread the cheese evenly over the crust. Layer the Meyer lemons evenly over the cheese.
  • Place in the 450 degree oven and let bake for 10-15 minutes, or until the cheese has melted and turned golden, and the lemons are tender. (For a crispy top, place under the broiler for a few minutes.)
  • Remove from oven and top with the remaining toppings. Cut into wedges and serve warm or at room temperature.

Quinoa Pizza11

  • MY FAVORITE VARIATION:  For a less lemon intense pizza, replace lemon slices with lemon zest,  thin zucchini circles, and add a clove or two of garlic, that has been thinly sliced.  After cooking add a handful of arugula on top of the other ingredients.  Yum!

Quinoa Pizza12

Wheatless Wednesday – Tabouleh (Grain Free)

4

Tabouleh7

Raw-Vegan-Potluck.  My friend, Karenna Love,  invited me to a vegan potluck at her house.  I love all things food related and immediately knew what I was going to bring – until I re-read the invitation.  Somehow I missed the ‘raw’ part.  I make a lot of vegetarian and vegan food but other than green salads, I generally cook some or all of my foods.  I was stumped. All my go to foods like grains, beans and legumes need to be cooked.   I thought about going out to my garden and picking fresh produce for a salad but other than lettuce and chard, nothing else is ready yet.  Then I remembered how well cauliflower stood in for wheat in my Cauliflower Crust Pizza Recipe and decided to make a traditional tabouleh using cauliflower ‘rice’ instead of the usual couscous or bulgur.  The result is delicious and, even though I know better since I ground up the cauliflower myself, I would swear it’s cooked  bulgur wheat not cauliflower.  This is a great recipe for those on gluten or wheat free diets – even for my Paleo friends.    I would definitely make this again-on purpose!

Why eat raw?  Eating fruits and vegetables raw ensures that you get 100% of the vitamins and minerals, including beneficial enzymes.  Cooking can make some foods easier to digest but some of the vitamins and minerals (and all of the enzymes) are lost in the process.  I’m not quite ready to throw out my pots and pans just yet, but I do see how adding more raw foods into our diets is a worthy goal.

Let’s go back to Karenna Love, founder of wonderful website VeganGreenPlanet, and her Raw Vegan Potluck.  I have to admit to a few apprehensions about going to a vegan event when I’m not even vegetarian.  But then I realized that GMD is all about pushing myself out of my comfort zone, so I went.  It was an interesting mix of caring and non-judgemental people and great food.   I’m so glad I stepped out of my box. My Tabouleh was well received, which after one taste, I knew it was yummy and potluck worthy. The speaker, Mikaele Holzer, health coach and cleansing expert at Green Your Spirit  was pretty interesting and very personable.   I learned a lot about vegan food, cleansing, and detox.  Both  are amazing women-check them out.

Grain Free Tabouleh

  • Servings: 4-6
  • Difficulty: easy
  • Print

1 head cauliflower

1 cup grape or cherry tomatoes, small dice

1 seedless cucumber, small dice

1 1/2 cups fresh parsley, minced

3/4 cup fresh cilantro, minced

1/2 cup fresh mint, minced

1/3 cup olive or avocado oil

3 Tbsn fresh lemon juice

3/4 tsp sea salt

1/4 tsp black pepper

Tabouleh5

  • Remove leaves from cauliflower and break into florets.  Discard leaves, core and stem.  Using a food processor, blend florets into ‘rice’.  Or you can use a hand grater.  Scoop into a large bowl.

Tabouleh6

  • If you are using a food processor, you can mince the parsley, cilantro and mint by machine as a shortcut.

Tabouleh4

  • Add the rest of the diced vegetables and minced herbs to the cauliflower.

Tabouleh2

  • Whisk together the oil, lemon juice, salt and pepper and pour onto salad. Toss to combine.  Adjust seasoning (add salt or lemon juice to taste).
  • Serve immediately or let rest in the refrigerator.  Flavors will continue to develop over several hours.

Tabouleh1


Wheatless Wednesday – Layered Beet Salad with Glazed Pecans & Citrus Vinaigrette

0

Beets14

I have a love affair with all food towered, stacked and layered, the taller the better.  There is something artistic and beautiful about the stark color contrast of the layers, each with it’s distinct flavor and character.  I know, I know,  food is to be eaten and not just looked at.  I also know that my creation will be destroyed the second it’s put on the table.  I’m okay with that.  I actually like the deconstruction process almost as much as the creative.  A certain amount of satisfaction can be derived from wrecking cool things, perhaps harkening back to our childhood days when we spent time building elaborate sand castles and then stomping them into oblivion.

This colorful salad was inspired by my cousin (by marriage), Joey, who is a fantastic and creative cook.  At a recent event, we were swapping kitchen stories, as people who like to cook are wont to do, and he passed along this clever method for layering beets and goat cheese.  Any soft cheese, even cream cheese, will work if you don’t like or have goat cheese.  I like to roast beets, rather than boiling or steaming them, as roasting intensifies the color and the flavor.  After roasting you have gloriously colored beets which can be sliced up and served in salads or simply drizzled with oil and vinegar and eaten alone.  Layering the beets with soft cheese elevates two simple ingredients into a beautiful and delicious work of art.  If you don’t have the time, or the inclination though, just combine all ingredients and toss with vinaigrette.  I love the salty, sweet crunch that the glazed pecans add to the salad.  For this dish I cooked them to almost burning to add a slightly  smokey flavor that complements the goat cheese.  When combined with the light citrus dressing, the flavors are divine!  The  beet slices would make good appetizers on their own, if made with small beets, as would the glazed pecans.


Layered Beet Salad

  • Servings: 4
  • Difficulty: medium
  • Print

 Beets7
2 large or 3 small beets
1/4 cup olive oil
8 oz goat cheese or cream cheese (plain or herbed)
3 cups mixed greens
glazed pecans (recipe below)
citrus vinaigrette (recipe below)
 
Herbs for Goat Cheese(optional)
2 teaspoons chopped fresh flat-leaf parsley leaves
2 teaspoons chopped fresh chives
1 teaspoon chopped fresh thyme leaves
1/2 teaspoon freshly ground black pepper


  • Rinse beets and pat dry. Do not remove tops or stems (you don’t want to lose any juice). To roast, you can either wrap them in aluminum foil or place in a covered glass dish.  Drizzle with olive oil and cook at 425 degrees for about an hour (or until you can easily pierce with a fork).  Larger beets may take longer.  Remove from the oven and let cool.

Beets6Beets1

  • When the beets are completely cool, peel the skin with a paper towel and remove the top and tail with a knife.

Beets2

  • Goat cheese should be at room temperature for best results.   If you would like you can add parsley, chives, thyme and black pepper to the goat cheese and mix to combine.
  • To assemble the beet towers, slice beets crosswise into 1/4 inch rounds, keeping them in order.
  • Place the bottom round on a platter and spread with spoonful of goat cheese.  Cover with a beet round and repeat until the beet has been reassembled.

Beets3

  • Wrap the beets tightly with plastic wrap and refrigerate at least an hour or overnight.

Beets5


  • Remove beet towers from the refrigerator and carefully unwrap.  Slice each tower vertically to get lovely striped slices. Wipe knife between each slice and use a spatula to transfer them to plates.

Beets16

Beets15


  • Toss greens in vinaigrette and divide greens evenly onto four plates.
  • Arrange a couple of slices of beet on each plate.
  • Top with pecans if desired.

Beets14

Glazed Pecans

  • Servings: 4
  • Difficulty: easy
  • Print

Beets8

1/4 white sugar)
1 Tbsn butter or coconut oil
1/8 teaspoon salt
2 Tbsn water
1 1/2 cup pecan halves (or walnut)
  • Combine sugar, butter, water and salt in a large skillet and stir over medium heat until butter is melted.
  • Add pecans and cook, stirring constantly,making sure pecans are evenly coated,  for 5-7 minutes.
  • Spread pecans in single layer on parchment paper and cool completely.

VARIATIONS:  To make pecans for snacking add 1/4 to 1/2 teaspoon of cayenne pepper for a spicy kick.  For a sweeter, dessert topping add 1/4 teaspoon vanilla or dash of cinnamon.  You can even substitute the white sugar for brown sugar for more of a carmely ‘turtle’ type result (great over ice cream!).

Citrus Vinaigrette

  • Servings: 1 cup
  • Difficulty: easy
  • Print

Beets13
1/4 cup lemon juice
1/4 cup orange juice
1/2 tsp minced fresh thyme leaves
2 Tbsn balsamic vinegar
1/2 teaspoon lemon or orange zest
1/2 cup avocado oil
Salt and freshly ground black pepper
  • Whisk all ingredients together.  Drizzle over salad and toss.

Meatless Monday – Crispy Glazed Tofu and Bok Choy

1


Tofu and Bok Choy9

Is tofu good or evil?  You may not be aware but the great tofu controversy abounds! I like tofu and have always thought of it as a healthful protein which is highly adaptable in recipes from stir frys to salad dressings.  However, I keep hearing that tofu is bad for you, evil even, so I decided to check into it. Tofu is a low fat, plant based, good source of protein, yet it is a processed food, in that it is no longer in its original bean form.  The beans have been made into milk, curdled, drained and pressed into blocks.  The more I looked into the great tofu question, the more confusing the issue.  Studies and opinions contradict each other-no surprise there.  Remember when coconut oil was supposed to be so terrible for us and to be avoided at all costs, and now is being touted as having health benefits ranging from weight loss and prevention of  heart disease to making your skin soft and pretty.   Andrew Weil, a well respected natural health and wellness expert, still recommends tofu as part of a healthy diet.   Click on his name to see why.   The Truth About Soy,  another seemingly unbiased view about tofu and soy (loads of information but long article) thinks the problem is not with soy but what we  have done with soy (read Genetically Modified-Roundup Ready).  90 – 94% of soy is GMO but most of that is fed to our food animals or made into soy products like baby formula (which is a different problem)  and not made into tofu.  If the label says organic or Non GMO Project it’s not genetically modified-one more reason to buy organic.   So, what did I come away with?  If you like tofu, eat it.  If you don’t like tofu, don’t.

For those that DO like tofu, here is a delicious recipe for Crispy Glazed Tofu with Bok Choy, which I adapted from Eating Well, March/April, 2014.  This is the perfect way to cook bok choy, which is delicately flavored with garlic and ginger.  The tofu is browned in a skillet first and then sautéed in a flavorful plum sauce. The outside is a bit crispy and the inside soft and creamy.   I reduced the amount of ketchup, since I’m not a ketchup lover, to let the other flavors shine, however, if you are a ketchup lover you can double or triple the amount.  I also added red pepper flakes and ginger paste for more of a zing.  Don’t skip the step of draining the tofu, which gets rid of excess water and allows the tofu to absorb the flavors.  Otherwise this is a very simple and quick meal to get on the table.  Serve over rice if desired.


Glazed Tofu and Bok Choy

  • Servings: 2-4
  • Difficulty: easy
  • Print

1 14-ounce package extra-firm water-packed tofu, drained
1/4 cup plum (or hoisin) sauce
1 tablespoons ketchup
2 tablespoons soy sauce
1 tablespoon rice wine (or dry sherry/rice wine vinegar)
2 teaspoons oil plus 1 tablespoon, divided (I like avocado or coconut oil)
3 scallions, trimmed and cut into 2-inch lengths and then ribboned
1 teaspoon minced garlic
2 teaspoon minced fresh ginger, divided
1/2 teaspoon red pepper flakes
4-6 baby bok choy, quartered lengthwise
1/4 cup water
1 tsp sesame seeds
Tofu and Bok Choy7
  • Fold a kitchen towel in half and place on a cutting board. Cut tofu in half horizontally, (and then in half again leaving 4 equal pieces) and set on the towel. Put another folded towel and a weight (such as a heavy skillet) on the tofu; let drain for 15 minutes.

Tofu and Bok Choy5

  • Meanwhile, whisk plum sauce, ketchup, soy sauce and rice wine in a small bowl and place near the stove.
  • Cut the pressed tofu into 3/4-inch cubes and place near the stove.
  • Toast sesame seeds in a small pan over medium low heat for a few minutes, or until they turn golden brown.

Tofu and Bok Choy6

  • Heat 2 teaspoons oil in a large nonstick skillet over medium-high heat. Add scallions, garlic and ginger; cook, stirring, for 30 seconds. Add bok choy and cook, turning, until bright green, 1 to 2 minutes. Add water, cover and steam until tender, about 2 minutes. Transfer everything to a plate. Wipe the pan dry.

Tofu and Bok Choy4

  • Return the pan to medium-high heat, add the remaining 1 tablespoon oil and heat until shimmering. Add the tofu in a single layer. Cook, without stirring, until starting to brown, 2 to 3 minutes. Stir and continue cooking, stirring frequently, until brown on all sides, 6 to 8 minutes more. Add the sauce; cook, stirring, until the tofu is well coated, 1 to 2 minutes.  Sprinkle with sesame seeds and serve with the bok choy over brown rice, if desired.

Tofu and Bok Choy2


Wheatless Wednesday – Grilled Striped Bass with Chimichurri Sauce

0

Fish1

At the farmer’s market on Sunday, in a momentary lapse of judgement, I found myself buying a whole 2 1/2 pound striped bass.  What was I thinking?  I have never prepared a whole fish before!  Well, Good Mother Diet is partly about expanding my culinary repertoire, so here goes…  This recipe can also be adapted for cooking individual fish filets (see recipe for tips).

Chimichurri, a sauce which is a staple on Argentinian tables,  is made from finely chopped parsley, minced garlic, olive oil, oregano, and white or red wine vinegar, although there are many variations which include cumin and other spices).  Since striped bass has such a nice delicate flavor, I didn’t want to overpower it with too many strong flavors during cooking, so topping it  with a spoon of chimichurri sauce after cooking is a great way to add freshness and flavor without ‘drowning’ the fish.

Cooking whole fish seems daunting but in reality, the preparation is quick and easy.  The only challenging part is removing the bones which can be done before or after cooking. Most butchers (even at farmers markets) will gut, clean and scale the fish for you even removing the fins. If you ask, they might be willing to also butterfly and remove the bones so you don’t have to do it later. If you are preparing smaller fish that hasn’t been de-boned you can leave it up to each diner to remove the bones, however, if you are cooking a large fish and serving family style, it’s best to remove the bones and cutting the filets into smaller pieces for serving. Click HERE for video instructions on how to debone a cooked fish.

Grilled Striped Bass with Chimichurri Sauce

  • Servings: 2-4
  • Difficulty: easy
  • Print

1 whole white fish (bass, branzino, snapper), gutted, cleaned and scaled (deboned is a bonus)
6 – 8 sprigs fresh thyme
4 sprigs  fresh oregano
1 lemon, thinly sliced
1 Tbsn olive oil
kitchen twine (optional)
  • Rinse and dry the fish with papertowels.  Brush the inside of the fish with olive oil and sprinkle with salt and pepper.
  • Spread half the thyme and oregano sprigs inside the fish.
  • Arrange the lemon slices on top of the herbs and place the rest of the herbs on top of the lemon.

Fish7

  • Wrap the twine, if you are using, around one end of the fish and tie it in place.  Wrap it around the fish several times, to keep the filling inside, and tie the other end.

Fish8

  • Preheat grill (or broiler).  Cook fish for 5 minutes.  Carefully turn it over and cook another 5 minutes, or until fish flakes easily.

Fish9

  • If you are using filets instead of whole fish, brush both sides with olive oil and sprinkle with salt and pepper.  Broil 3-4 minutes on a rack at least 6 to 8 inches away from heat.  Turn fish over and place herbs and lemon on top.  Broil 3-4 more minutes.  Top with Chimichurri Sauce.

Fish2

You can choose to serve the fish skin side up or down depending on preference.

Fish6

Chimichurri Sauce

1/3 cup extra-virgin olive oil
1/4 cup freshly squeezed lemon juice (or red wine vinegar)
1 large garlic clove, minced
1  Tbsn fresh oregano, finely chopped
1/3 cup flat-leaf parsley, finely chopped
1/2 tsp salt
2 small fresh or dried hot red chiles, seeded and minced
 
Combine all ingredients together and spoon over cooked fish. 
Fish5

Mexican Trio – Fish Tacos, Chile Rellenos & Black Bean and Mango Salad with Avocado Ranch

0

cinco de mayo5

Monday is Cinco de Mayo, a Mexican celebration which many Americans have wholeheartedly adopted. I mean who’s going to pass up an opportunity to legitimately drink margaritas and salsa dance on a Monday? (Stay tuned, I promise a recipe for the World’s Best Margaritas and easy ‘homemade’ tortilla chips on Friday). I have always focused on the wonderful Mexican food and cervezas without knowing much about the holiday itself, other than knowing cinco de Mayo means fifth of May in Spanish. It is a celebration of the Anniversary of the Battle of Puebla, in which the Mexican military was victorious over the French in 1862. The victory at Puebla became a symbol of Mexican resistance to foreign domination.  Read more at Enclyopaedia Britannica.

cinco de mayo1

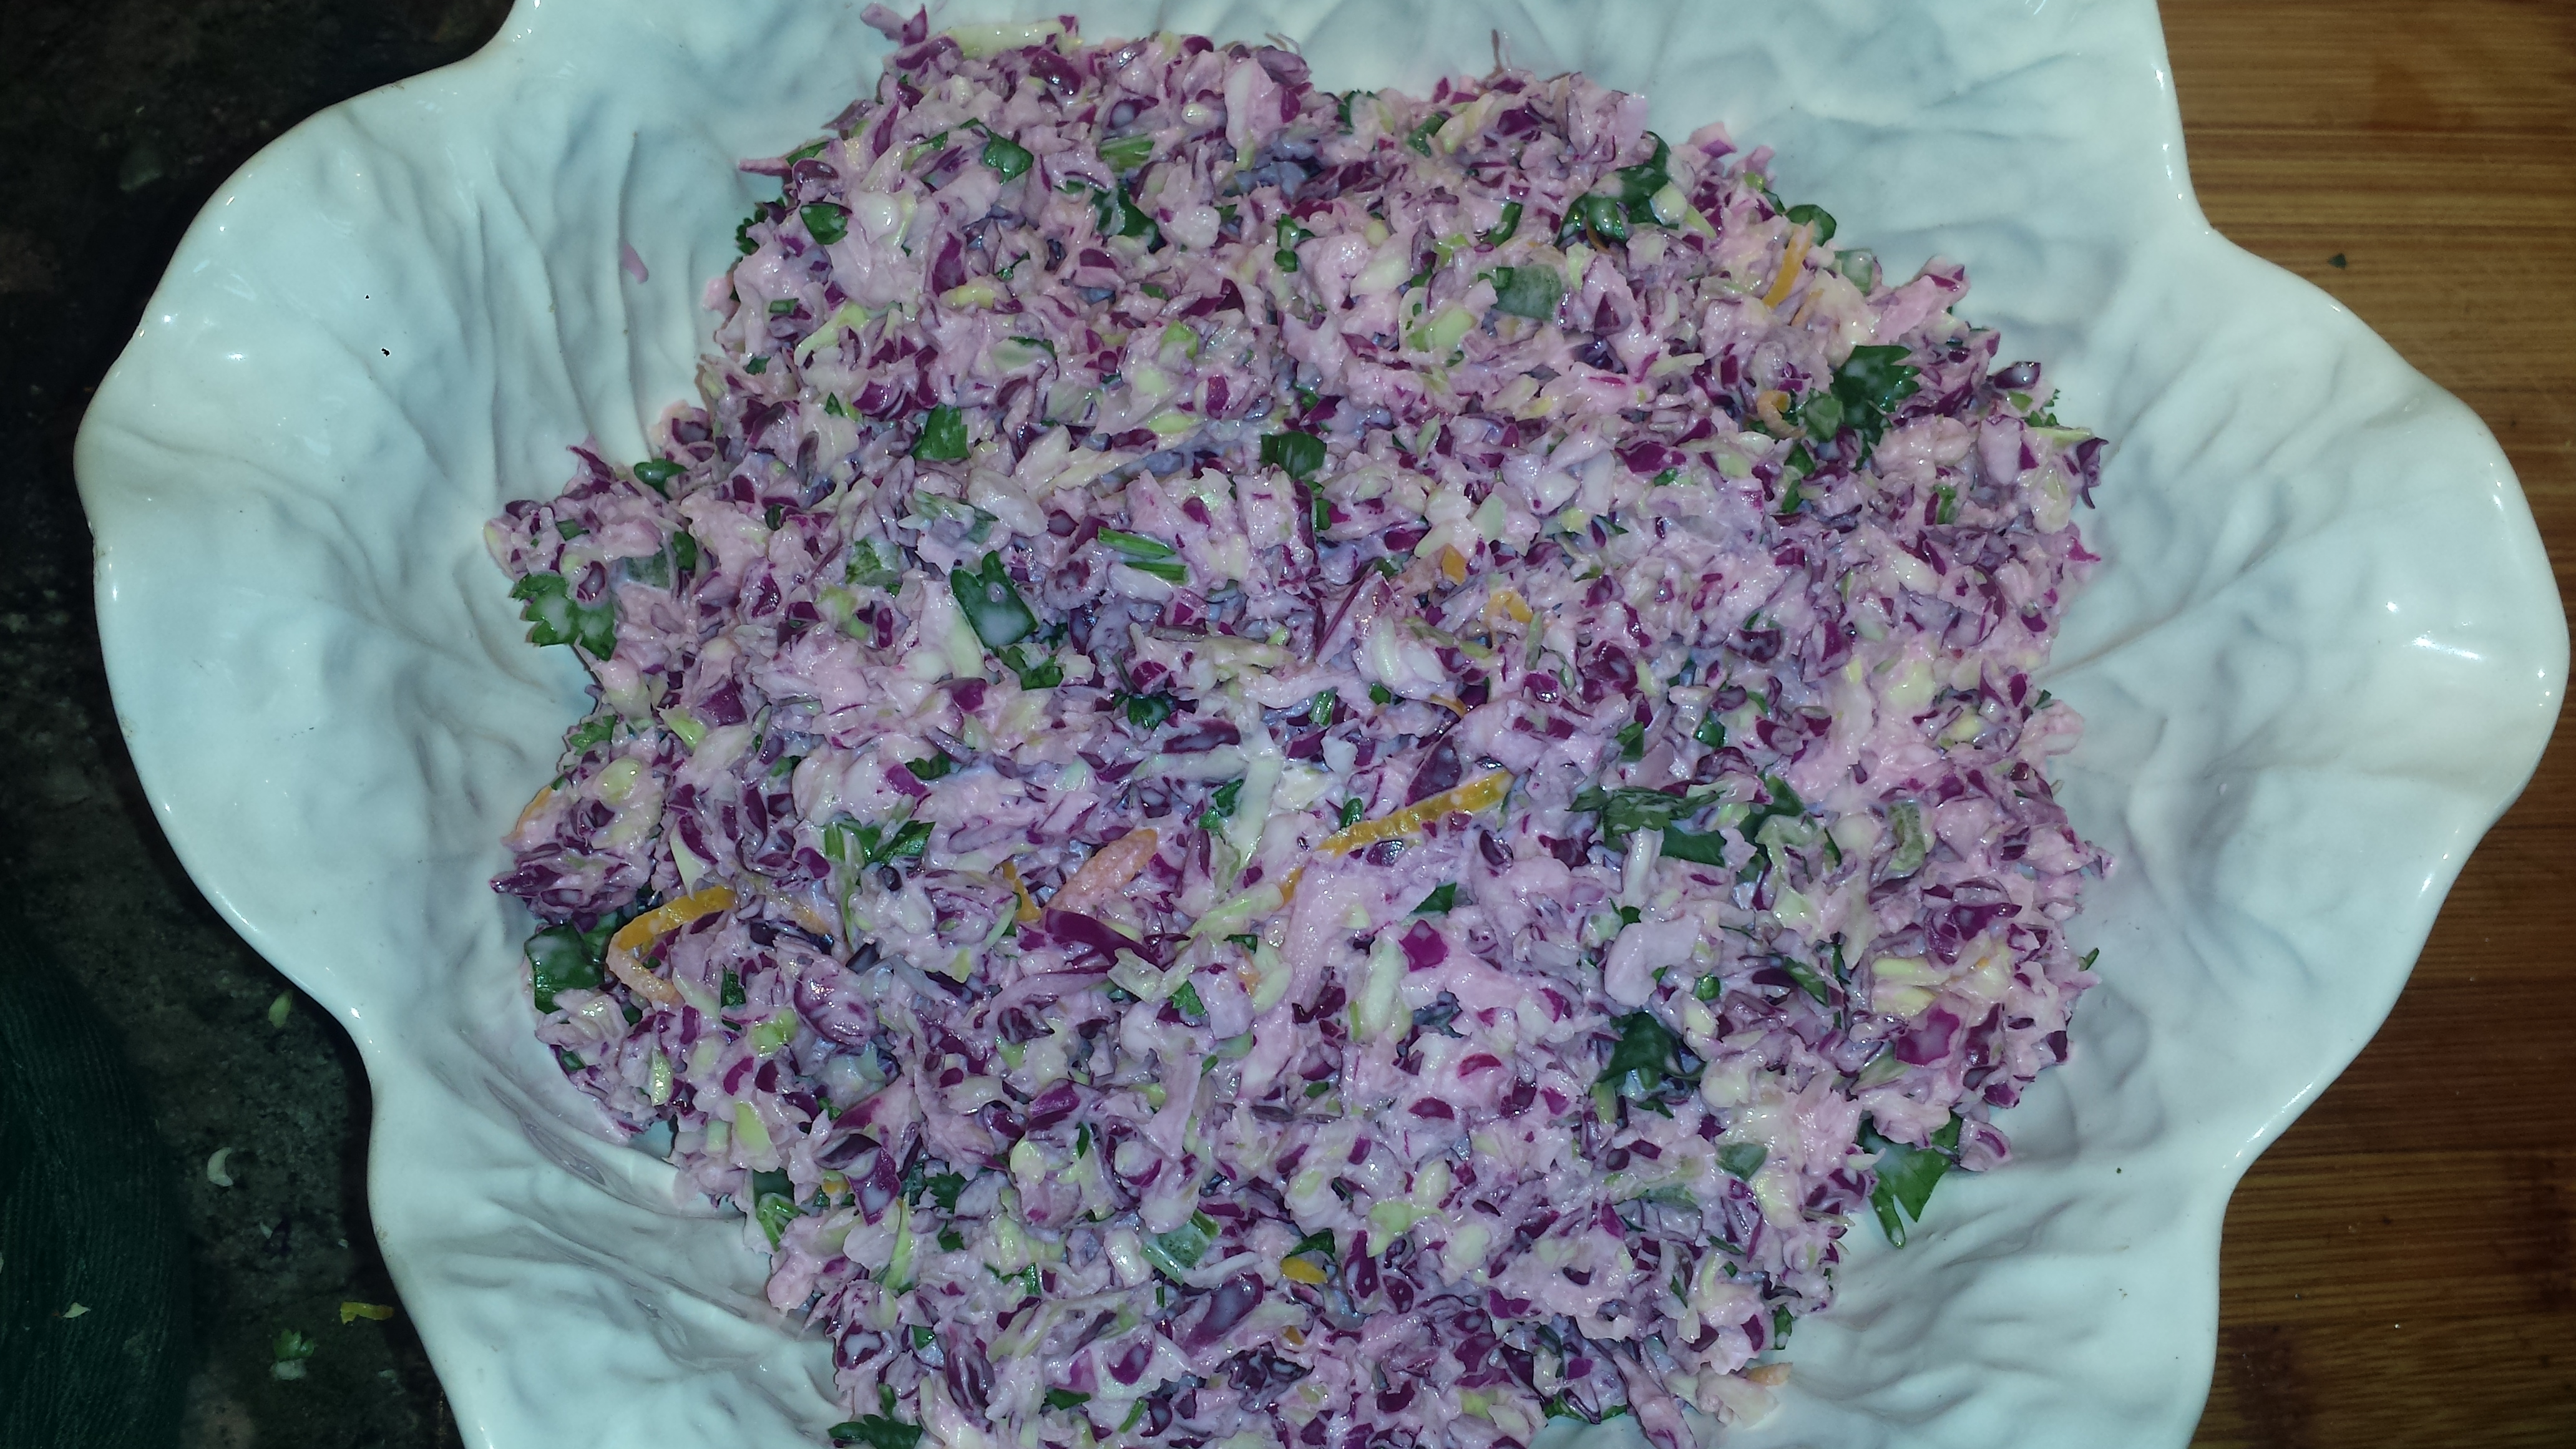
In honor of this Mexican holiday, I am presenting a trio of Mexican goodies to include in your celebration next week. They are all wheat free,  gluten free, and vegetarian, with the exception of the fish tacos. The fish tacos are made with roasted halibut, spiced with ancho chili, garlic and cumin, then topped with a  creamy, lime coleslaw.   If you don’t like creamy dressings, you can omit the sour cream/yogurt and mayo and substitute olive or avocado oil and vinegar for a fresh, zesty coleslaw.  My coleslaw turned out a glorious pink color.  The more red cabbage you use, the darker purple it will get.  I try to buy fresh fish that is live caught (rather than farmed) and sustainably fished.  Good choices are mahi mahi and halibut but any mild, white fish will work. Seafood Watch is a good source of information on selecting sustainable seafood.

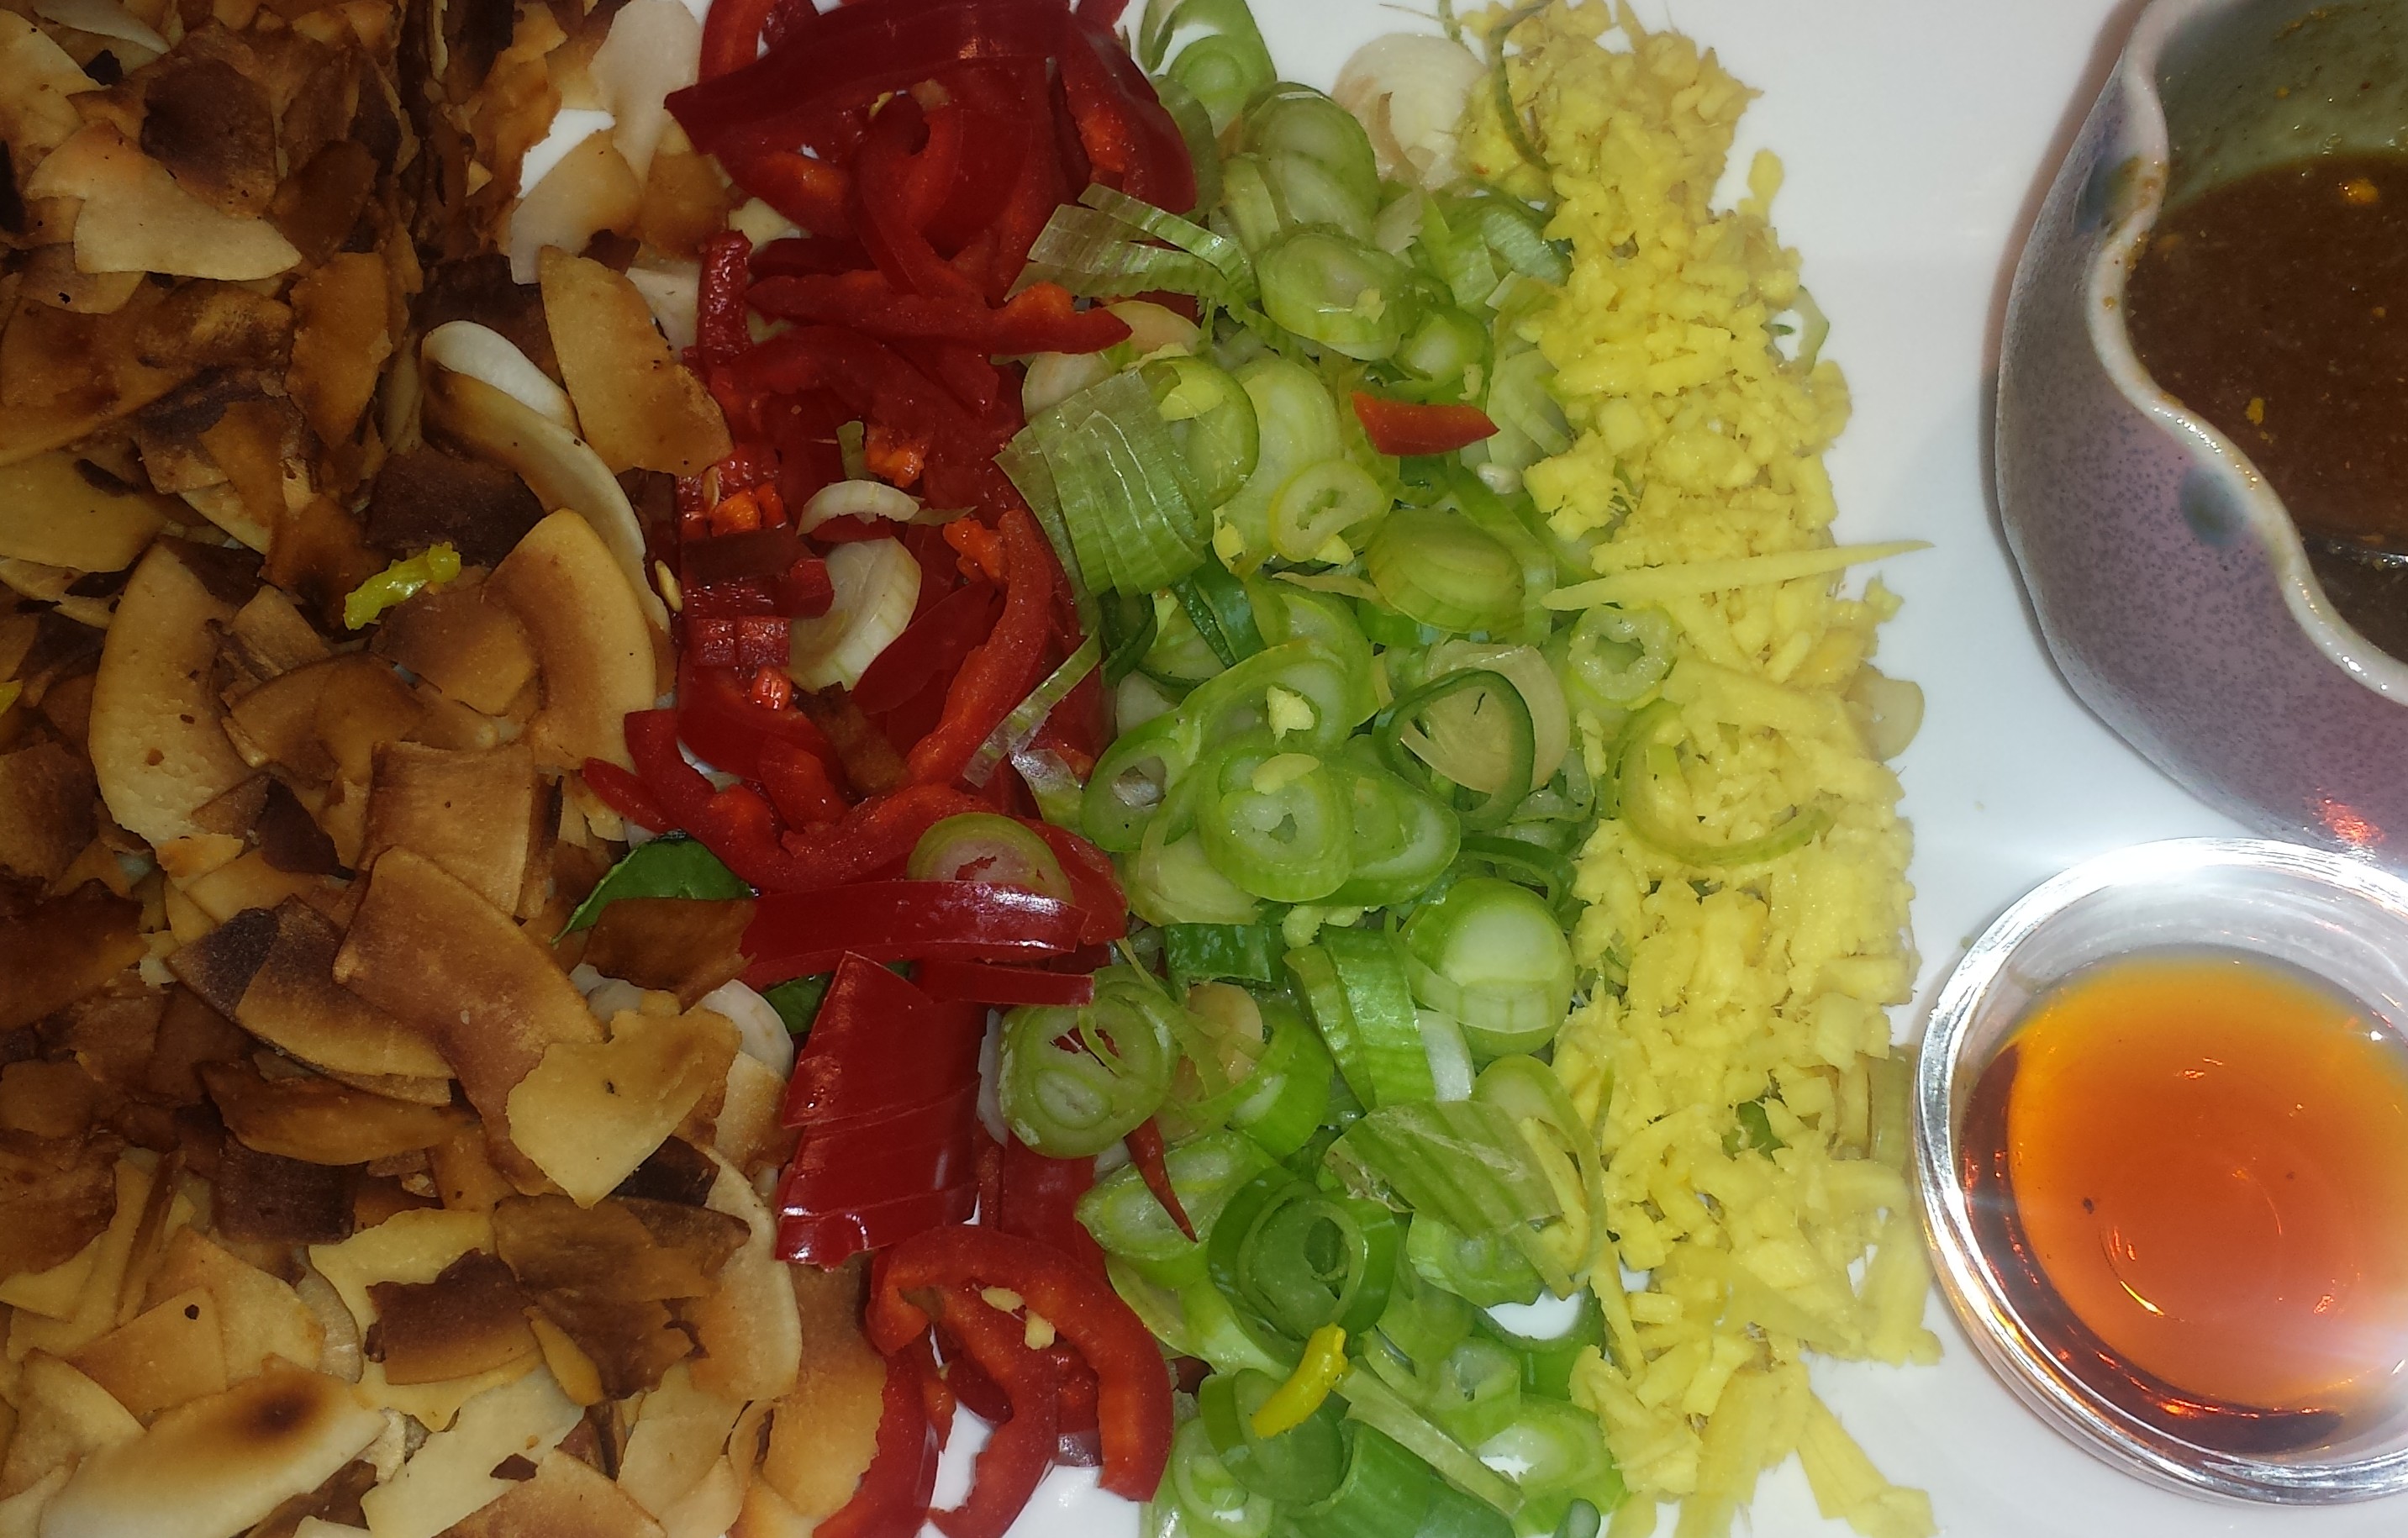
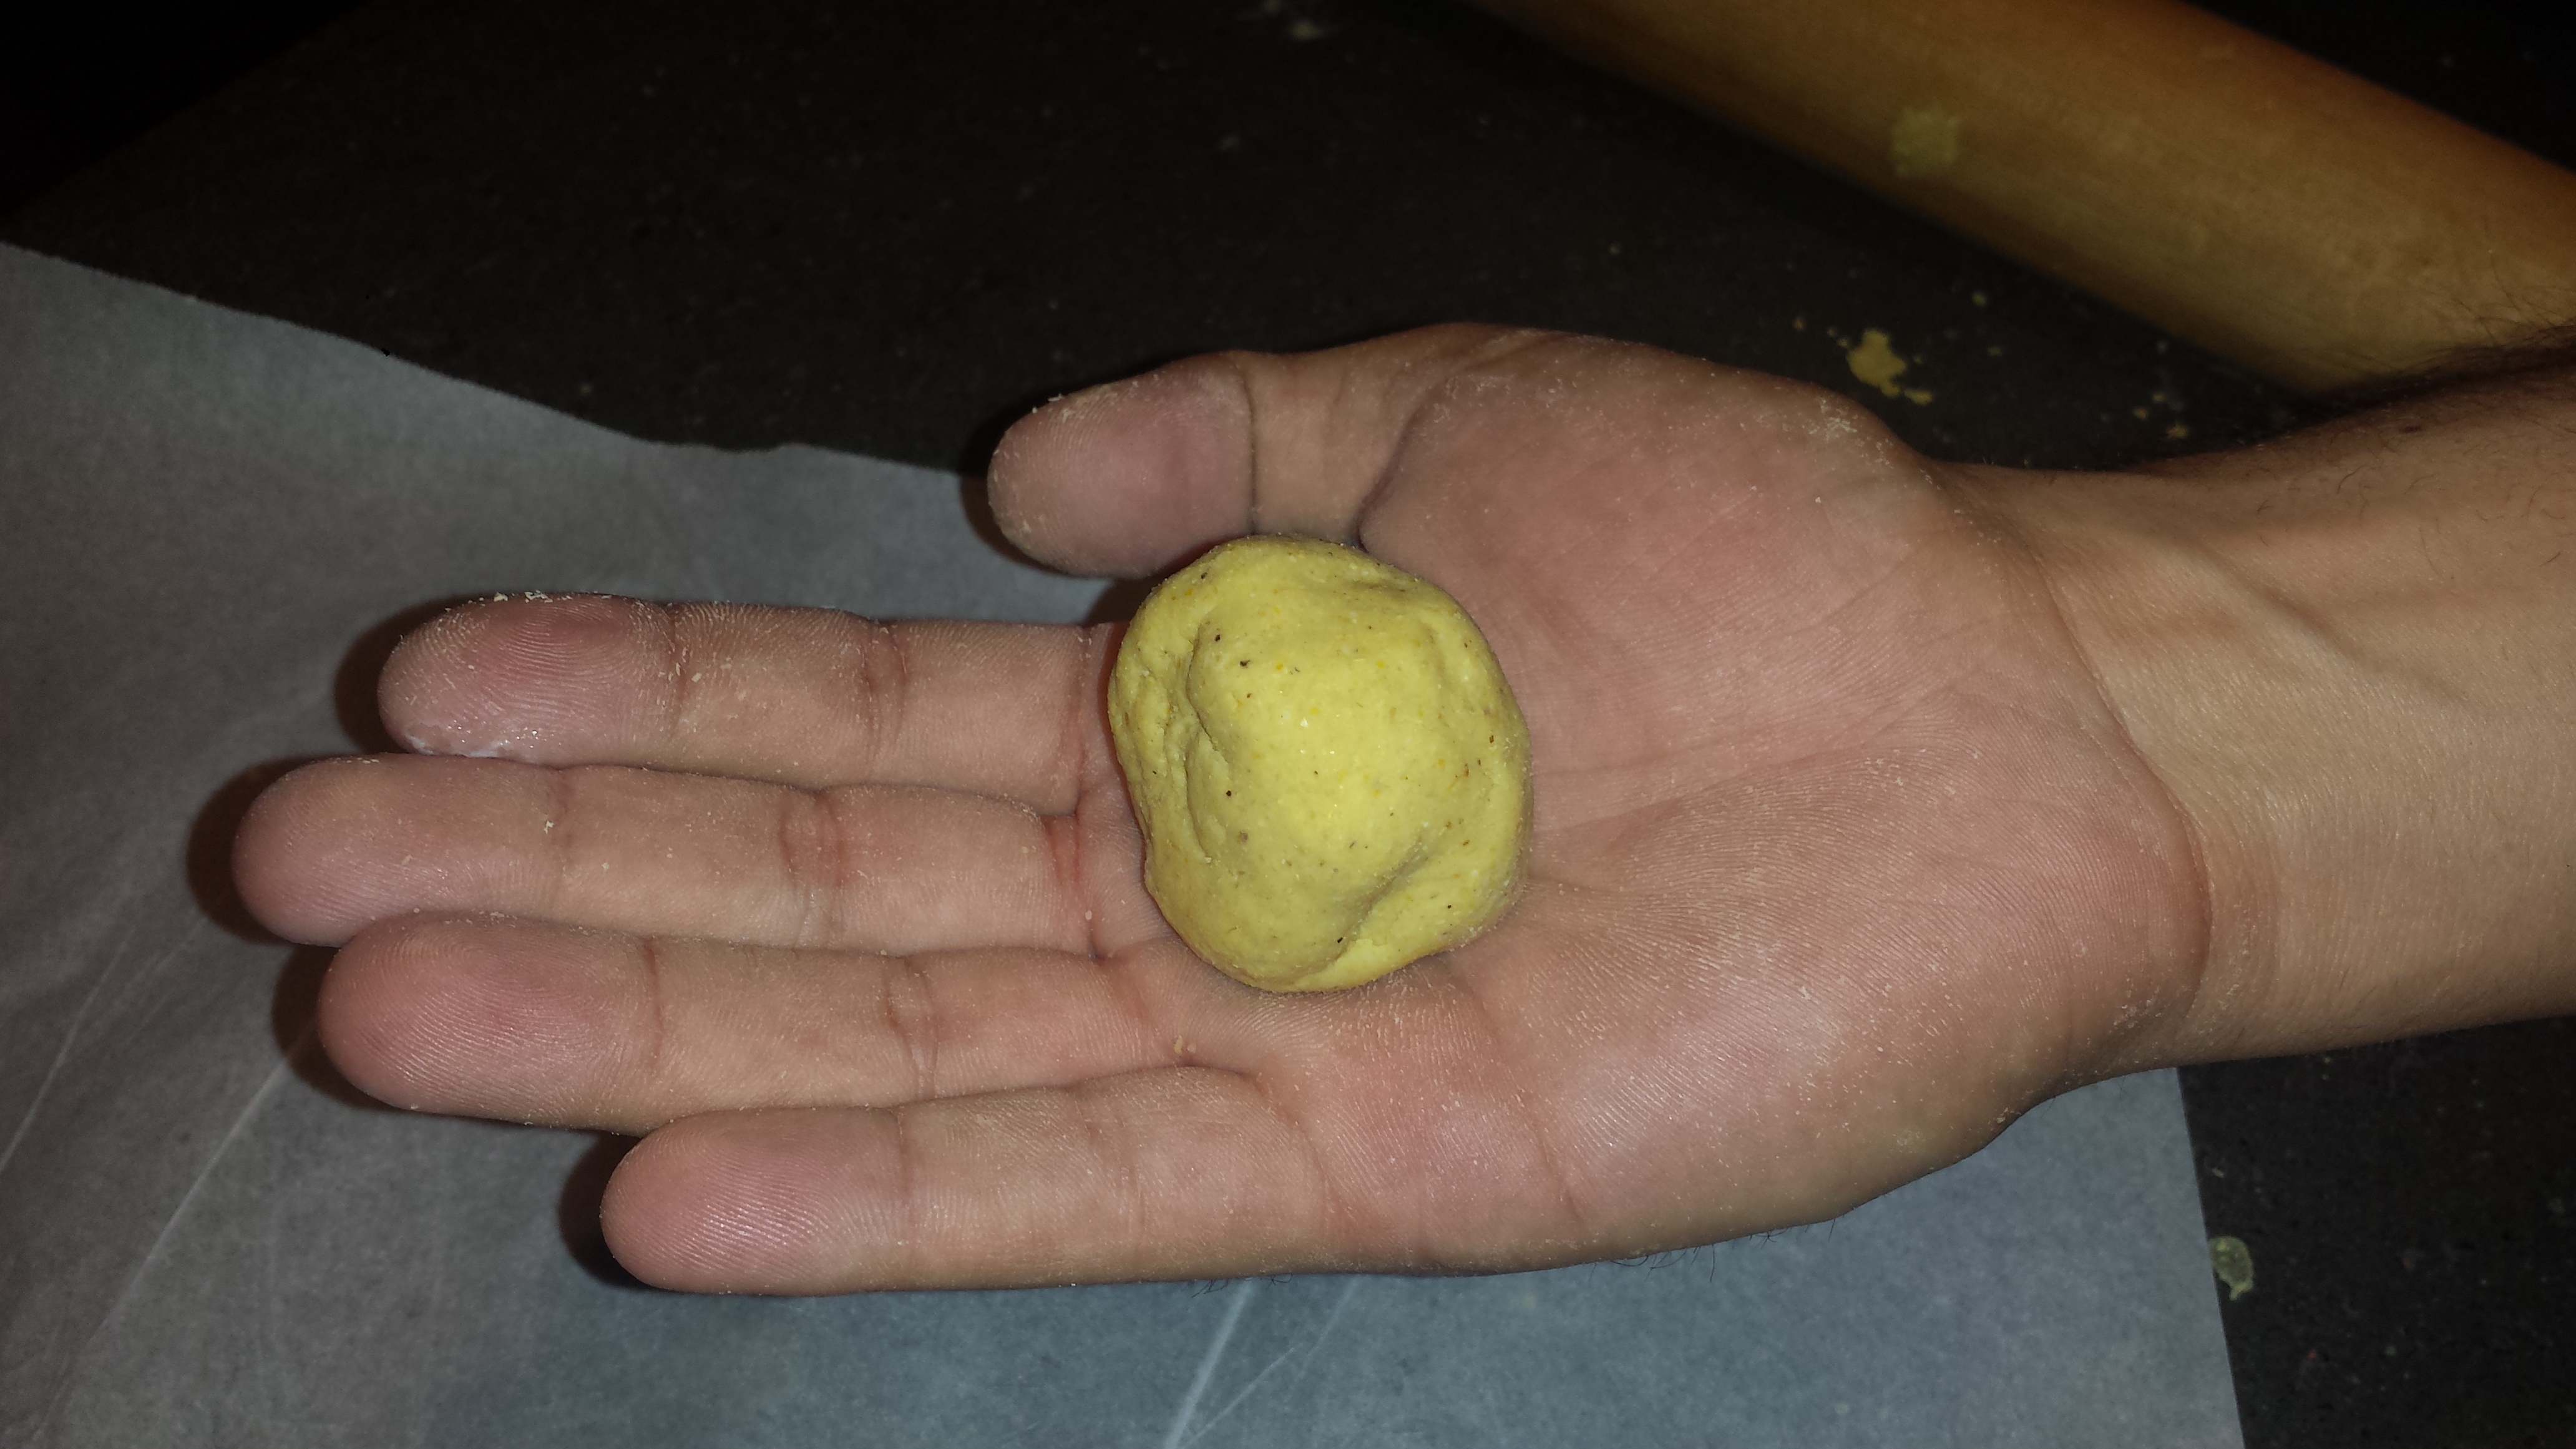
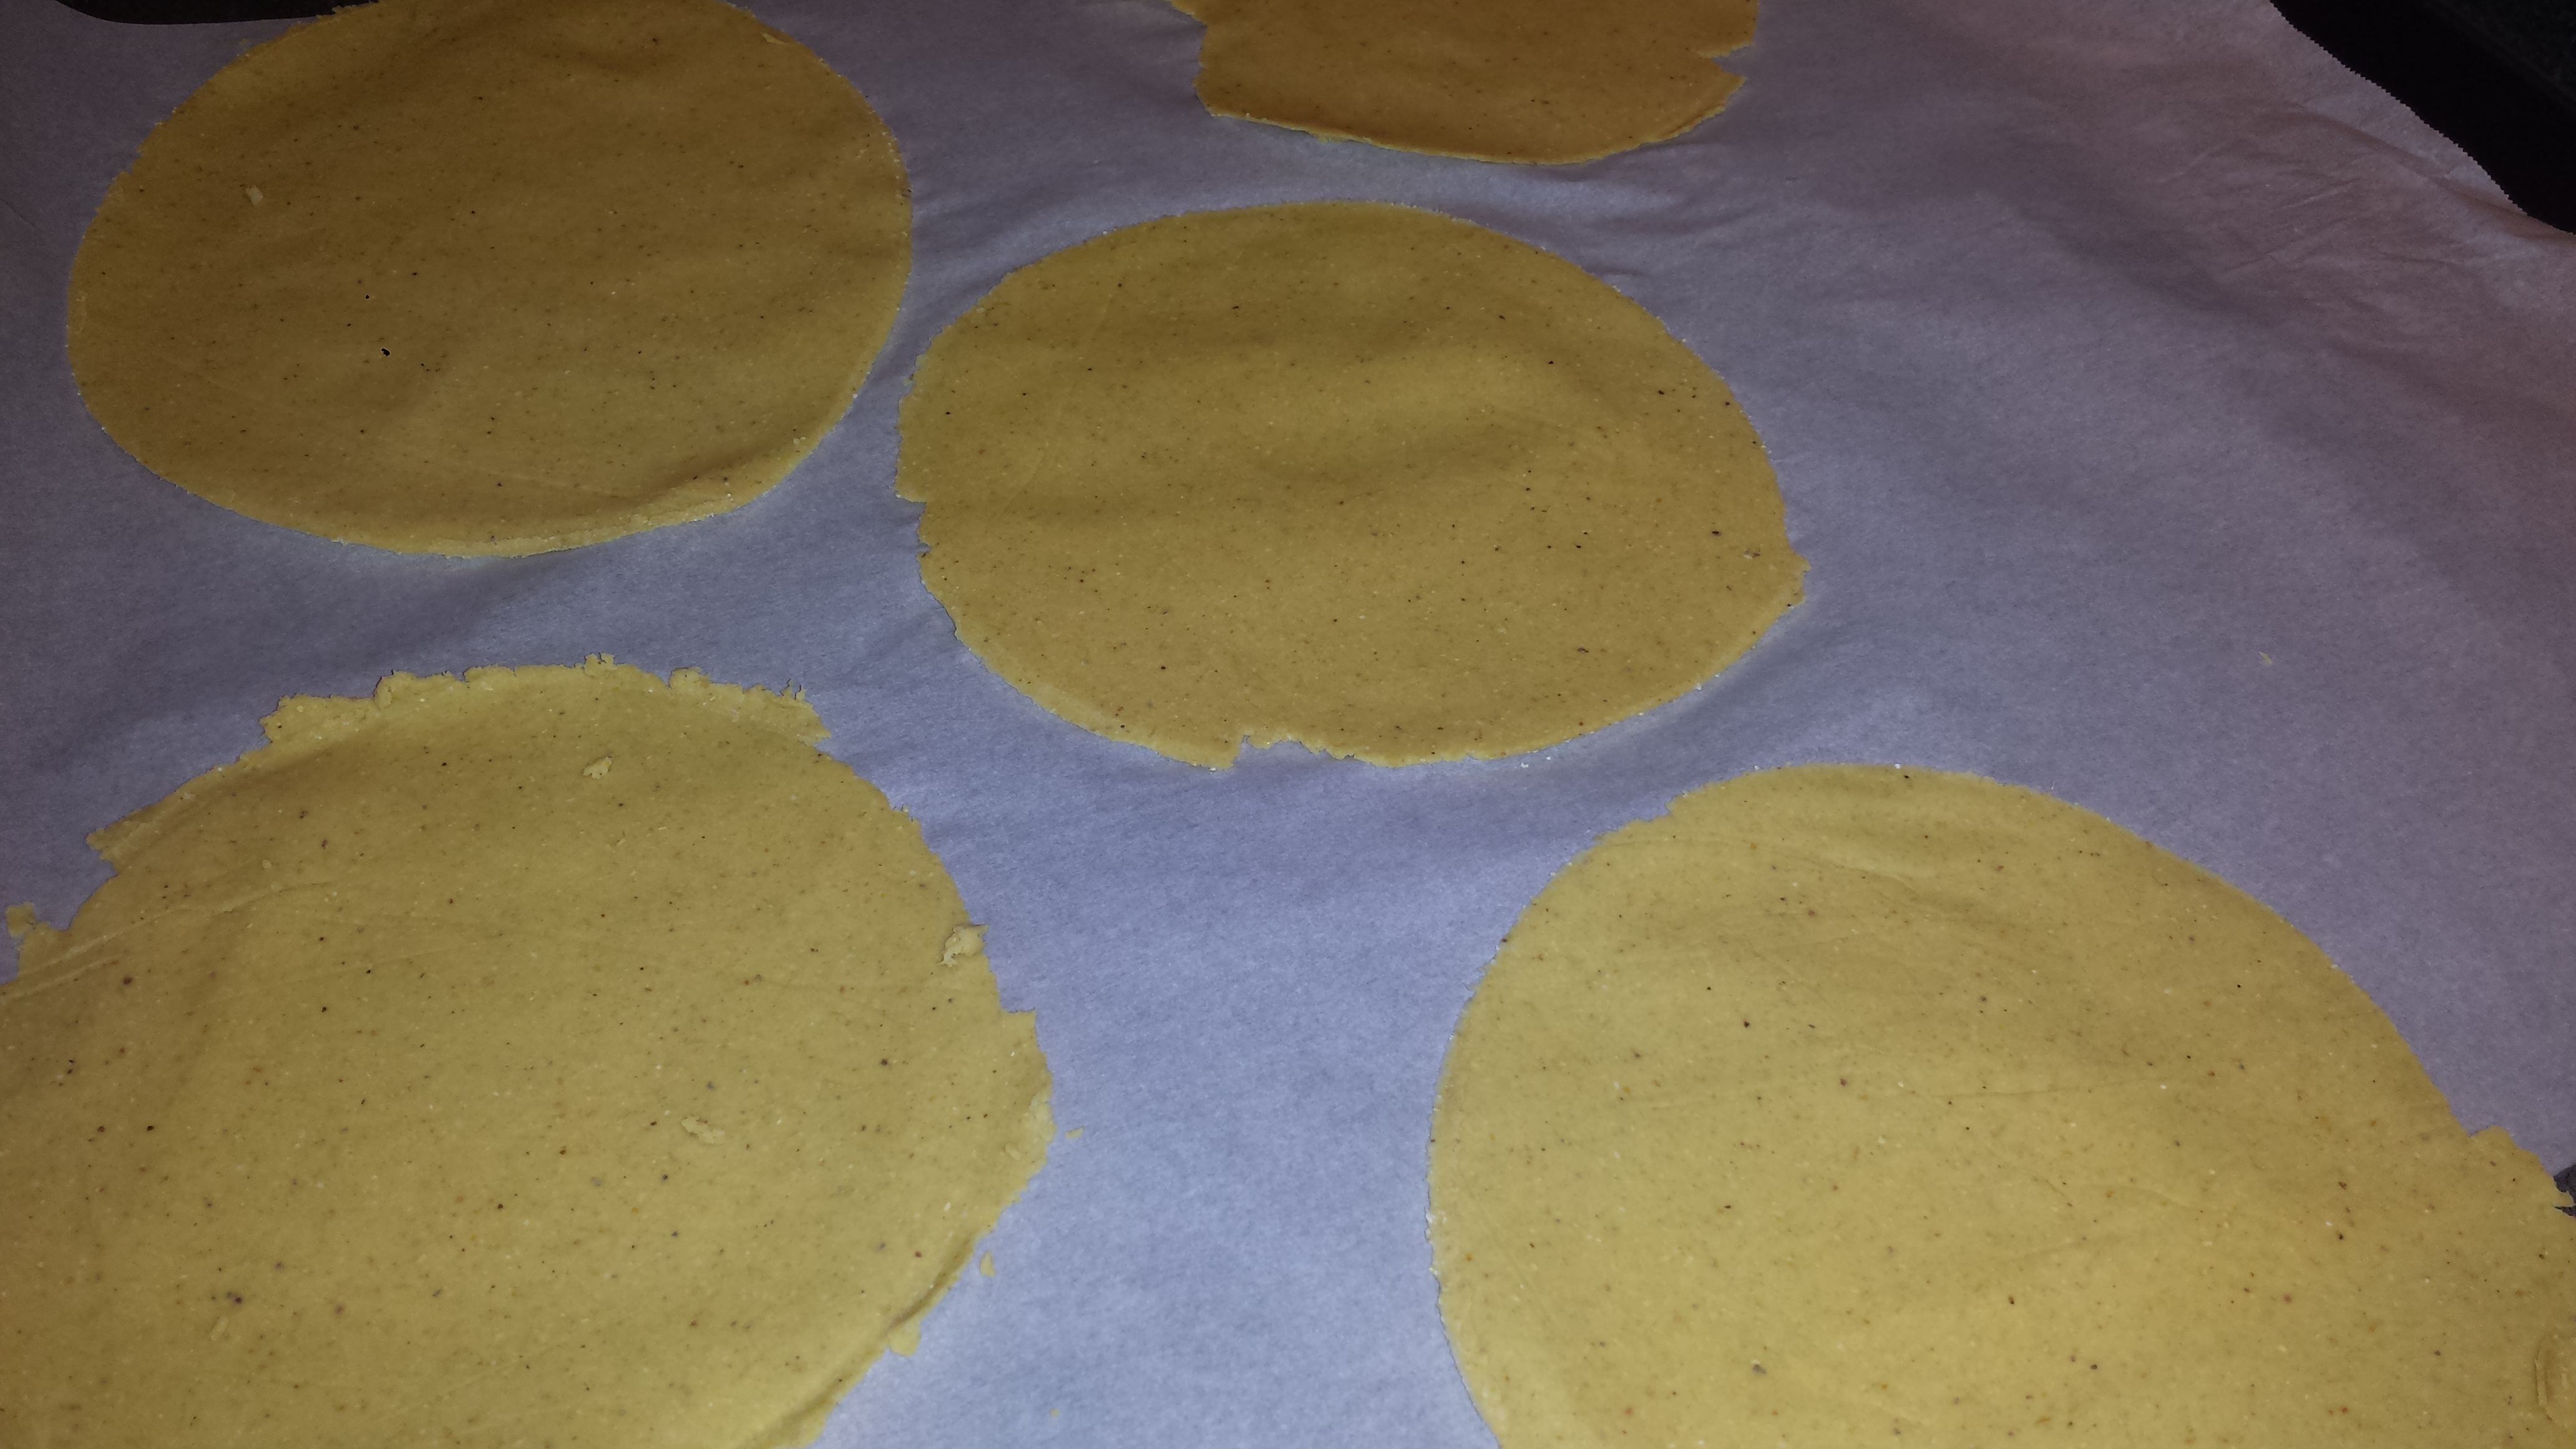
I (with the direction able assistance of my son, Eric) made corn tortillas for the first time and it wasn’t a difficult as I thought it was going to be.  If you don’t want to go to the trouble, you can find many very good store bought tortillas that are labeled organic (meaning non GMO). My favorites are organic, whole grain Taco Sliders by Mi Rancho.  They are also the perfect size (4 1/2 inch round) for taco appetizers or mini quesadillas.

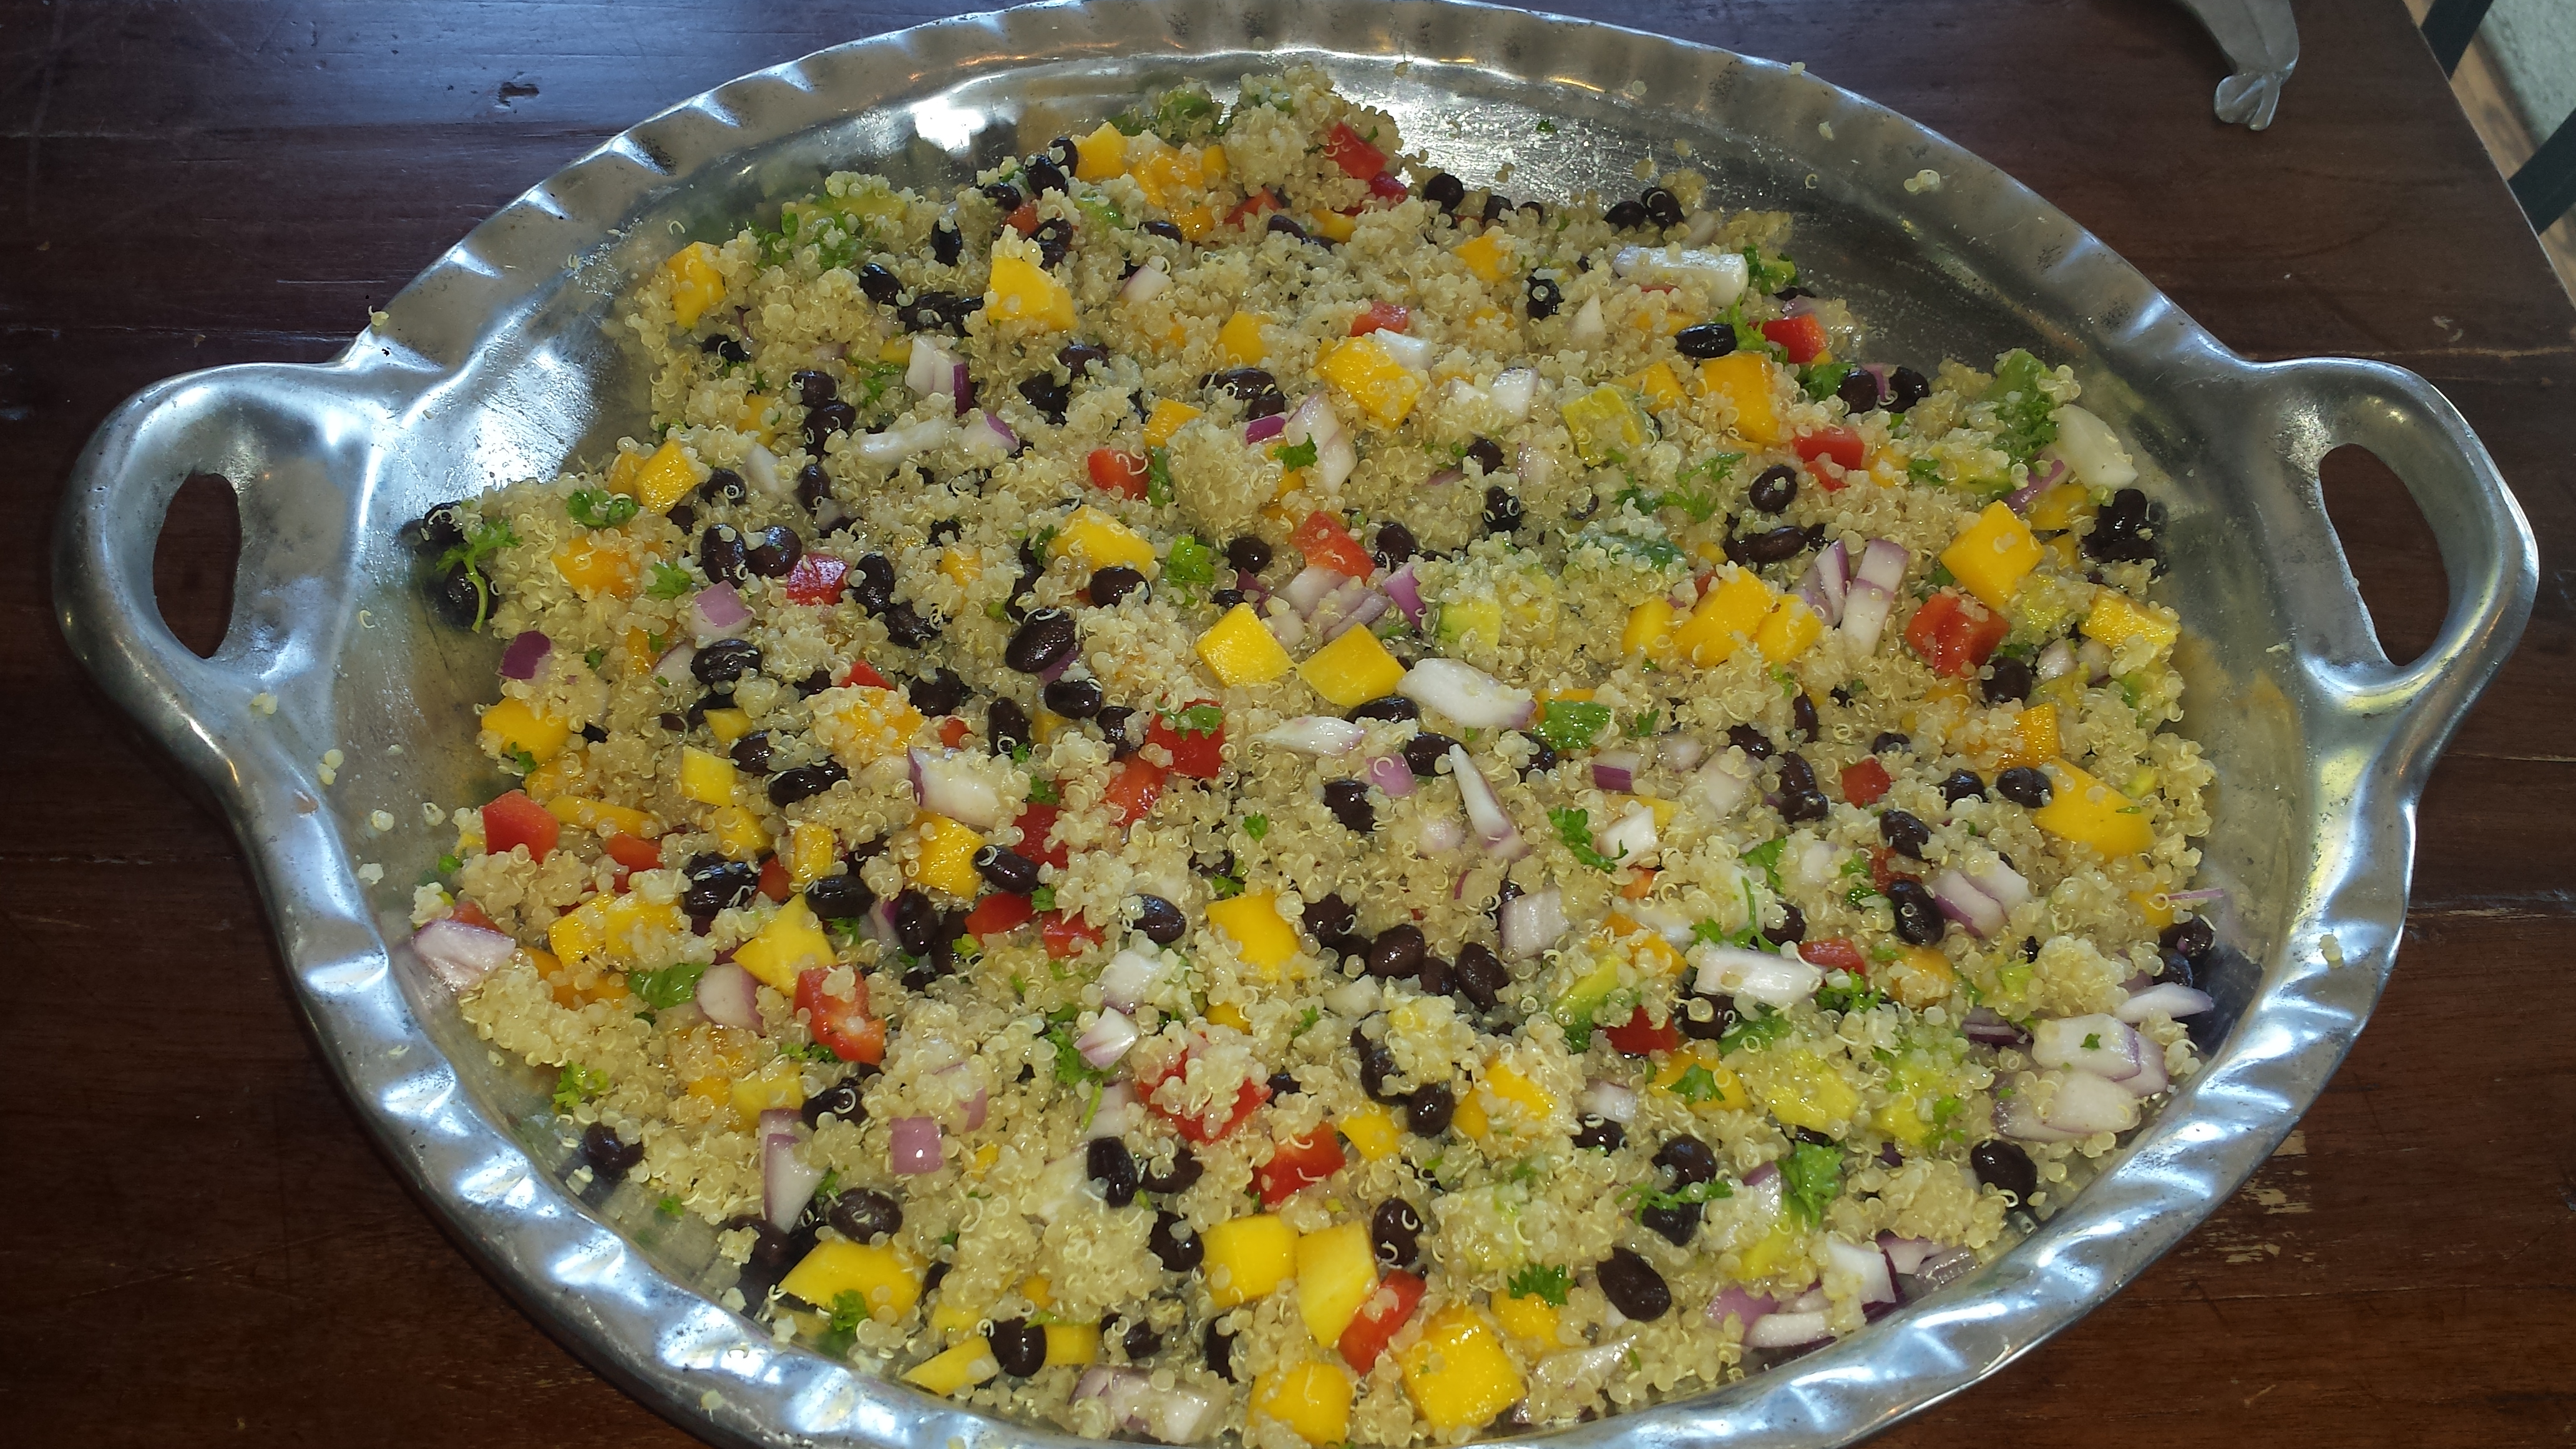
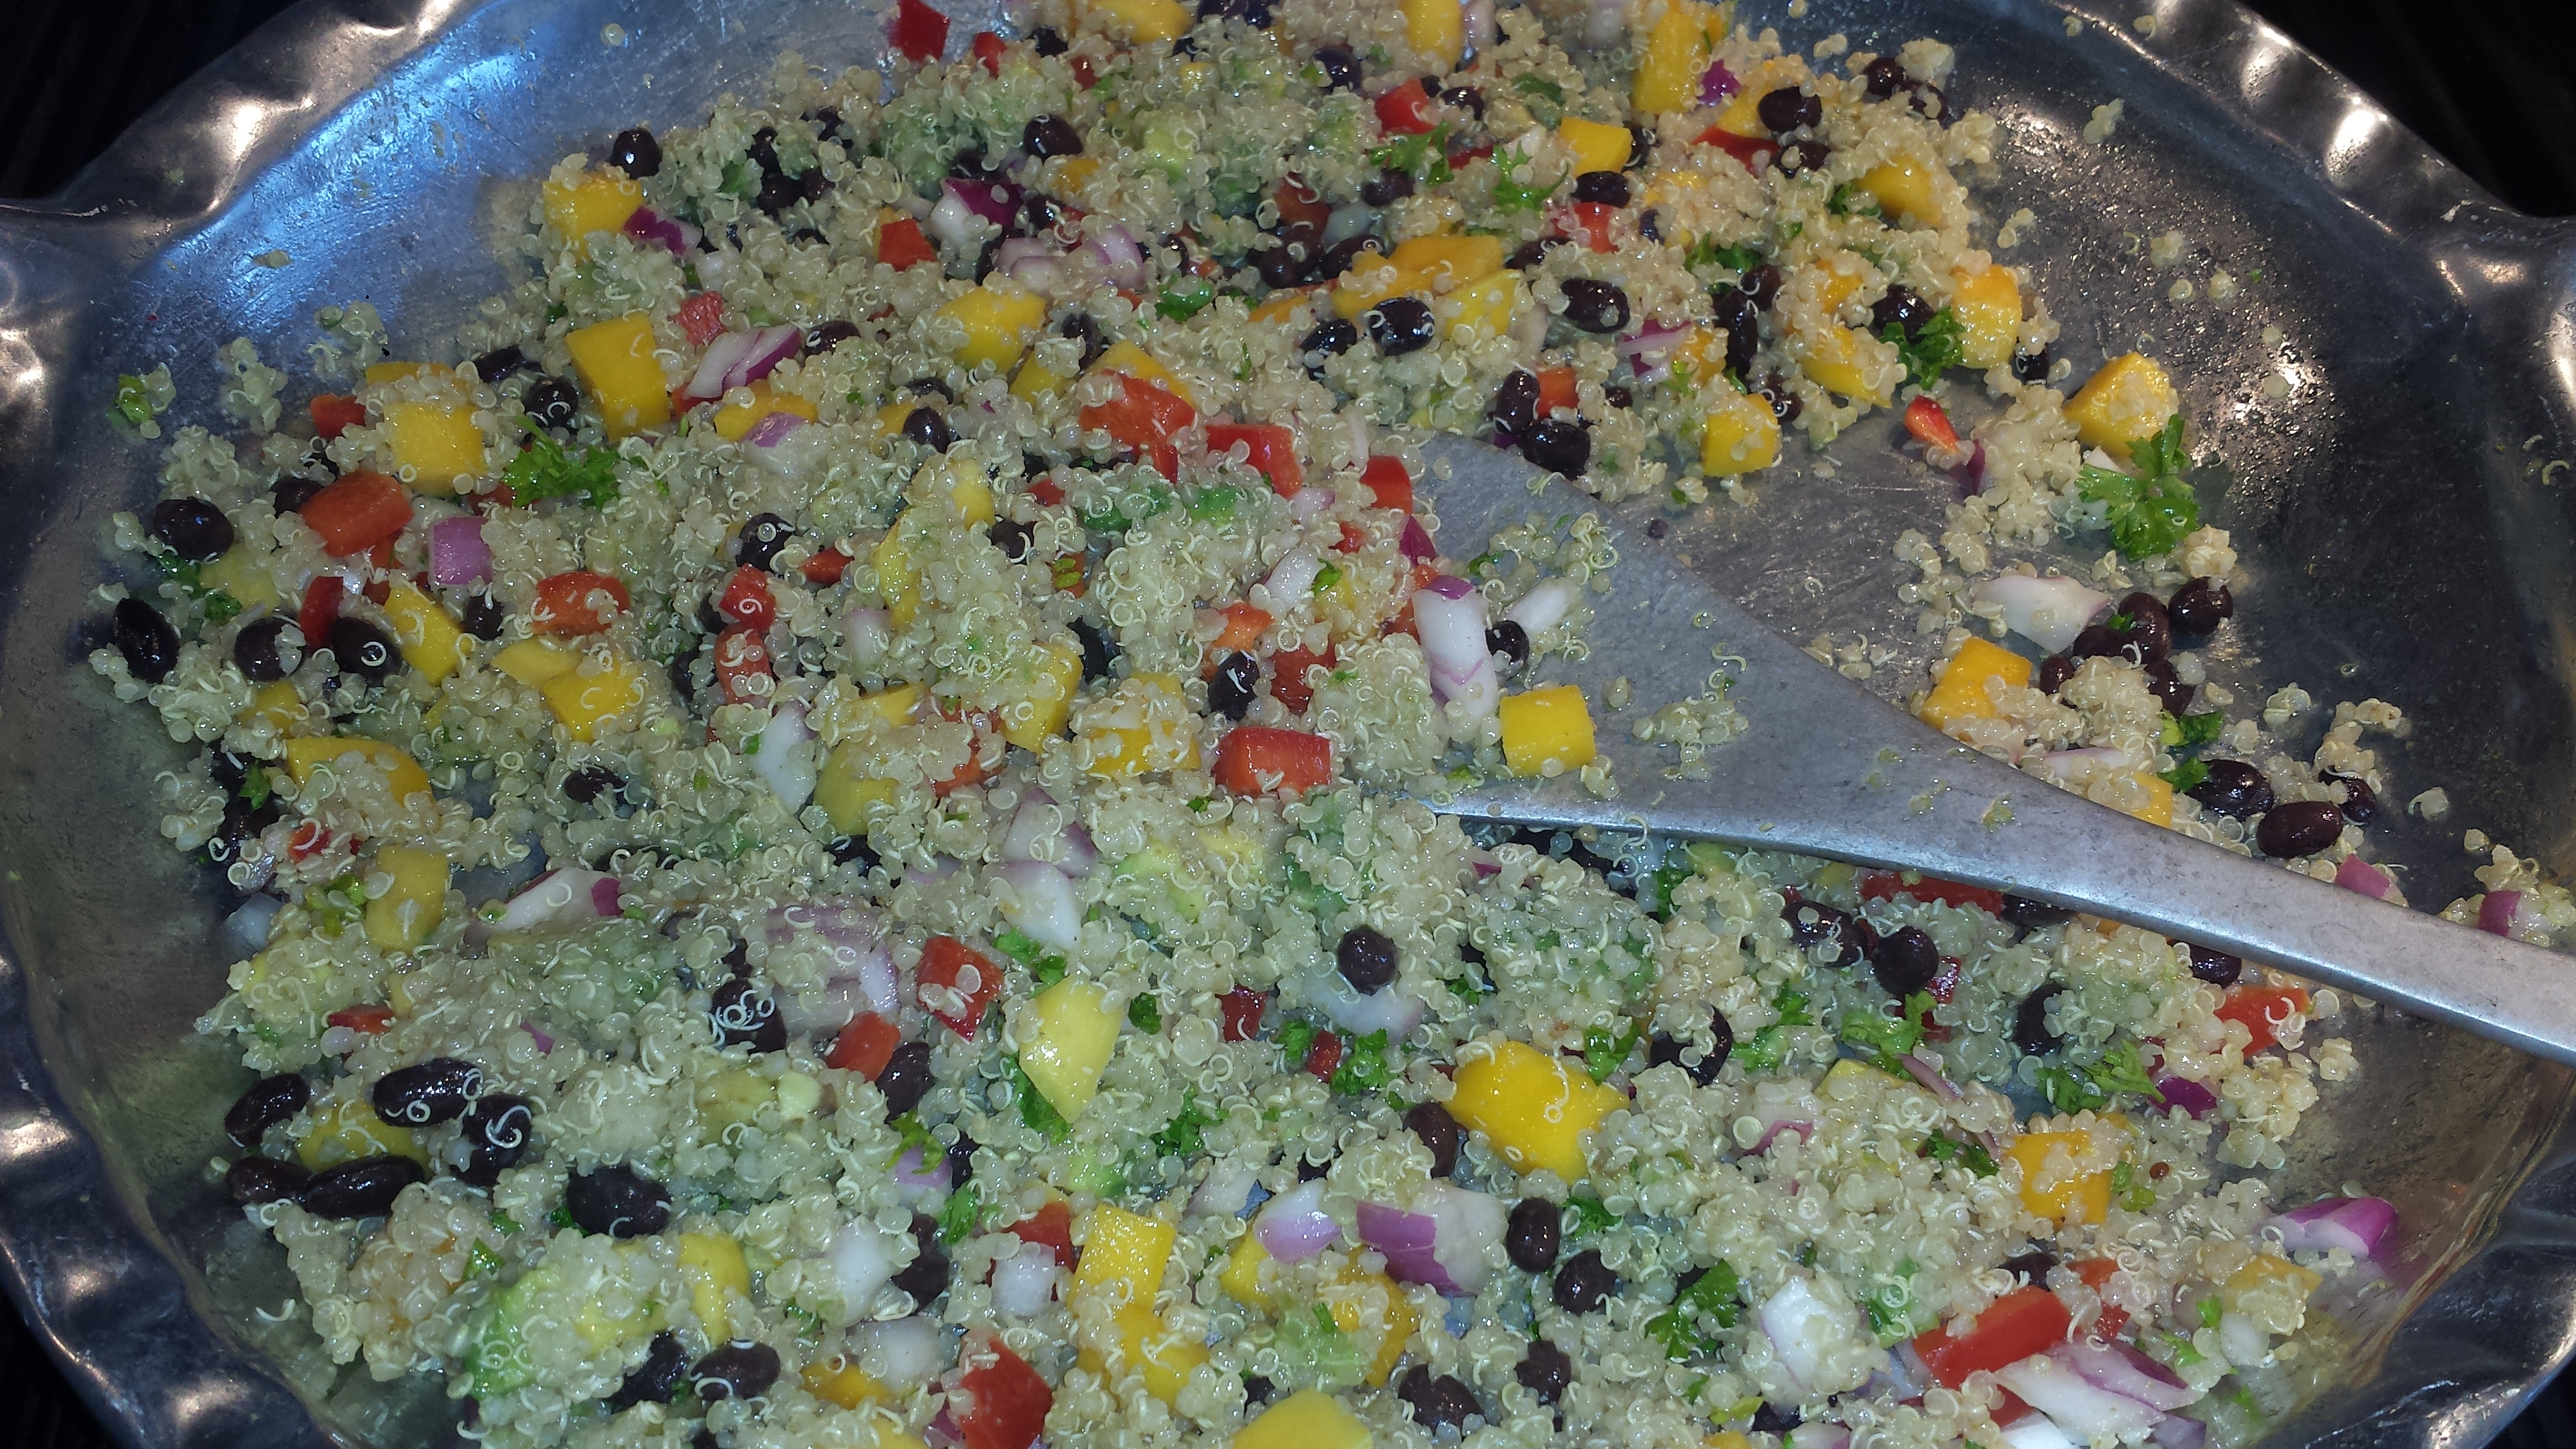
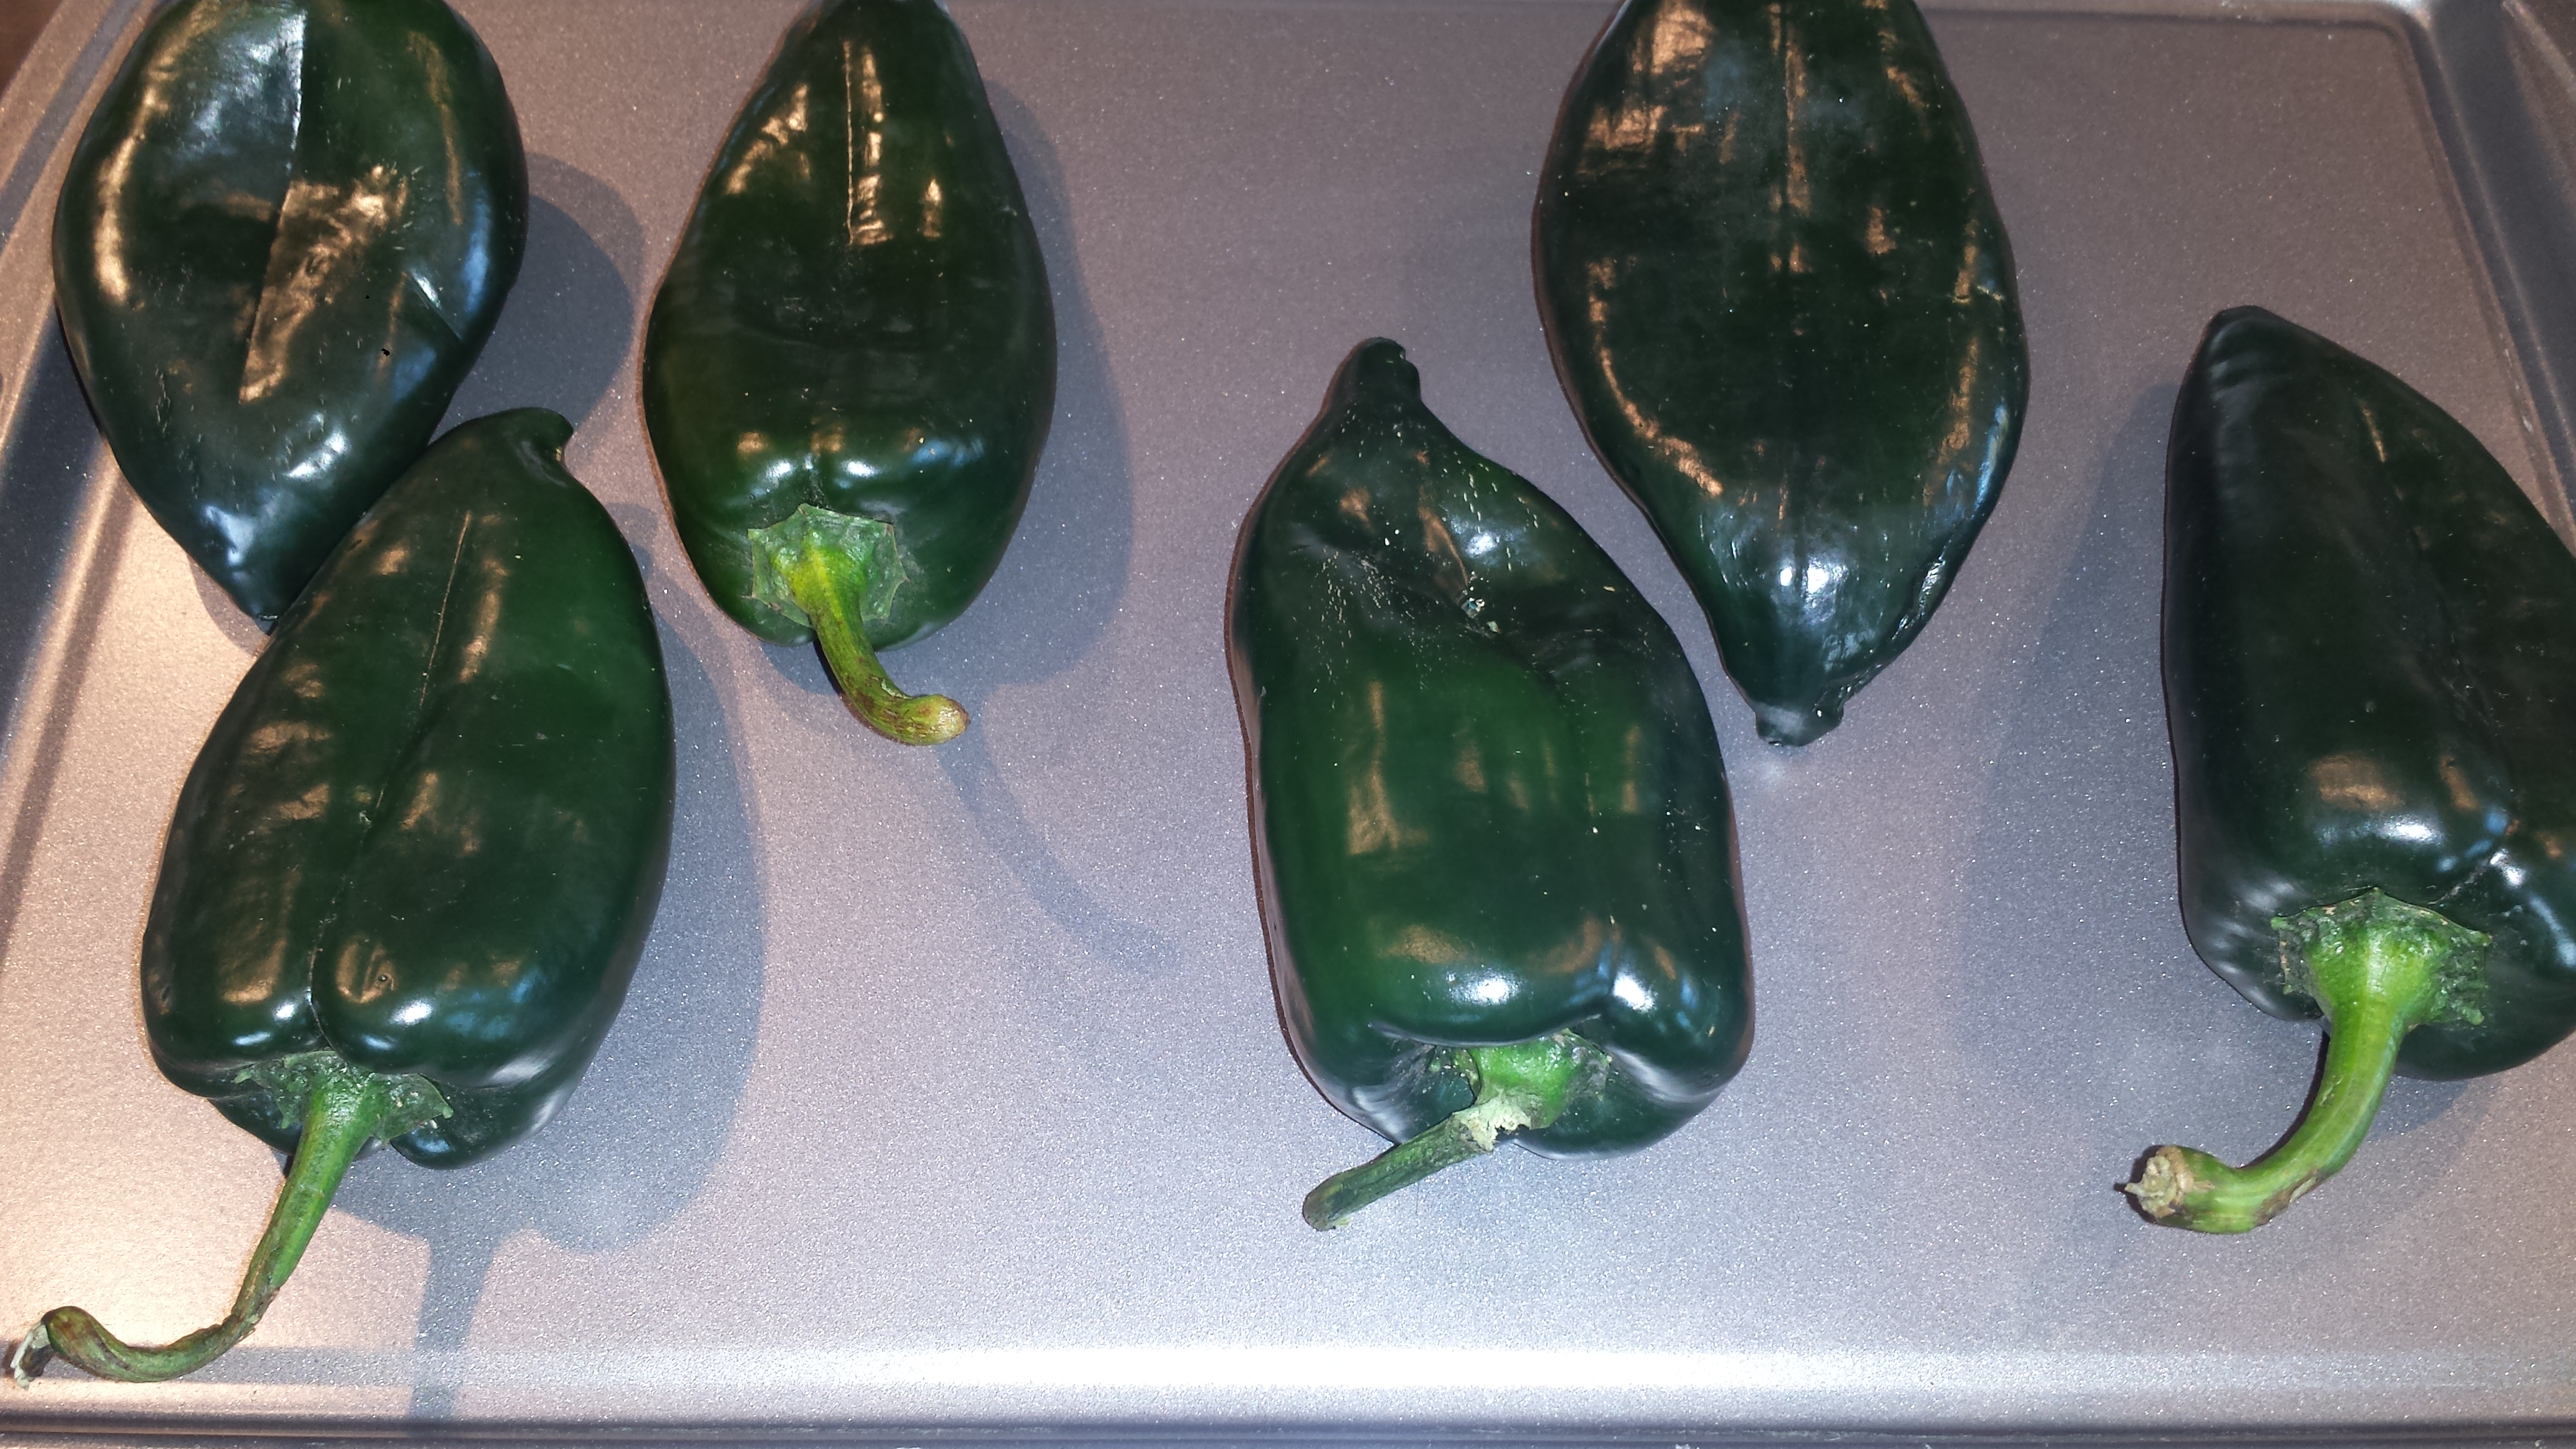
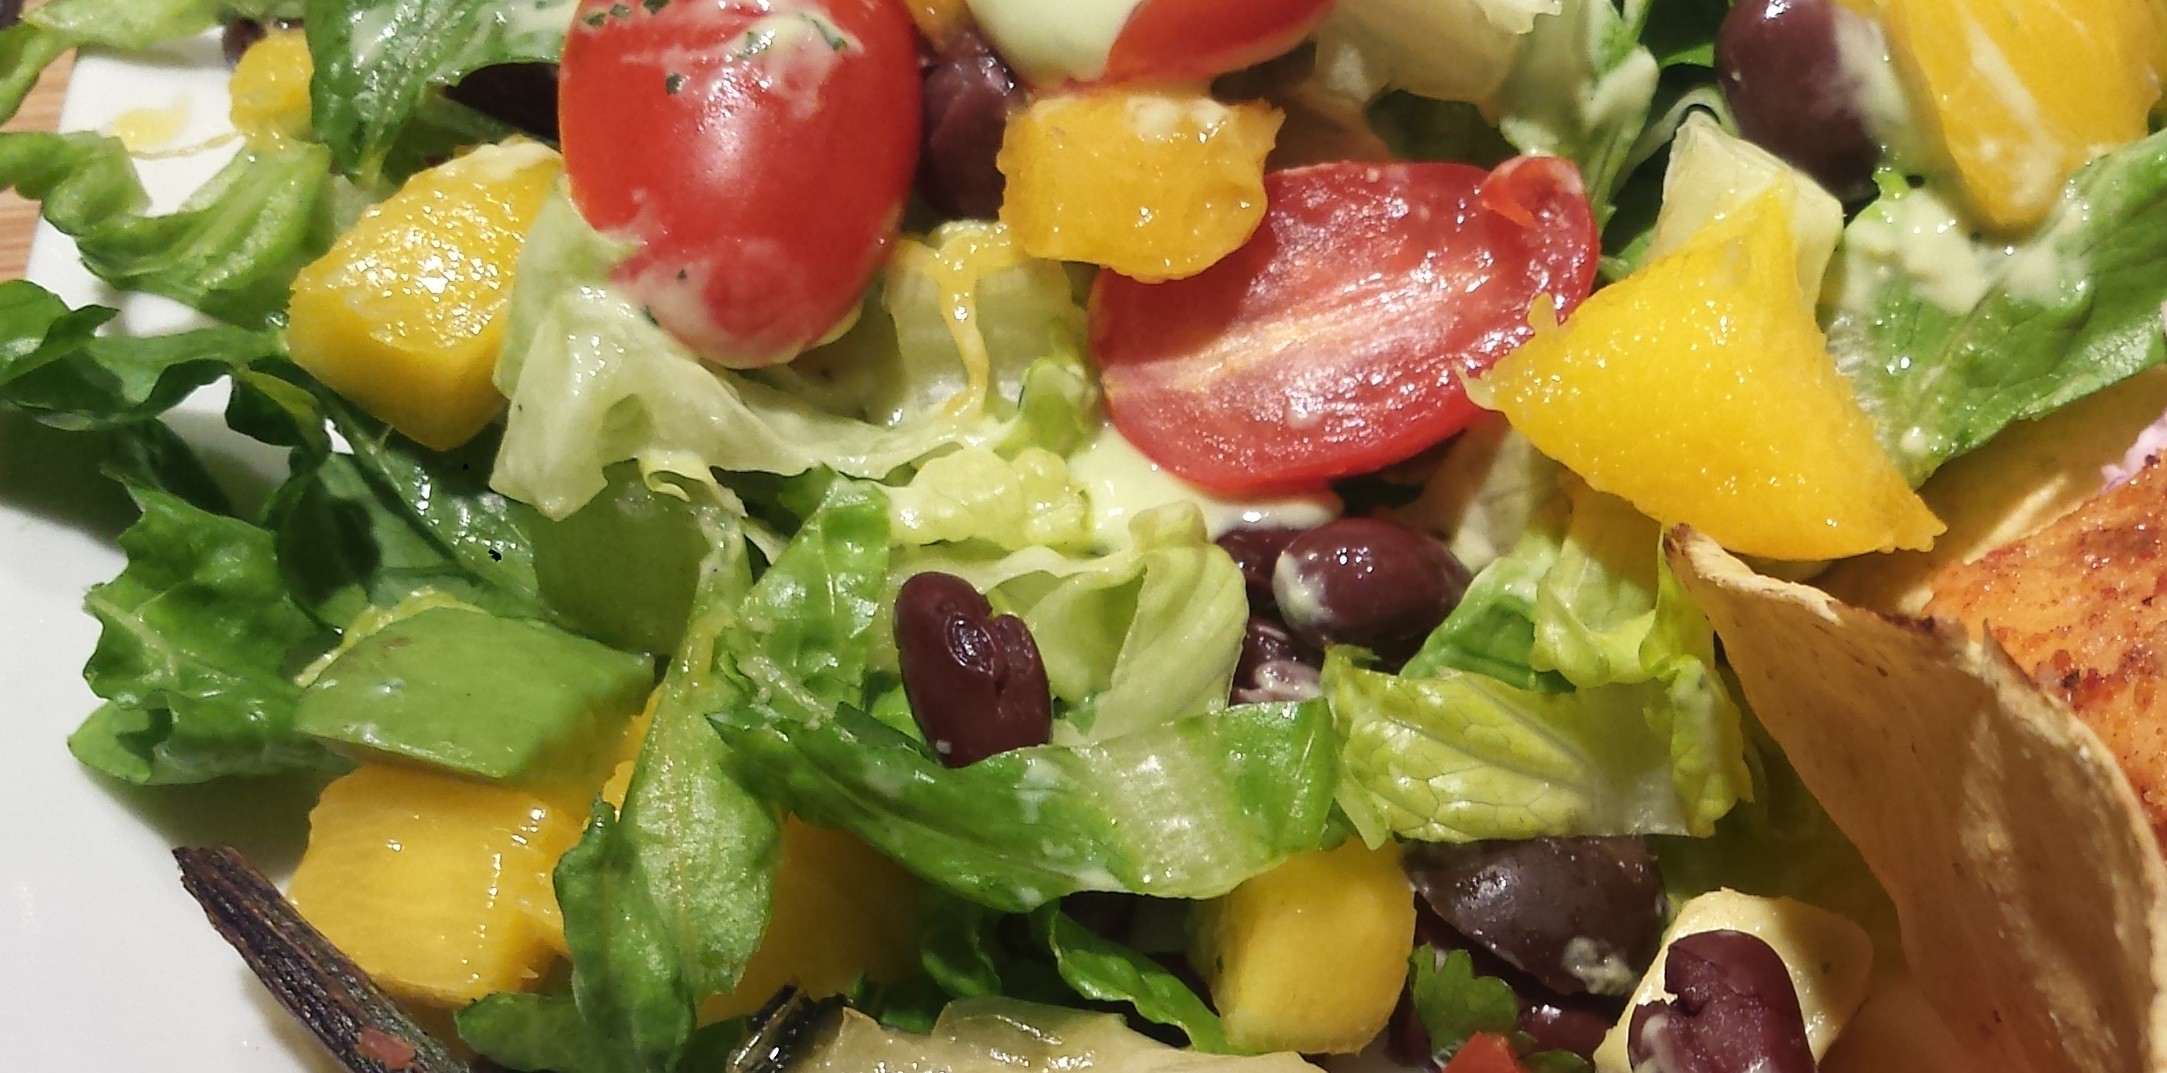
I fondly remember my Mom making chili rellenos when I was a kid, using canned chilis, stuffed with cheese, dipped in batter and fried.  Sounds pretty good doesn’t it?  This updated version includes fresh poblano peppers, not fried but roasted and stuffed with jalapenos and various cheeses topped with fresh tomatoes, cilantro and lime.   We rounded out the meal with a Black Bean and Mango salad tossed with a dollap of homemade  avocado ranch dressing. Yum!

Spicy Fish Tacos

  • Servings: 4-6
  • Difficulty: easy
  • Print

cinco de mayo26

2 pounds halibut(or other mild white fish), skinned, and cut into 4 to 6 pieces
3 Tbsn chili powder
1 teaspoon(s) ground cumin
1/2  tsp cayenne pepper(or more to taste)
1 clove garlic, minced or 1 tsp garlic powder
2 Tbsn lime juice
2 Tbsn olive oil
1 teaspoon(s) salt
 
 cinco de mayo14
  • Combine chili powder, cayenne, cumin, garlic lime juice, oil and salt in a gallon zip lock baggie and shake to combine.
  • Add fish and allow it to marinate for 20 minutes or so.

cinco de mayo17

  • When ready, broil fish for 4 or 5 minutes per side, until fish flakes easily. (fish can also be cooked on the grill)
  • Break into pieces for serving, if desired.

cinco de mayo9


Coleslaw

3 cups red or green cabbage, finely shredded
2 Tbsn fresh cilantro, chopped
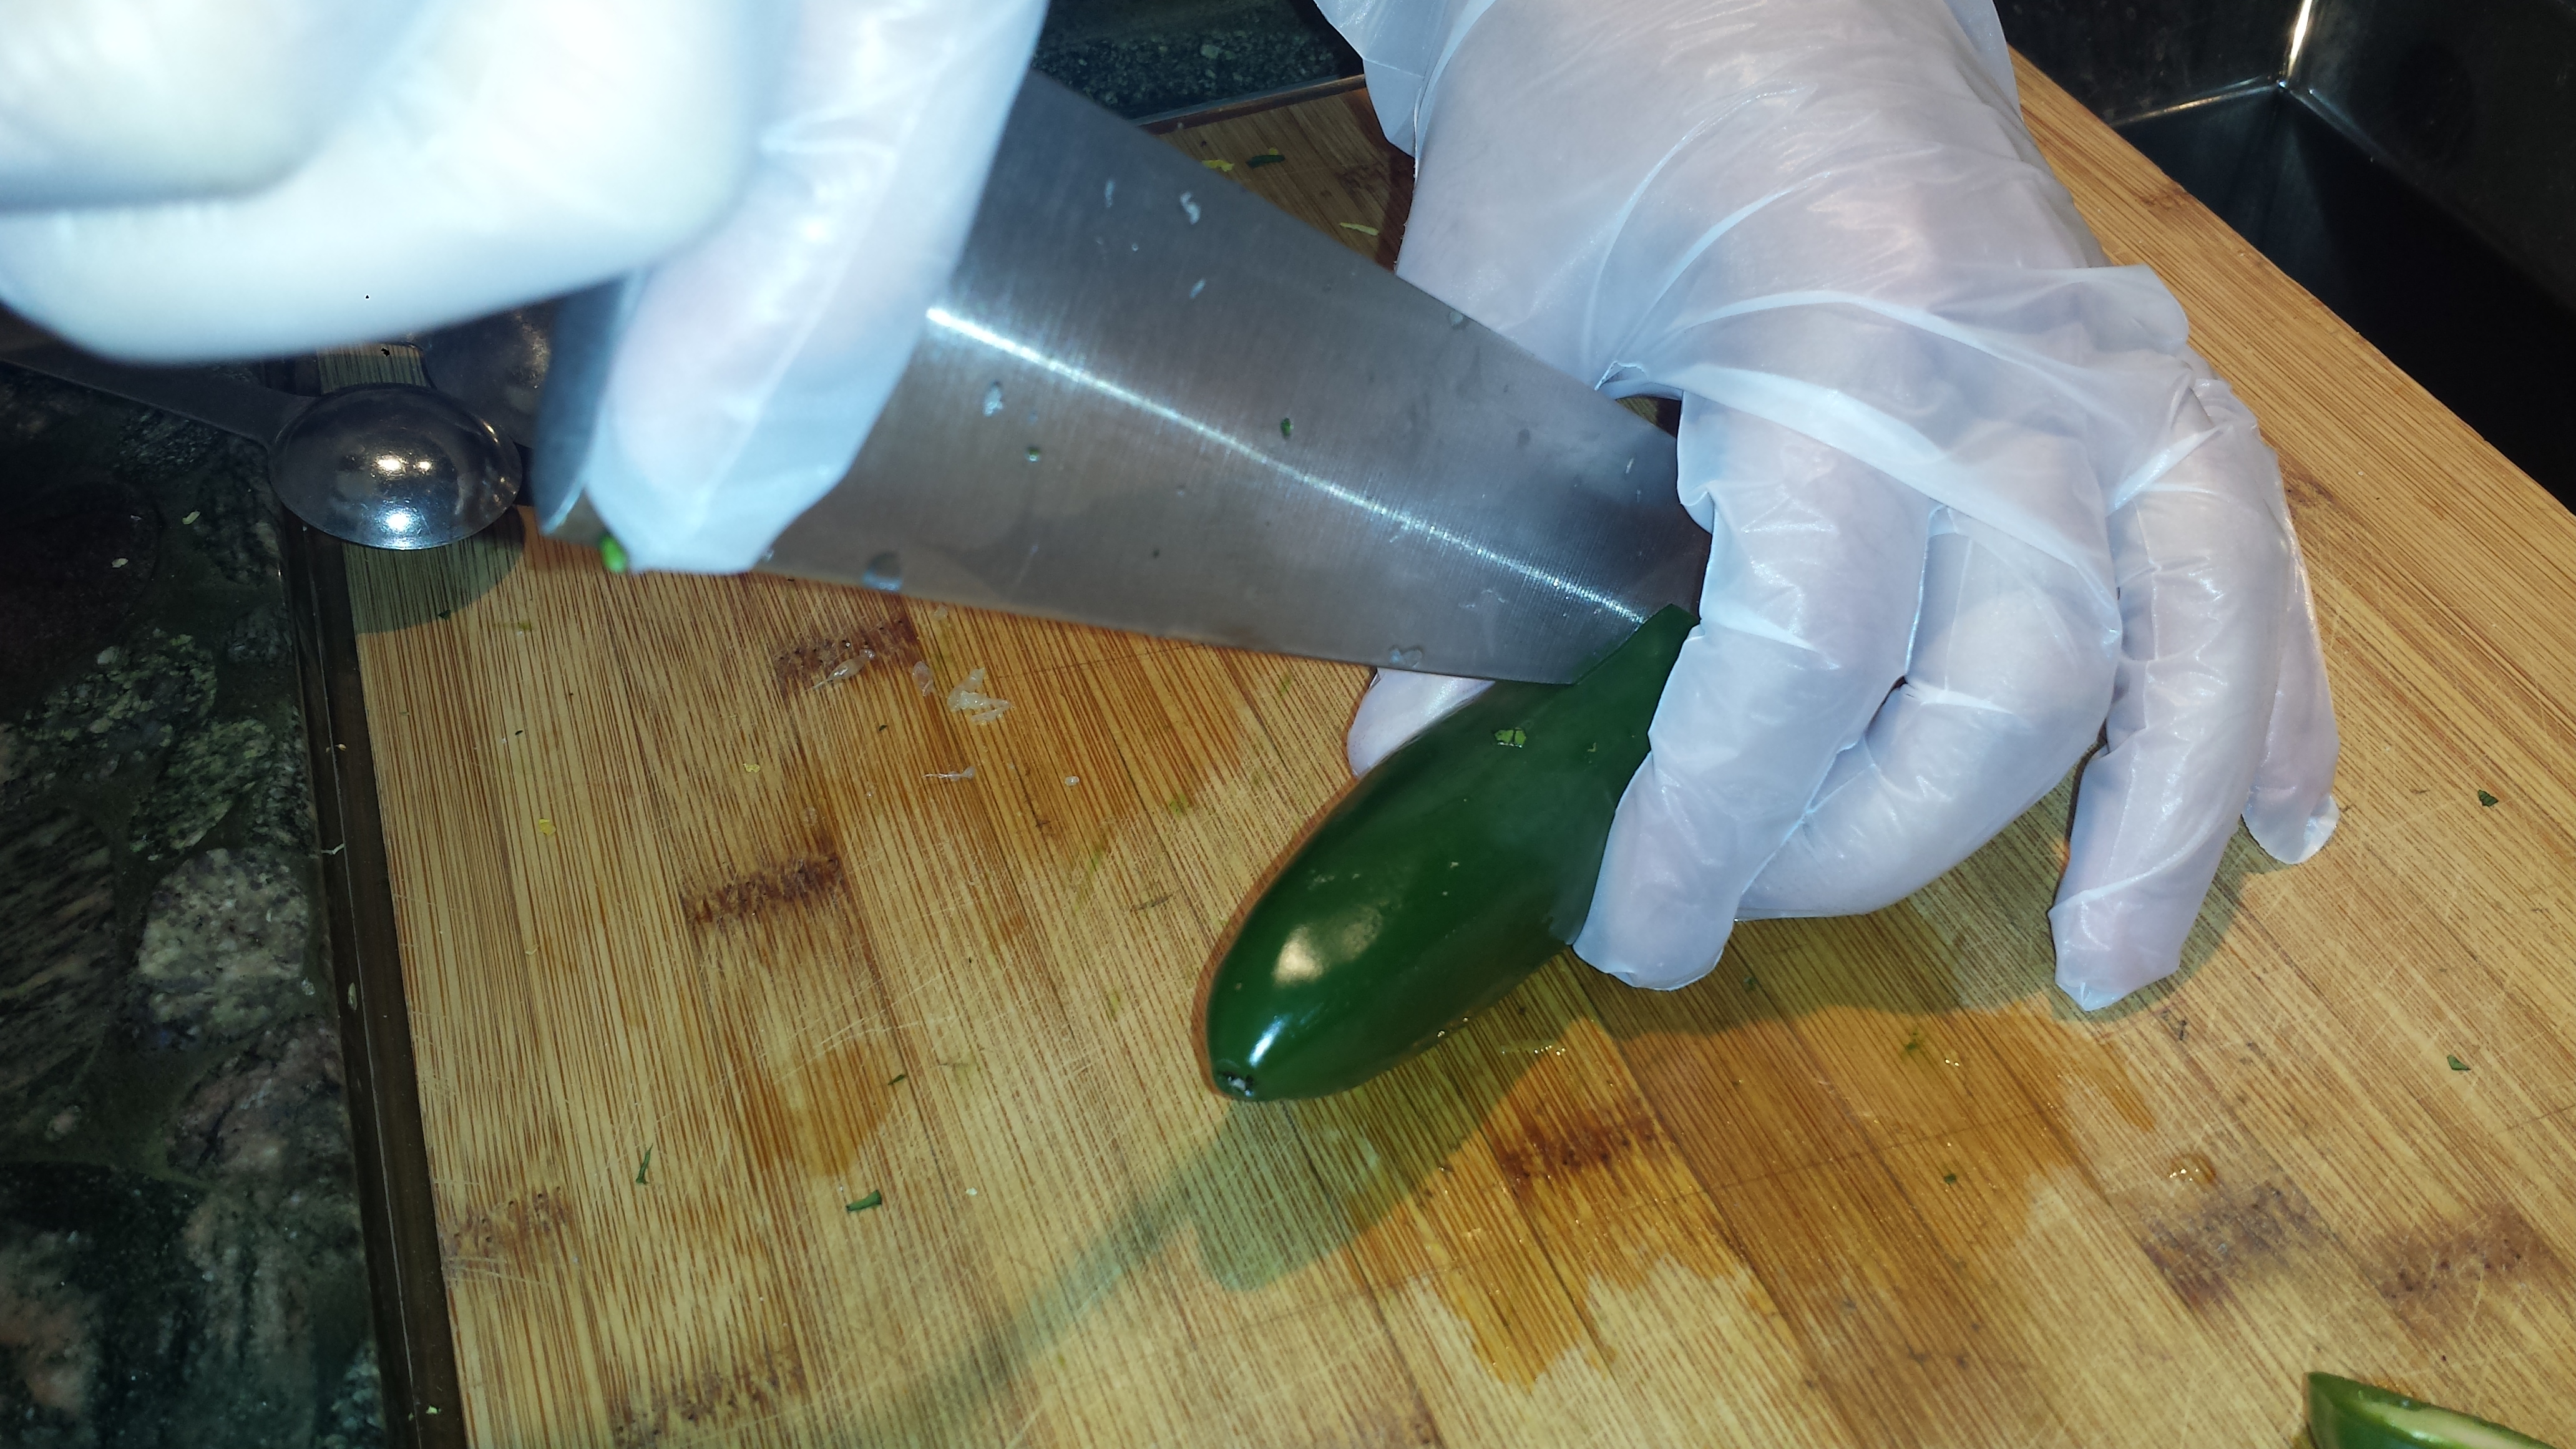
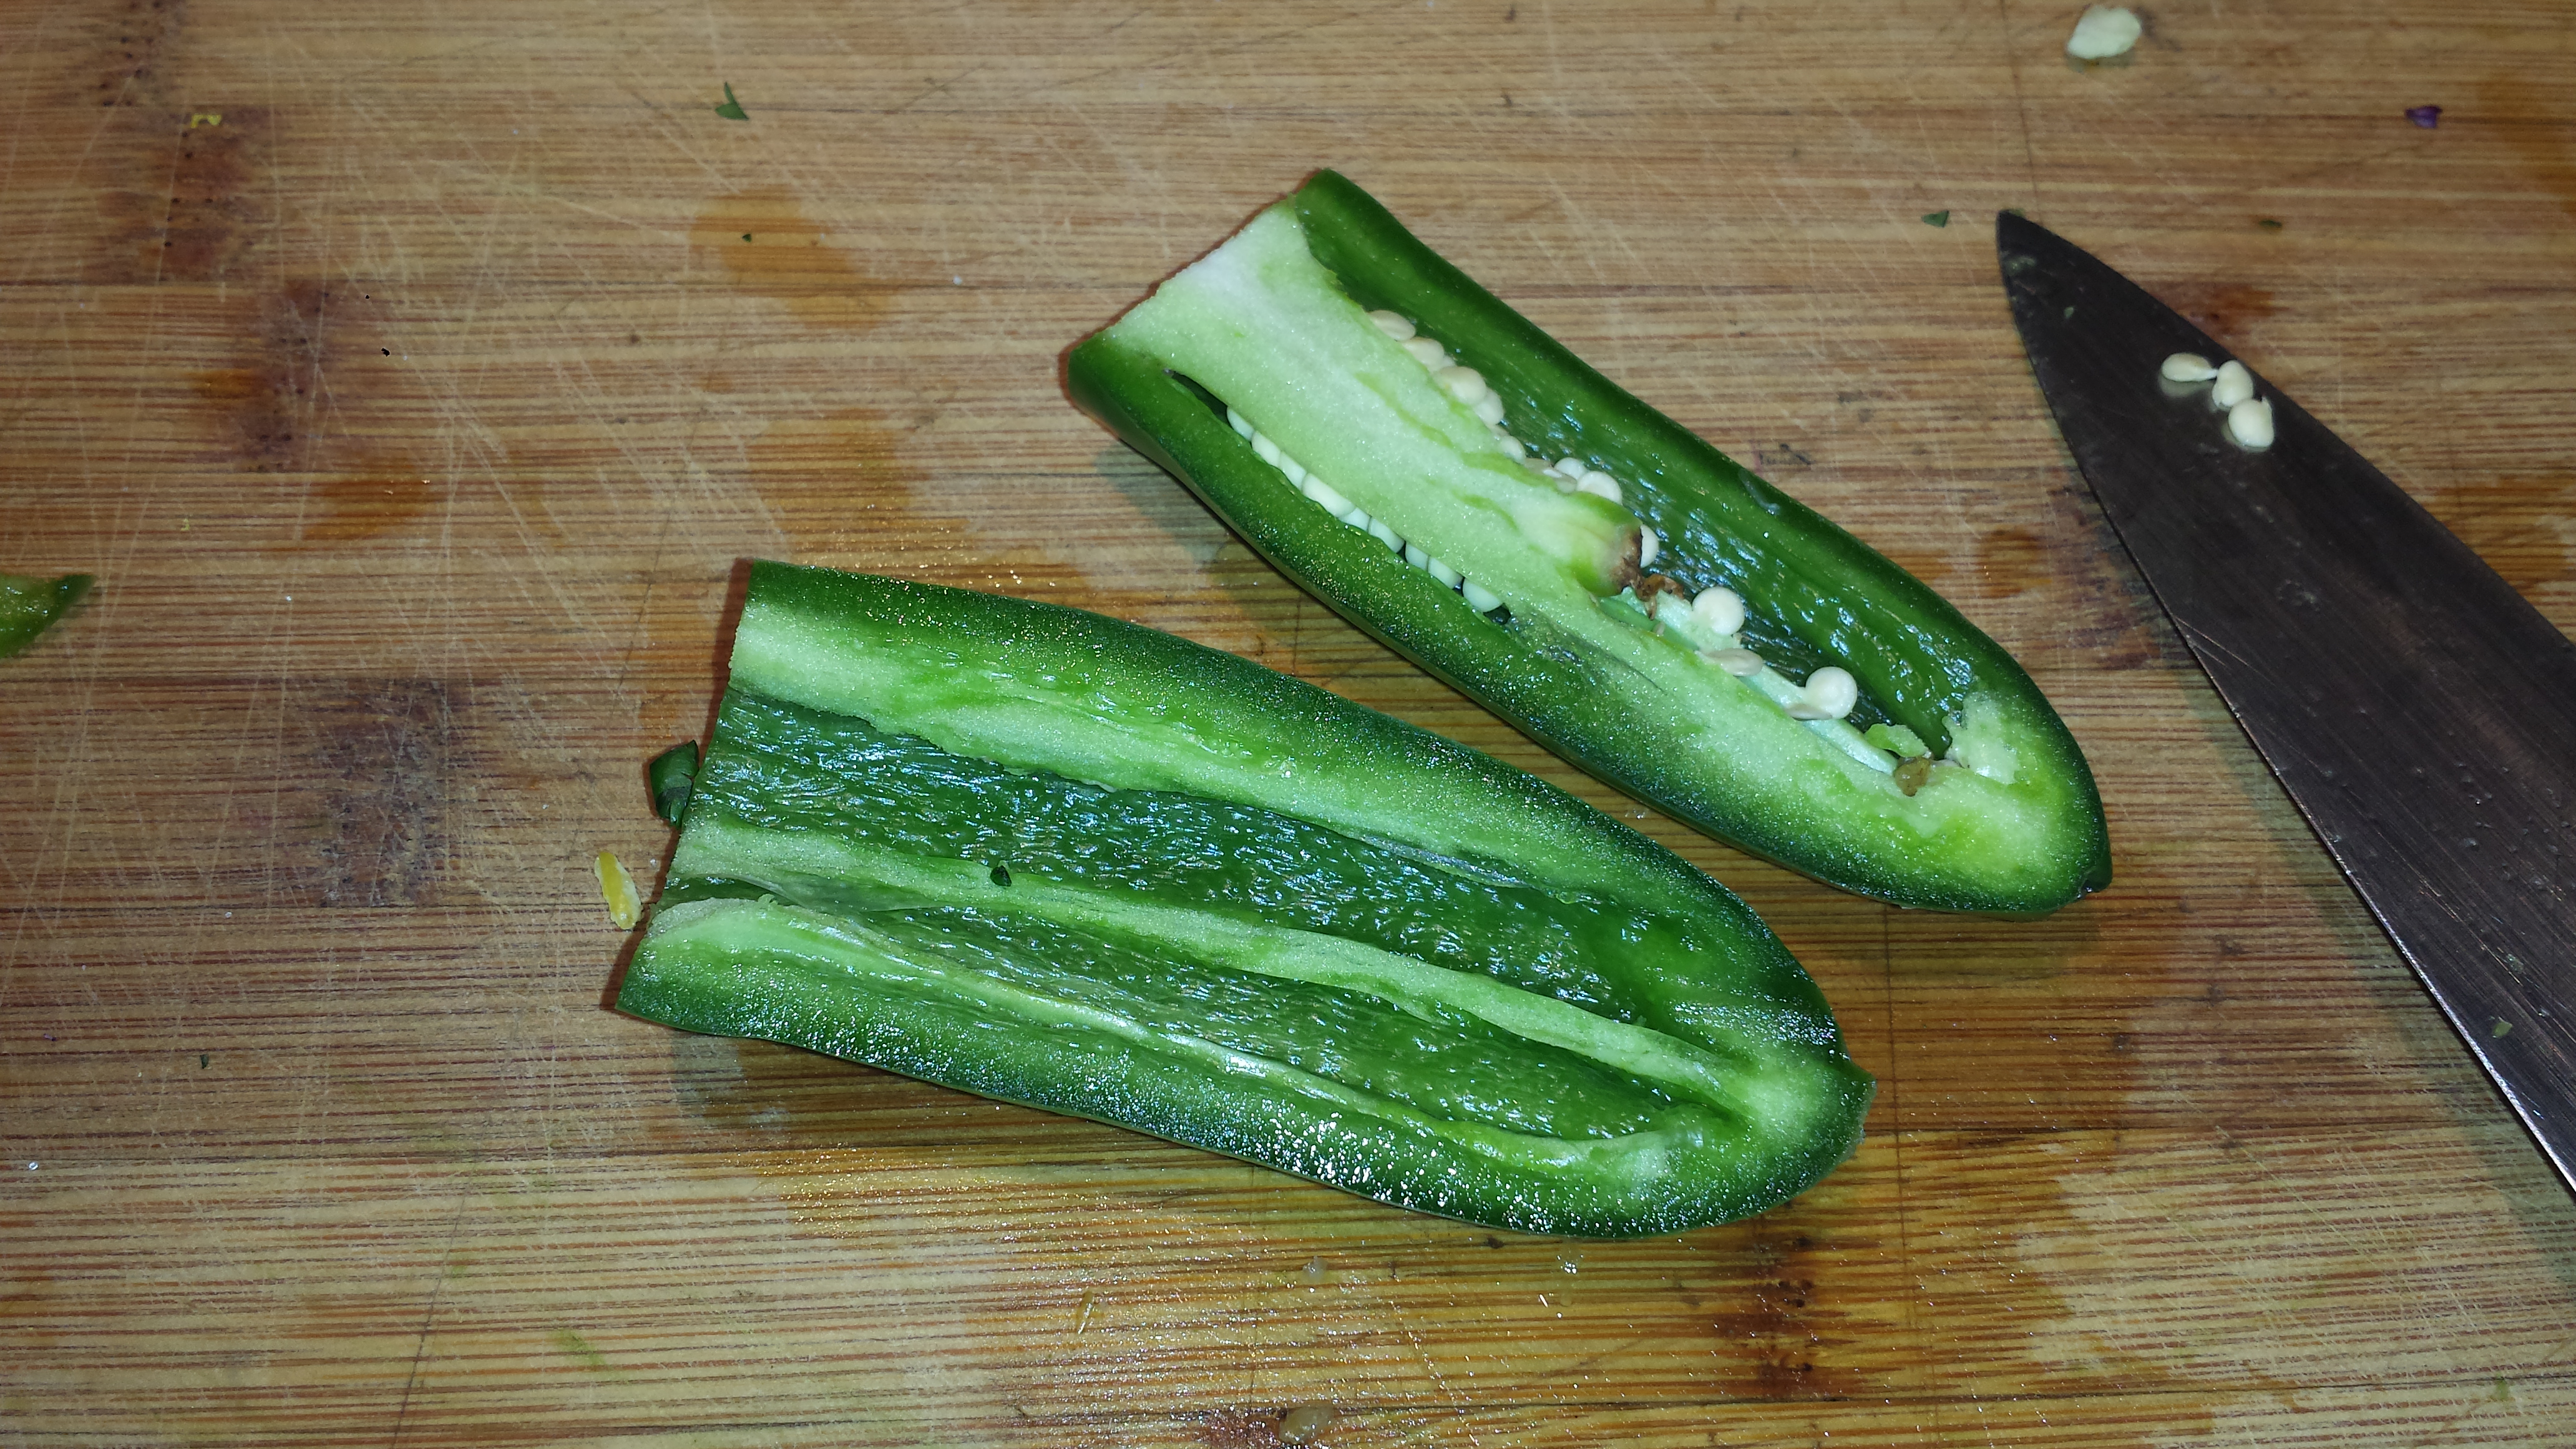
1/2 jalapeno
1/4 cup sour cream or yogurt
1/4 cup mayonnaise
1 tsp lime zest
2 Tbsn lime juice
1 tsp sugar
2/3 tsp salt
cinco de mayo25
  • Combine all ingredients, except cabbage, jalapeno and cilantro, in a small bowl and stir until creamy.

cinco de mayo27

  • While wearing gloves, seed and mince jalapeno and add to cabbage and cilantro.

cinco de mayo24cinco de mayo28

  • Add creamy mixture to cabbage mixture and toss to combine.

Tortillas

If you are using pre-made tortillas, you can wrap stacks of 10 or 12 in damp paper towels and heat them in the microwave for 30 seconds or so.  Or wrap them in foil and heat them in a 375 degree oven for 10 to 15 minutes.  Wrap them in a clean towel to keep warm.  If you are feeling industrious and want to make them yourself, here is how:

2 1/2 cups masa
1 1/2 cups water
1 1/4 tsp salt
 
 
 cinco de mayo16cinco de mayo7
  • Combine all ingredients and form into a ball, kneading until it’s smooth.  It should be firm not sticky. It will not be elastic like a four dough.  Add water if it doesn’t form a ball or masa if it’s too sticky;.
  • For each tortilla, form a golf sized ball of dough and place it between two sheets of parchment or waxed paper and roll it into a flat circle with a rolling pin.  You can free form it or use an inverted  bowl as a ‘cookie cutter’.  A golf sized ball will yield a 5 or 6 inch tortilla.
 
cinco de mayo8cinco de mayo10
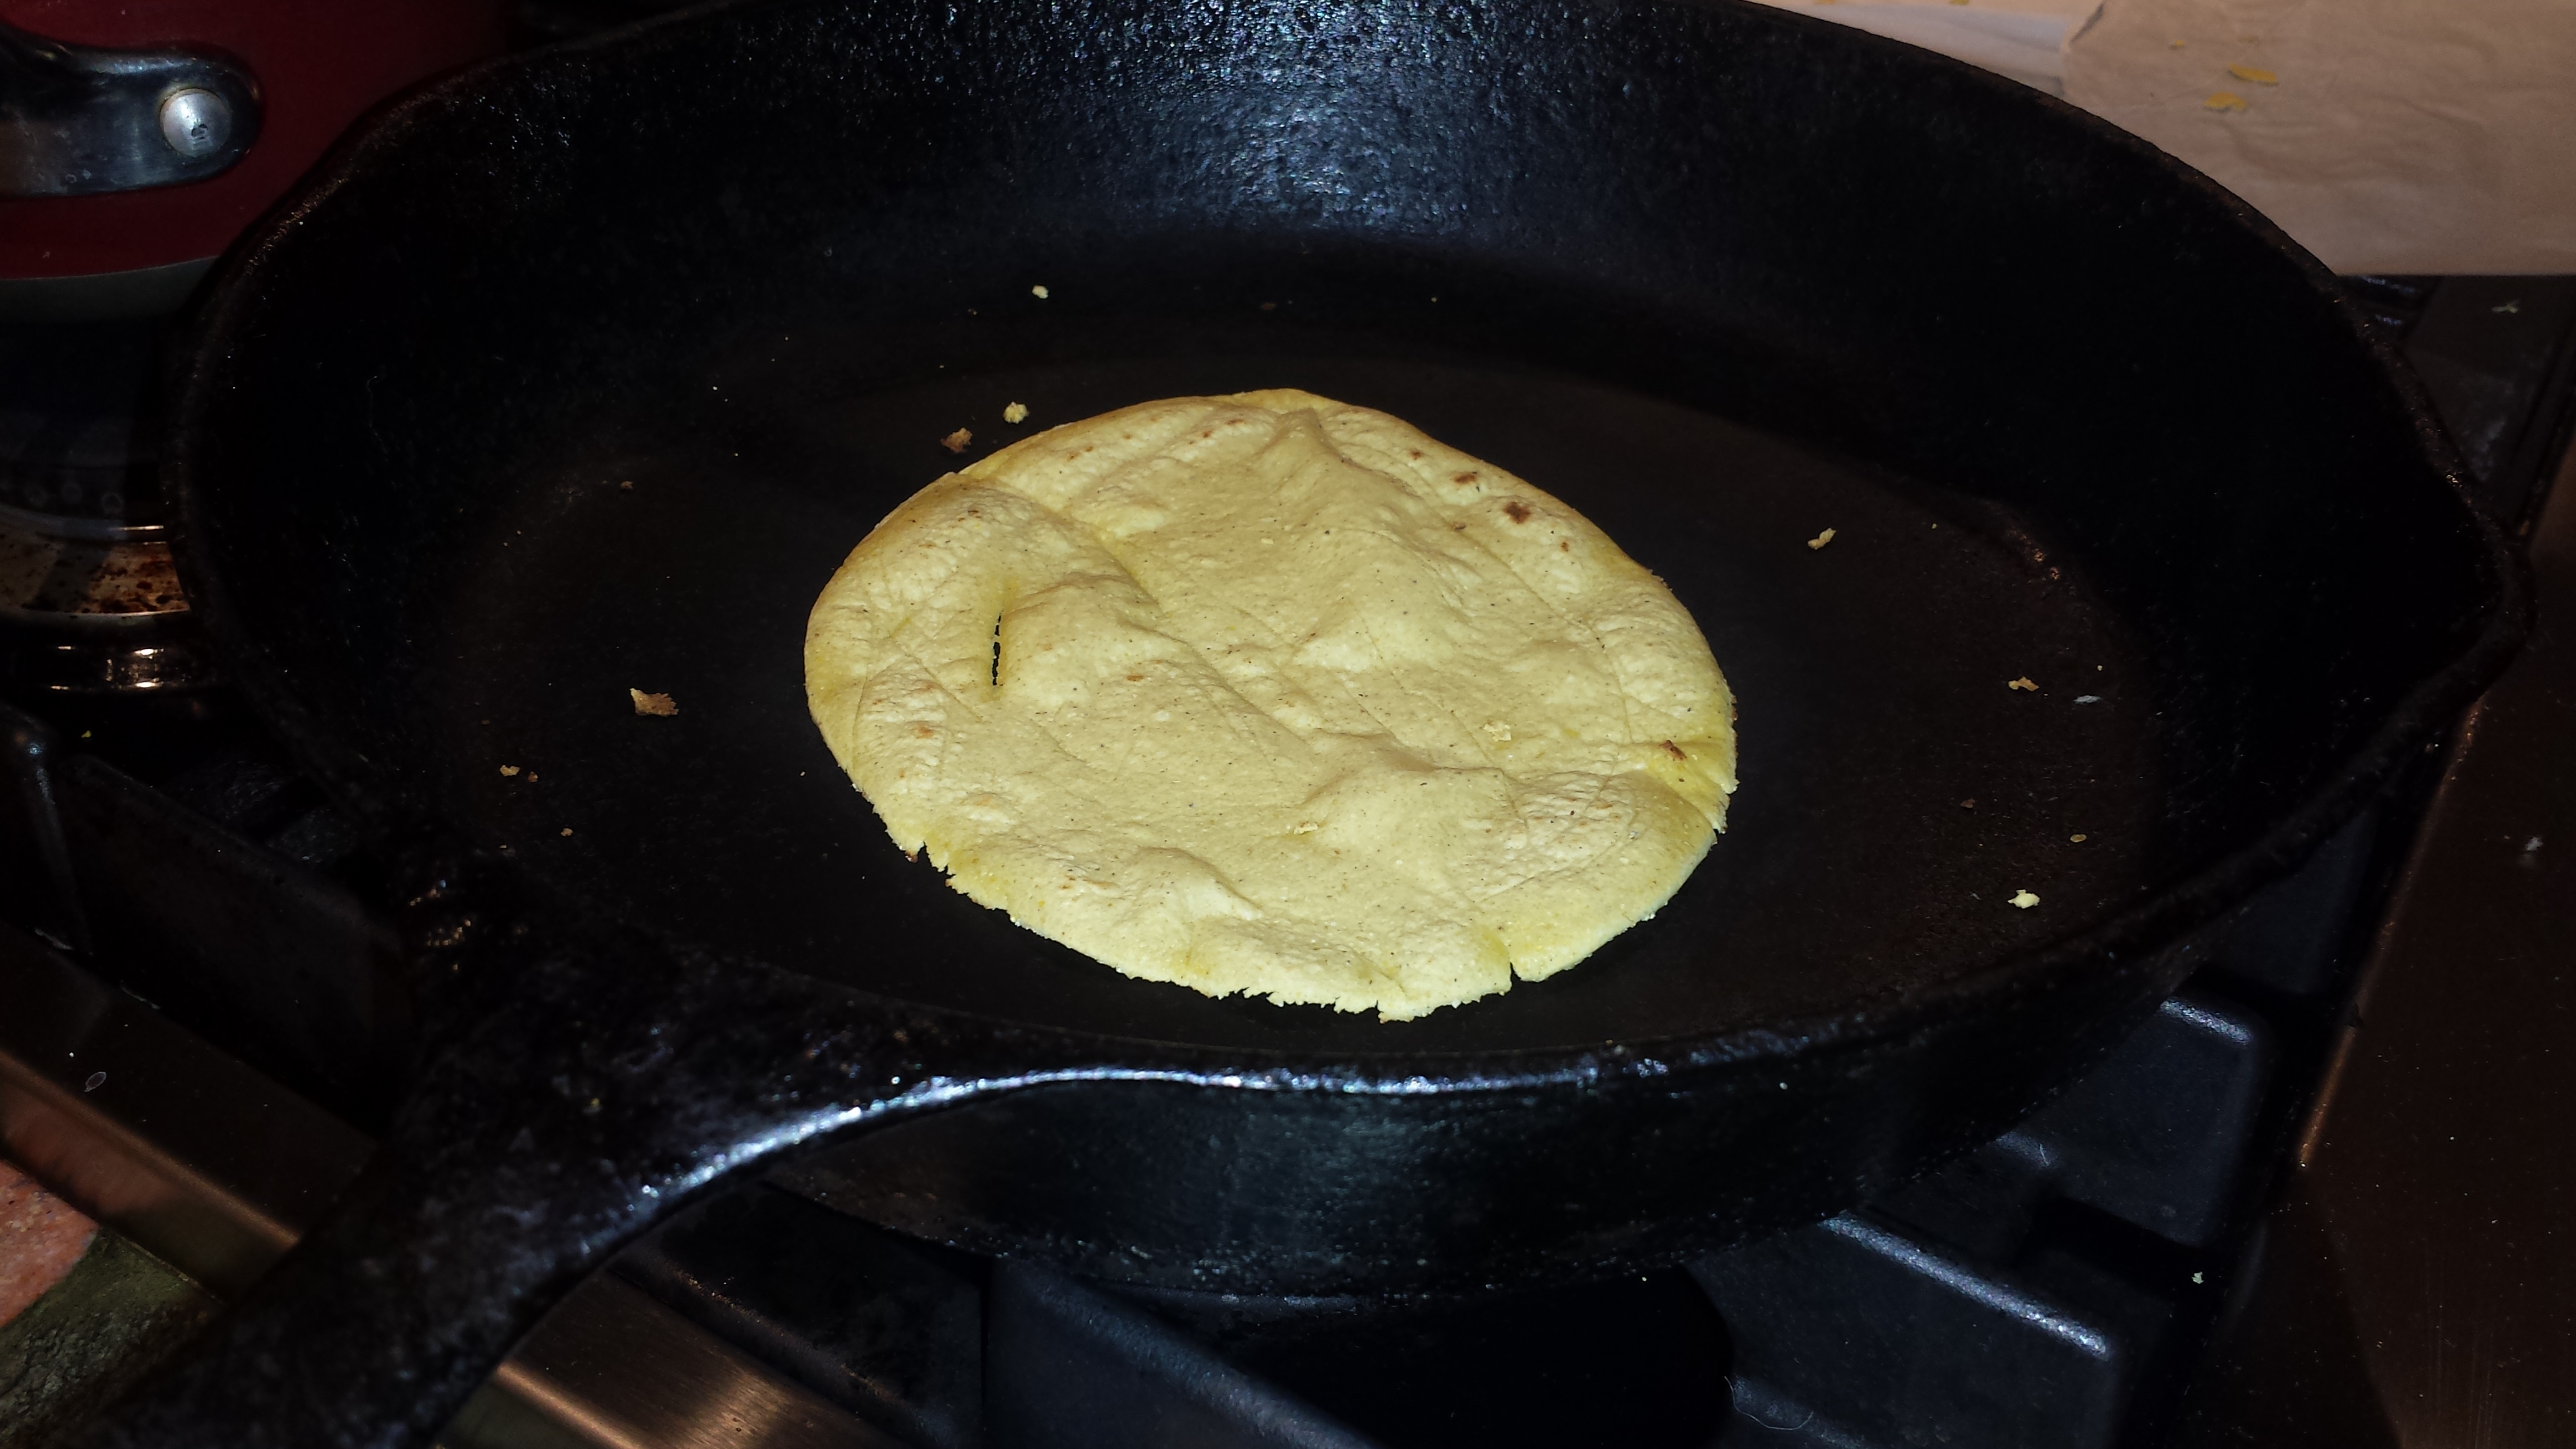
  • Cook tortillas in a dry (ungreased/ heavy skillet, preferably cast iron, for 1 or 2 minutes on each side over medium heat until there are several small brown spots.  Stack them as they are done and cover with foil or a clean dish towel.
 
cinco de mayo22


Chiles Rellenos

  • Servings: 4-6
  • Difficulty: medium
  • Print

cinco de mayo6

6 poblano peppers
1/2 small onion, minced
1 garlic clove, minced
1 jalapeño, seeded and minced
1 1/2 cups shredded cheeses (jack, pepper jack, cheddar, parmigiano)
2 tablespoon(s) chopped cilantro
Salt

1 cup grape tomatoes, quartered
2 tablespoon(s) chopped cilantro
1 tablespoon(s) freshly squeezed lime juice
Salt and freshly ground pepper

Cinco de mayo2cinco de mayo3

  • Roast the poblanos directly over a gas flame or under a broiler, turning occasionally, until they are charred all over.
  • Transfer the peppers to a bowl, cover with plastic wrap and let cool.  Peel. The skins will come off easily

cinco de mayo29

  • Using a small, sharp knife, make a small lengthwise slit in each one, near the stem end and carefully remove the core and seeds, leaving the stem on if possible.  If you accidently cut it off, you can add it back after the pepper has been stuffed.

cinco de mayo11

  •  Sauté the onion, garlic and jalapeño over medium heat, stirring occasionally, about 5 minutes. Let cool, then add the cheese and chopped cilantro.
  • Carefully stuff the cheese filling into the poblanos and press the poblanos closed.

cinco de mayo18

  • Place the stuffed poblanos on a baking sheet and roast at 425 degrees for 10 to 12 minutes, until the cheese is melted.
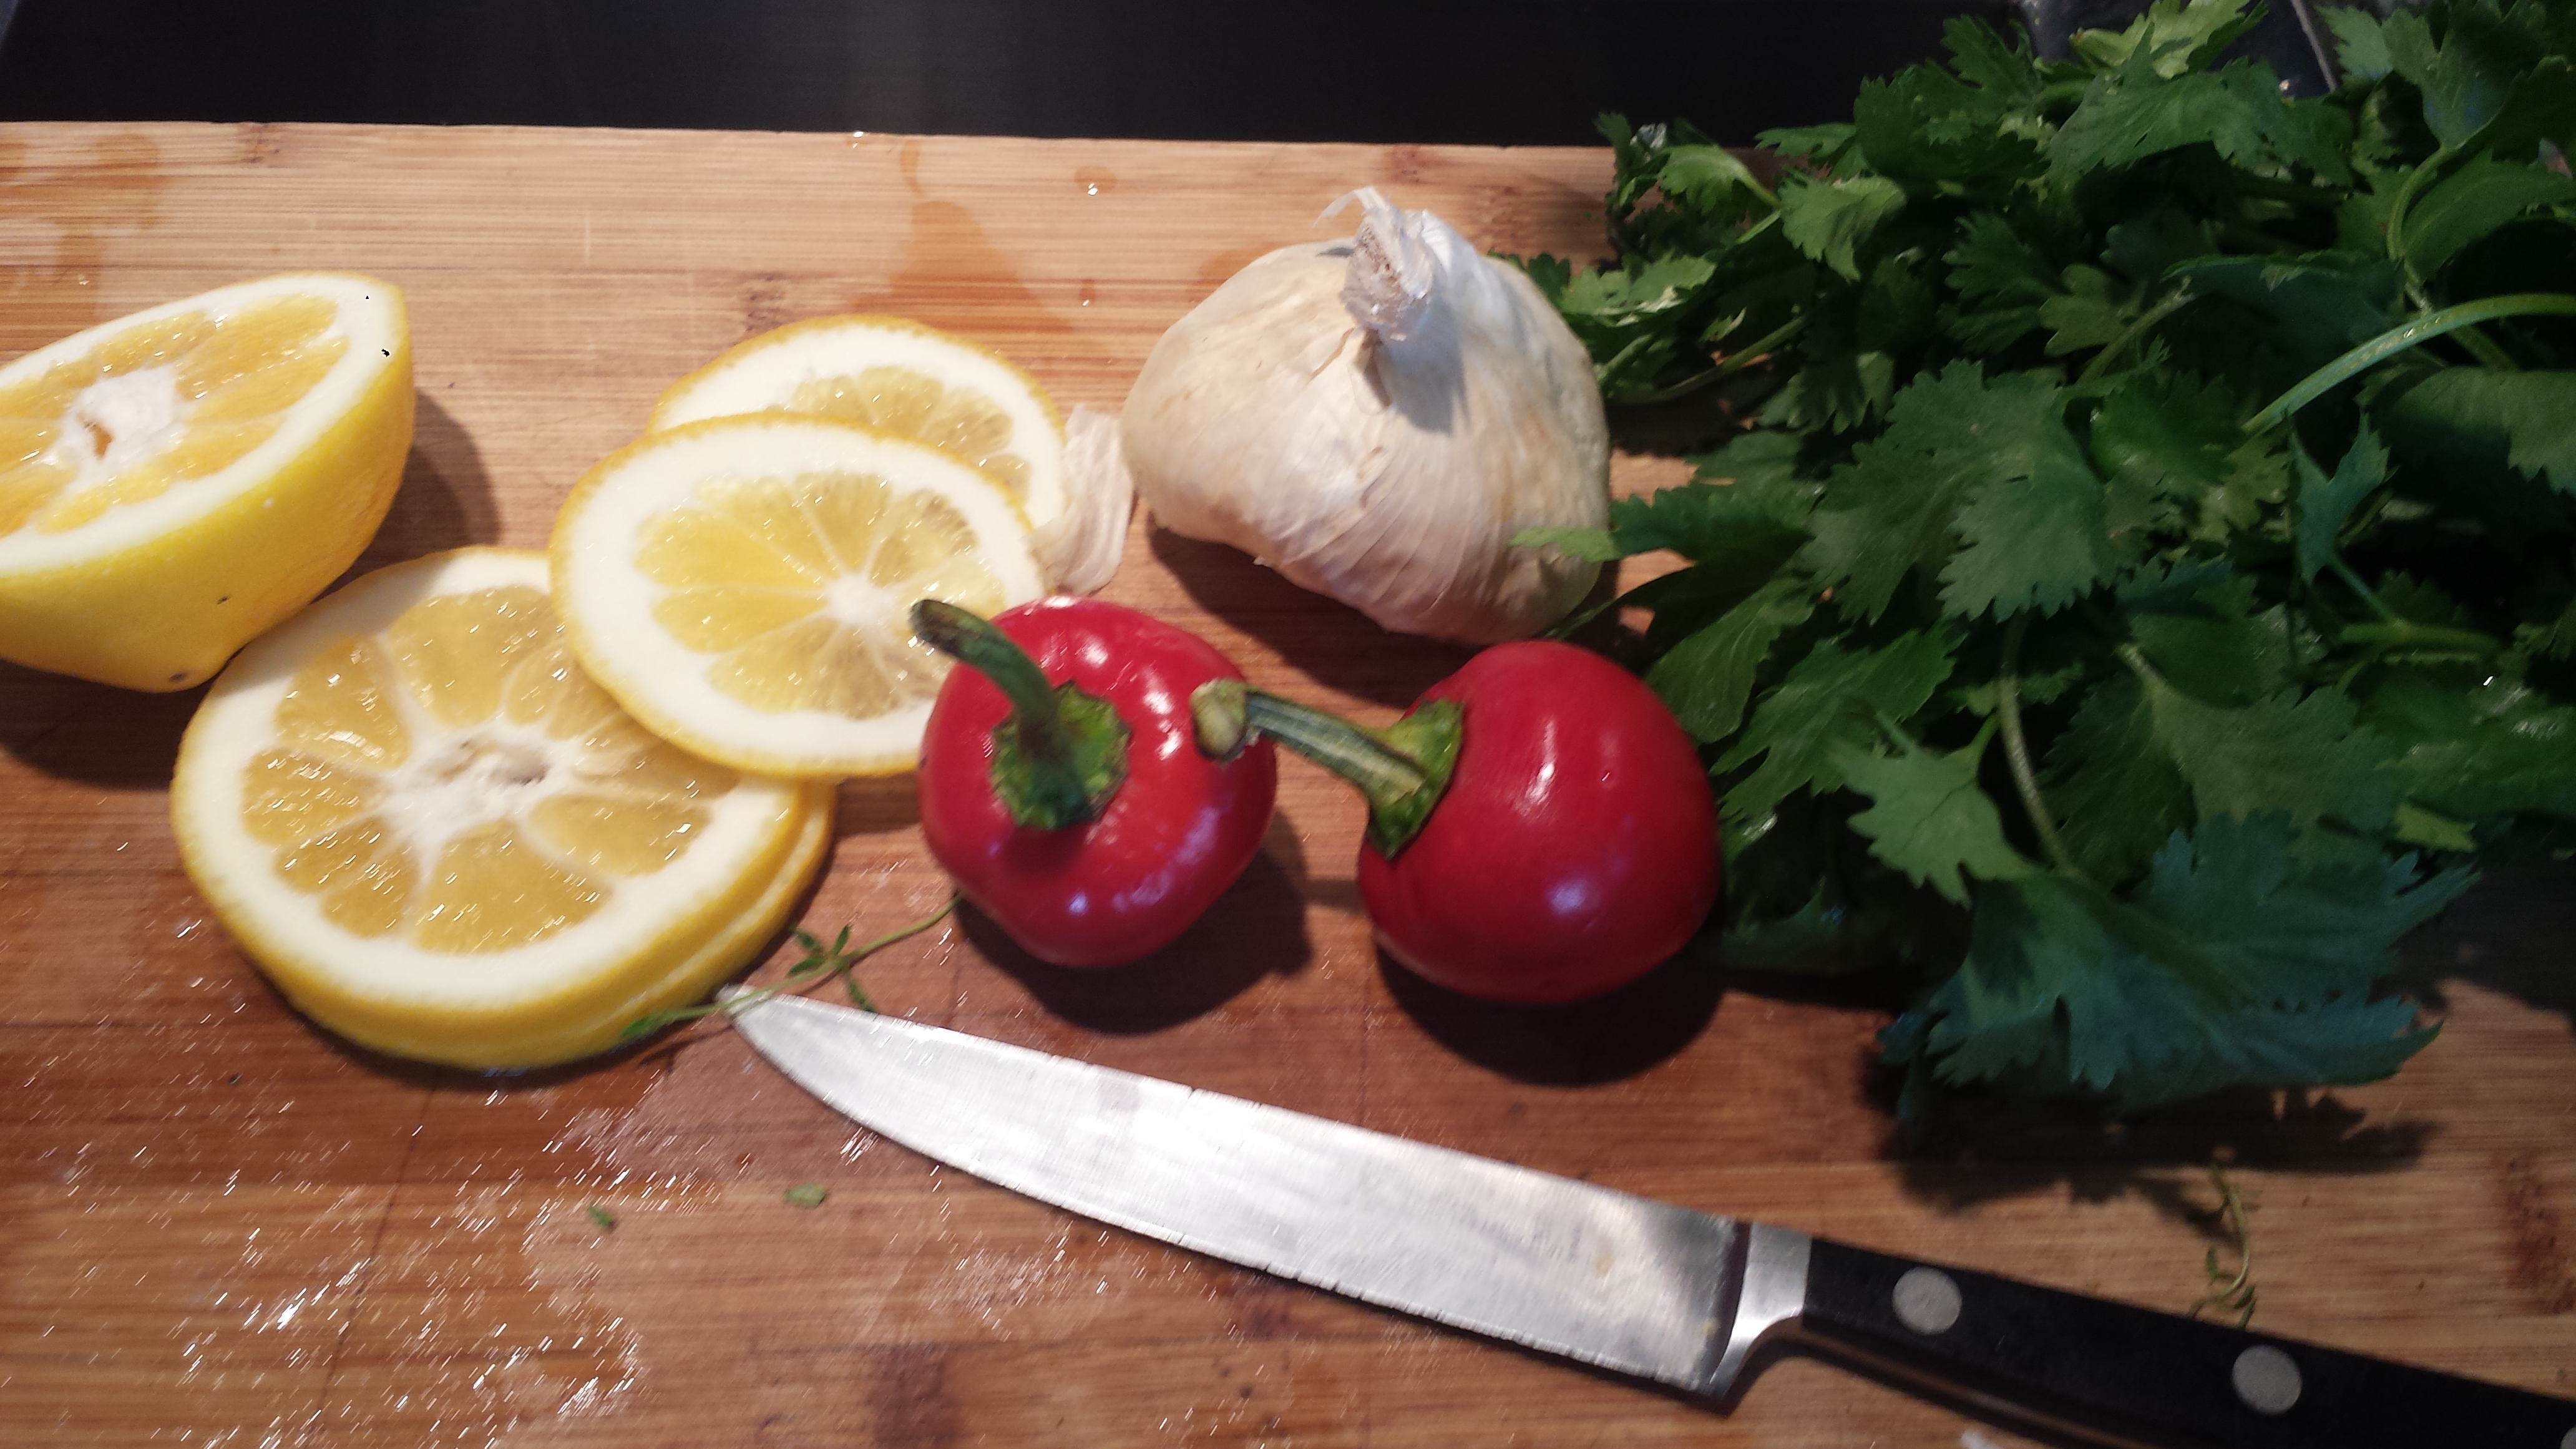
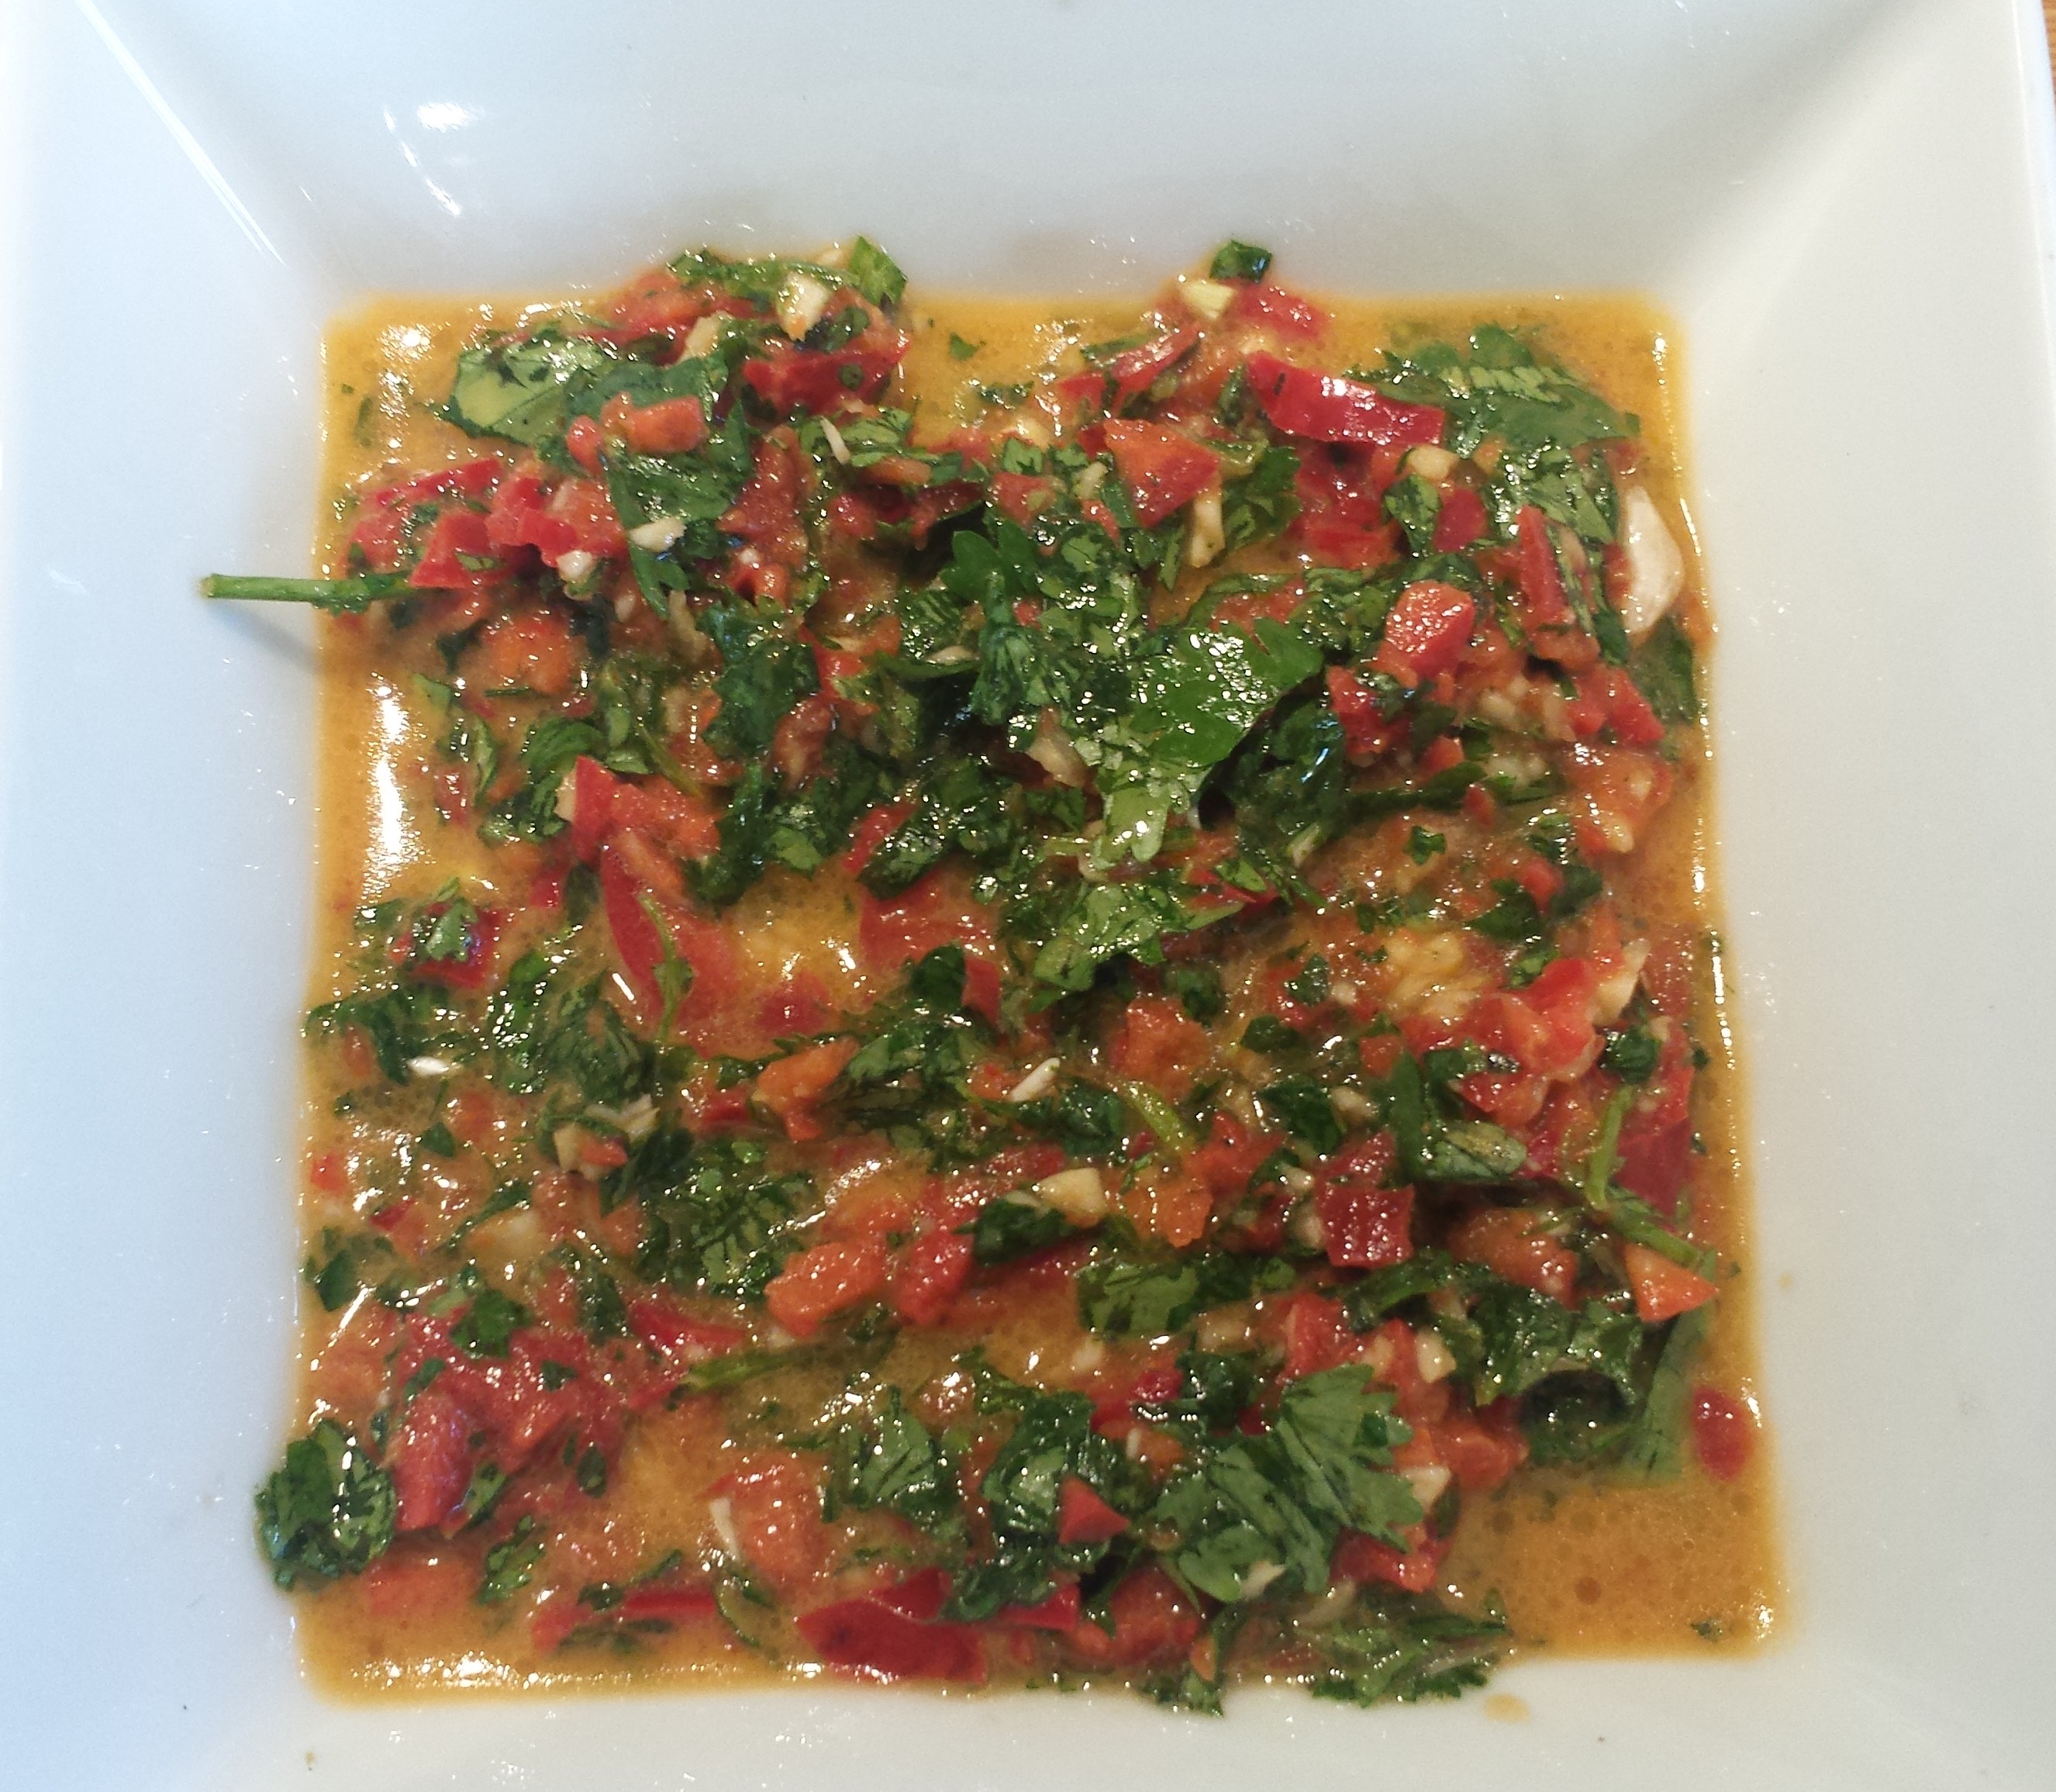
  • Combine tomatoe, cilantro, lime and salt in a small bowl.
  • Serve chile rellenos with tomato garnish.


Black Bean and Mango Salad with Avocado Ranch

  • Servings: 4-6
  • Difficulty: easy
  • Print

cinco de mayo5

1 head romaine
1 can black beans, drained and rinsed
1 cup cherry tomatoes, halved
1 cup fresh mango, diced
1 avocado, peeled, seeded and diced
 
  • Chop romaine and top with beans, tomatoes, mango and avocado.
  • Dress with avocado ranch.

Avocado Ranch

1 ripe avocado
1/3 cup sour cream
1/4 cup mayonnaise
2 tablespoons freshly chopped parsley or cilantro
1 garlic clove, minced
1 teaspoon worcestershire sauce
1 Tbsn apple cider or white vinegar
1 clove garlic, minced
1/2 teaspoon salt
pepper to taste
  • Combine all ingredients in a food processor and blend until smooth, scraping down the sides occasionally when needed. Thin with water if desired.

cinco de mayo13


Wheatless Wednesday – Zucchini Crust Pizza with Grilled Eggplant & Roasted Red Pepper

2

Zucchini Crust Pizza1

Are you ready for another wheat free pizza?  My sister, Sandy, knowing my quest for the world’s best (and healthy) pizza, sent me a recipe for pizza with zucchini crust she found from Seattle Local Food. I searched a few other recipes as well and  checked with my friend, Elizabeth, who has been making zucchini crust pizzas for her kids for years.  I came up with my own version ,which includes almond meal and herbs, but this was the inspiration.    I know we are just beginning to plant our zucchini seedlings now, but this could be the answer later this summer to the seemingly endless quantities of squash coming from the garden. It’s also a natural follow up to my Cauliflower Crust Pizza recipe.   So I decided to bite the bullet for all of us ahead of time (you’re welcome) and give it a try.  The results?  A resounding DELICIOUS!  The taste and texture of this pizza is fantastic, way better than I expected. It got a big thumbs up in my house!

Zucchini Crust Pizza5

I topped my pizza with grilled eggplant, roasted red pepper, fresh mozzarella and fresh basil on a light bed of tomato sauce and shredded cheeses. If you want to make your own Marinara Sauce, I have provided the recipe below.  Other topping suggestions include, pesto, white sauce or olive oil and garlic instead of tomato sauce, sauteed mushrooms, carmelized onions, tomatoes, pepperoncini, olives, marinated artichoke hearts,goat cheese the list goes on…   All raw vegetables need to be pre-cooked though so they don’t release more moisture into the pizza crust and make it soggy.  I don’t think you will have any leftover pizza, but it can be reheated in a heavy pan on low.

Pizza with Zucchini Crust

  • Servings: 1 pizza that serves 2-3
  • Difficulty: easy
  • Print

Zucchini Crust Pizza14 
2 eggs
About 3 8′”zucchinis
1.5 cups grated parmesan cheese
1/3 cup almond meal
salt
Fresh or dry oregano
Fresh basil leaves
1 Japanese  or small globe eggplant
1 roasted red pepper, sliced
1 ball fresh mozzarella
  •  Preheat the oven to 450 degrees.

Zucchini Crust Pizza11

  •  Grate the zucchini.(food processor is easiest but any method works fine)  Put shreds into a bowl and sprinkle with salt. Let sit for about 10 minutes.   Don’t worry about too much salt as most of the salt goes out with the liquid (Do not skip this step!)

Zucchini Crust Pizza12

  • Slice the eggplant vertically into thin slices.  Sprinkle with salt, again to bring out the liquid and let sit 10 minutes.
  • Toss eggplant with olive oil and grill on both sides.  Set aside

Zucchini Crust Pizza13

  • Put a clean kitchen cloth over a clean bowl and pour zucchini shreds into the cloth.  Squeeze cloth to get rid of as much excess liquid as possible.

Zucchini Crust Pizza9

  • In a mixing bowl, add zucchini, parmesan, almond meal, eggs and fresh or dry spices (except fresh basil).  Mix together until evenly combined.

Zucchini Crust Pizza6

  • Place a piece of parchment paper over a pizza stone or a baking sheet.  Pour the zucchini mixture onto the middle and spread into a circle about 1/4″ to 1/2″ thick.  Use your hands and fingers to even out the edges.

Zucchini Crust Pizza4

  • Bake for 25 minutes until golden brown..

Zucchini Crust Pizza3 Zucchini Crust Pizza2

  • Top with sauce, eggplant, shredded cheese, fresh mozareella, peppers and fresh oregano.  Bake 5 to 10 minutes or until cheese is melted.
  • Sprinkle with fresh basil.  Slice with a pizza wheel.  Serve immediately.

Marinara Sauce

1 28 oz can crushed tomatoes
2 Tbsn fresh basil, finely chopped
1 Tbsn fresh or 1 tsp dried oregano
2 cloves garlic, minced
1 Tbsn olive oil
½ tsp salt
1 tsp balsamic vinegar <
  • Heat olive oil in a saucepan and saute garlic for a few minutes.  Add basil and crushed tomatoes and stir to combine.
  • Bring to a boil and add salt.  Simmer about 45 minutes.
  • Before serving add balsamic vinegar and stir to combine
 

Zucchini Crust Pizza1


Wheatless Wednesday – Jerusalem Chicken with Fava & Spring Vegetable Saute

0

bRoasted Chicken1

Can there really be a cookbook co-written by an Israeli and a Palestinian?  Yes, and it is a work of art!   Yotam Ottelenghi, from the Jewish West, and Sami Tamimi, from the Arab East, have written a gloriously beautiful book, “Jerusalem”, which is a cookbook with wonderful recipes but also gorgeous photos and personal commentary that portray life in Jerusalem where they both grew up, albeit in different parts of the city.  They didn’t know each other in Jerusalem but met later in London and became good friends and then business partners.  They now own many successful restaurants together. They claim that this book was a walk down memory lane for them, “a nostalgic trip into their pasts”.  More about “Jerusalem”

Jerusalem

My friend, Stephanie, brought this book back from Israel for my birthday last year and I thought it appropriate to try one of it’s dishes for Passover.  I made their Roasted Chicken with Jerusalem Artichoke and Lemon which was delicious.  The combination of lemon, artichoke,  halved shallots, garlic and sliced lemon combined with saffron and fresh herbs was really flavorful.  I couldn’t find Jerusalem artichoke so substituted canned artichoke quarters packed in water.  I used local, free range chicken, herbs from my garden and lemons from my tree in an effort to make a smaller footprint (and frankly, to support the small local growers because if it’s a profitable to let chickens run around in the sunshine, maybe more will follow suit).

Roasted Chicken12

So now I know why fava beans are so expensive.  I had planted fava beans as a cover crop to introduce nitrogen into the soil for my summer tomatoes, not realizing that you are supposed to pull or plow under cover crops when they are flowering and not let them fruit or they pull all the nitrogen back out of the soil. ( More Info on Cover Crops Thank you Sean for all the cover crop info! )  I had already messed up on the cover crop thing since I had quite a few fava bean pods growing on my plants already, so I decided to let them go a bit longer and enjoy a mini harvest.  It seemed a shame to throw out such beautiful, healthy plants so I procrastinated a bit more.  Then we had dinner at a great local restaurant, Farmshop, which offered a roasted halibut on a bed of spring vegetables with fava leaves.  What?  You can eat the leaves?  I had to order the dish just to see for myself.  The dish was delicious but more importantly I now know what to do with my favas.  Finally I can feel good about pulling out my plants before their time.  So why are fava beans so expensive?  First, a big pile of fava beans in their pods shrinks into a small bowl of edible beans.  Secondly, they require a four step process before they are edible.  First they need to be shelled, then parboiled and put straight into an ice bath and finally their skins have to be removed.  Luckily I had two capable helpers, Veronica and Eric who made quick work of the favas.  How to shell fava beans.

I paired the chicken with a spring vegetable medley which includes fava beans, fava leaves, zucchini, asparagus and baby bella mushrooms all diced to be the same size as your average fava bean.  I was really wishing my Dad was in the kitchen to help out as well.  He is the world’s best sous chef.  He wields the paring knife like a master, cutting everything beautifully into  the perfect same size so everything cooks at the same rate.  Luckily, I learned from the best!.

Jerusalem Chicken aka Roasted Chicken with Jerusalem Artichoke and Lemon

  • Servings: 4-6
  • Difficulty: easy
  • Print


Roasted Chicken8 Roasted Chicken7

  • 1 lbs Artichokes, peeled and cut lengthwise so they are 2/3 thick
  • 3 tbsp lemon juice
  • 4 bone-in chicken breasts
  • 12 shallots, halved lengthwise
  • 12 large garlic cloves, sliced
  • 1 medium lemon, halved and thinly sliced
  • 1 tspn saffron threads
  • 3.5 tbsp of olive oil
  • 2/3 cup of cold water
  • 1.5 tbsp of crushed peppercorns
  • 1/4 fresh thyme
  • 1 cup of tarragon leaves, chopped
  • 1 tsp salt
  • 1/2 tsp ground black pepper

Roasted Chicken11 Roasted Chicken10

  • Combine artichoke, water and half of the lemon juice in a medium saucepan. Bring to boil, and then lower to simmer for 10-20 minutes. If you are using canned or marinated artichokes, this is not necessary.

Roasted Chicken6 Roasted Chicken5

  • Mix all ingredients (except the lemon juice and half of the tarragon) in a bowl. Cover and let marinade overnight, or at least 2 hours.

  • Preheat oven to 475degrees. Arrange chicken with the skin up in the center of the pan. Place the remaining ingredients around them.

  • Roast for 30 minutes uncovered.

  • Roast for additional 15 minutes, covered with foil or top, or until full cooked.

  • Add the reserve tarragon and lemon juice.

Stir, taste and add salt if necessary.

Roasted Chicken2

Fava & Spring Vegetable Saute

2 – 3 dozen fava bean pods
large bunch fava leaves (optional)
1/2  bunch asparagus
1 zucchini
6 large mushrooms
3 cloves garlic, minced
1/4 cup olive oil
1 tsp each  of fresh thyme and oregano
Roasted Chicken4 Roasted Chicken3
 
  • Dice all vegetables (except for fava beans and leaves) and set aside.
  • Heat oil in a heavy pan and sauté garlic and diced vegetables. 


  • Add herbs, fava beans and leaves and stir until leaves are wilted.
  • Salt and pepper to taste.


Meatless Monday – Coconut Ginger Quinoa

0

Coconut Ginger Quinoa8


Somehow 2013 came and went without my knowing that I was missing “The International Year of the Quinoa”  as officially  declared by The Food and Agricultural Organization of the United Nations. (The World’s Healthiest Foods)  I didn’t ‘discover’ quinoa until December, almost completely missing the superfood’s official year.  I’m on board now, though and always looking to include interesting seeds and grains in my diet.  Interestingly, Quinoa is not a grain but a seed (a Chenopod to be specific) related to  beetroot and spinach.  It is a complete protein and nutrient rich, including a source of calcium. Quinoa is gluten free and easier to digest than many other grains and pseudo-grains.

Coconut Ginger Quinoa is a flavor packed dish, the combination of onion, ginger and coconut providing a great balance of savory and sweet.  In addition to the quinoa, edamame and almonds give it a protein boost.  The apples and raisins add a natural sweetness and help make it kid friendly.  Younger kids might have fun shelling the edamame while you cook the quinoa.   This is a very forgiving dish that can be served warm or at room temperature, making it perfect for making ahead or bringing to a potluck. You can even make the quinoa ahead of time and assemble the ingredients at the last minute. Enjoy!

Coconut Ginger Quinoa

  • Servings: 4-6
  • Difficulty: easy
  • Print

2 tsp. coconut or olive oil
½ cup onion, chopped (optional)
2 Tbs. minced fresh ginger
1 cup quinoa
1 ½ cups vegetable broth

1/2 cup slivered or sliced almonds
1 cup edamame, shelled
1 medium apple, diced
1/4 cup raisins, currants or cranberries (optional)
1/2  cup unsweetened coconut flakes or shreds (I used half and half)
Dressing (optional):  1/2 cup olive oil, 1/4 cup red wine vinegar, 2 tsp honey
Coconut Ginger Quinoa3Coconut Ginger Quinoa9
  • Toast almonds in dry pan over medium heat for several minutes, or until fragrant and golden brown. Remove from heat and let cool. If you are using flake coconut, you can dry toast it as well for a nice nutty flavor.  Set aside.
  •  Sauté onion in oil 2 to 3 minutes, or until translucent.

Coconut Ginger Quinoa2

  •  Add vegetable broth, quinoa and ginger.  Simmer, covered for 15 to 20 minutes, or until all liquid is absorbed. (Note:  Rinse quinoa to remove any last remaining saponin, a naturally occurring but bitter covering.  If you don’t have a fine mesh strainer, just put quinoa in a bowl , fill with water and pour out as much water as possible without pouring out any quinoa.)
  •  Let partially cool and pour into a large serving bowl.

Coconut Ginger Quinoa4 Coconut Ginger Quinoa6

  • Shell the edamame and boil in salted water for 4  minutes. Drain.  (Or you can add the edamame to the quinoa for the last few minutes of cooking)
  • Add edamame, almonds, apple, raisins and coconut to quinoa and toss to mix. Salt to taste.  Drizzle with dressing if using. Serve warm or at room temperature.

Coconut Ginger Quinoa8


Wheatless Wednesday – Ginger Shrimp & Sugar Snap Peas

0

Shrimp & Sugar Snap Peas1

“What’s for dinner?”  That is the number one question asked when my boys are home.  The second most asked question?  “Have you seen my shoes/my phone/ my keys?”  It can be hard coming up with interesting and delicious meals, day after day.  I can remember my Mom saying “The cooking part is not hard, it’s coming up with the ideas and having all the ingredients that is so exhausting”.    “I hear you, Mom!”  I battle menu fatigue by keeping a pantry stocked with beans, grains and legumes and I try to have a lot of fresh produce around so I have more options without having to order takeout run out to the store with a long grocery list.  I also try to keep my freezer stocked with flash frozen raw shrimp and scallops that thaw quickly.

I often get dinner inspiration from wonderful produce I find at the farmer’s market, or if I’m lucky, right from my own garden.  Yesterday, my late fall gardening efforts were rewarded with  an abundance of juicy, fat sugar snap peas hanging off their vines.  I harvested a giant bowl of them and started to think about the best way to showcase these emerald gems.  Their color is fabulous so I decided to pair them with colorful bell peppers, mushrooms and shrimp for a very spring-like meal.  The beauty of this dish is that it is very simple, only a few really good ingredients, but delicious and pleasing to the eye.

Shrimp & Sugar Snap Peas2

I never learned to properly stir-fry. I understand the concept of starting with the vegetables that need to cook the longest and ending with those that are fastest cooking.  I just never really mastered the technique of pushing the cooked food up on the sides of the wok.  I’m sure it was operator error but everything always ended up down in the bottom in a big jumble.  I prefer to cook everything separately so I can more easily control the level of cooking, plus each vegetable maintains it’s distinct flavor and character.  I cooked the snow peas and peppers first, then the mushrooms and lastly the shrimp.  Then I threw all the vegetables back in the pot with the shrimp and tossed them together.   I served it over brown rice, but any grain, or even pasta, is a great setting for this dish.  A very simple way to add more flavor to rice, without resorting to heavy sauces,  is to cook it with vegetable broth instead of water and toss in a one inch piece of fresh ginger, peeled but not chopped.  Just remove the ginger before serving.

Shrimp & Sugar Snap Peas3

Ginger Shrimp and Sugar Snap Peas

  • Servings: 4
  • Difficulty: easy
  • Print

1 lb raw extra large shrimp

2 cups fresh sugar snap peas
1 red bell pepper
1 yellow bell pepper
8 crimini or baby bella mushrooms
2 Tbsn grated ginger
3 cloves garlic, minced
3 Tbsn coconut or olive oil
dash Creole Seasoning
Salt and pepper to taste

Shrimp & Sugar Snap Peas5

  • Using a sharp knife, shell and devein shrimp. VIDEO on how to shell and devein shrimp  Wash shrimp and dry with papertowels.
  •  Cut off the stem of the sugar snap peas and remove the string
  • Slice the bell peppers into strips, discarding seeds and pith.
  • Wipe mushrooms clean with a damp papertowel.  Cut off dry end of stem and slice.

Shrimp & Sugar Snap Peas4

  • Heat 1 tbsn of oil in a heavy pan (I love cast iron) on medium heat.  Saute sugar snap peas and peppers (together or separately)for 4 or 5 minutes  with half the garlic and ginger.  Transfer to a large plate or bowl and leave uncovered (so they don’t continue to cook).

Shrimp & Sugar Snap Peas8

  • Add a bit more oil if necessary and sauté the mushrooms with the rest of the ginger and garlic, 2 or 3 minutes or until slightly browned on the edges. Transfer to plate with vegetables.

Shrimp & Sugar Snap Peas7

  • Add a bit more oil if necessary and sauté the shrimp about a minute per side, or until pink and firm.  Sprinkle with creole seasoning or just salt and pepper.
  • Add vegetables back into the pan along with any juice made by the veggies and stir until hot. Add salt and papper to taste.
  • Serve over long grain brown rice, or any grain or pasta

Shrimp & Sugar Snap Peas1


Wheatless Wednesday – Flourless Chocolate Brownie Cookies

3

Flourless Chocolate Brownie Cookie1

Chocolate is one of the world’s favorite foods and GoodMotherDiet  is not immune.  Sometimes we need a break from cauliflower, quinoa and butternut squash.  Can dark chocolate really be part of a healthy diet (and not just wishful thinking)?   There are reputable claims  that dark chocolate is good for your heart (lower blood pressure +),  brain (improved cognitive function), blood sugar (what?), teeth (no way!) and even your cells (antioxidants). Dark chocolate is also high in vitamins and minerals (copper, potassium, magnesium and iron).  For specific nutritional data (or if you don’t believe me that dark chocolate is good for your teeth) click here:  http://www.fitday.com/fitness-articles/nutrition/healthy-eating/6-health-benefits-of-dark-chocolate.html

Sometimes we do know what we need.  So now the question is Cookies or Brownies?  Why choose?  These tasty morsels are a cross between a fudgy brownie and a chewy chocolate chip cookie. Need I say more?  They are also flour free and gluten free (as long as you are using a powdered sugar that doesn’t have flour added for fluffiness – yes they do that so check the label).  Should I go on or do you just want to make them now?

Flourless Chocolate Brownie Cookie

  • Servings: 24
  • Difficulty: easy
  • Print

Flourless Chocolate Brownie Cookie2

3 cups powdered sugar
3/4 cup unsweetened cocoa powder
1 tsp kosher salt
2 large egg whites
1 large egg
4 oz. bittersweet chocolate or 2/3 cup bittersweet chocolate chips
3 Tbsn dark chocolate (70% or higher cacao)
 
Flourless Chocolate Brownie Cookie3
  • Chop chocolate into small pieces.
  • Mix powdered sugar, cocoa powder and salt in a large bowl, then whisk in egg whites and egg.

Flourless Chocolate Brownie Cookie4Flourless Chocolate Brownie Cookie5

  • Fold in chopped chocolate.

Flourless Chocolate Brownie Cookie6

  • Spoon batter by the tablespoonful onto parchment-lined baking sheets, spacing 2″ apart.
  • Bake  at 350 degrees until cookies are puffed, cracked, and set just around the edges, 14-16 minutes.
  • Transfer baking sheets to wire racks and let cookies cool before removing them from parchment.

Flourless Chocolate Brownie Cookie7