Bittersweet Chocolate Mousse – Party Sized

0

Chocolate Mousse13

I’m not sure why but once kids head back to school, the parties start – Oh wait, I think I just answered that.  Party season has definitely begun!   Invitations are flying in for birthdays, housewarmings, fundraising events, anniversaries, weddings, bar and bat mitzvahs, even  a Harvest Party – and we aren’t even to Halloween yet.  My friend, Tracy, and I just co-hosted a bridal shower for our beautiful friend, Karin, who is getting married up in Sonoma this weekend.  My job was coming up with a dessert festive enough to honor the special bride.  I didn’t want to try to rival her spectacular wedding cake (and not being a frequent baker anyway, because I end up eating it all myself) my thoughts immediately turned to chocolate, the ultimate crowd pleaser.  I have made a decadent but super simple bittersweet chocolate mousse in the past for special occasions but never for a crowd.  So I revamped my Bittersweet Chocolate Mousse Recipe, which only makes four small servings, to serve a dozen and updated the presentation to adapt for any occasion.

Chocolate Mousse14

If you can boil water and you have a food processor, you can make this foolproof, no-cook chocolate mousse. You just have to plan ahead by at least three hours because it needs chilling time to set.  I didn’t have a dozen of any appropriate dessert dish so I ran down to my local hardware store and bought a box of half pint wide mouth glass canning jars, also commonly known as ‘jelly jars’, which are inexpensive and re-usable.  Best of all they are easy to decorate. (Thanks Dawn!).

Chocolate Mousse15

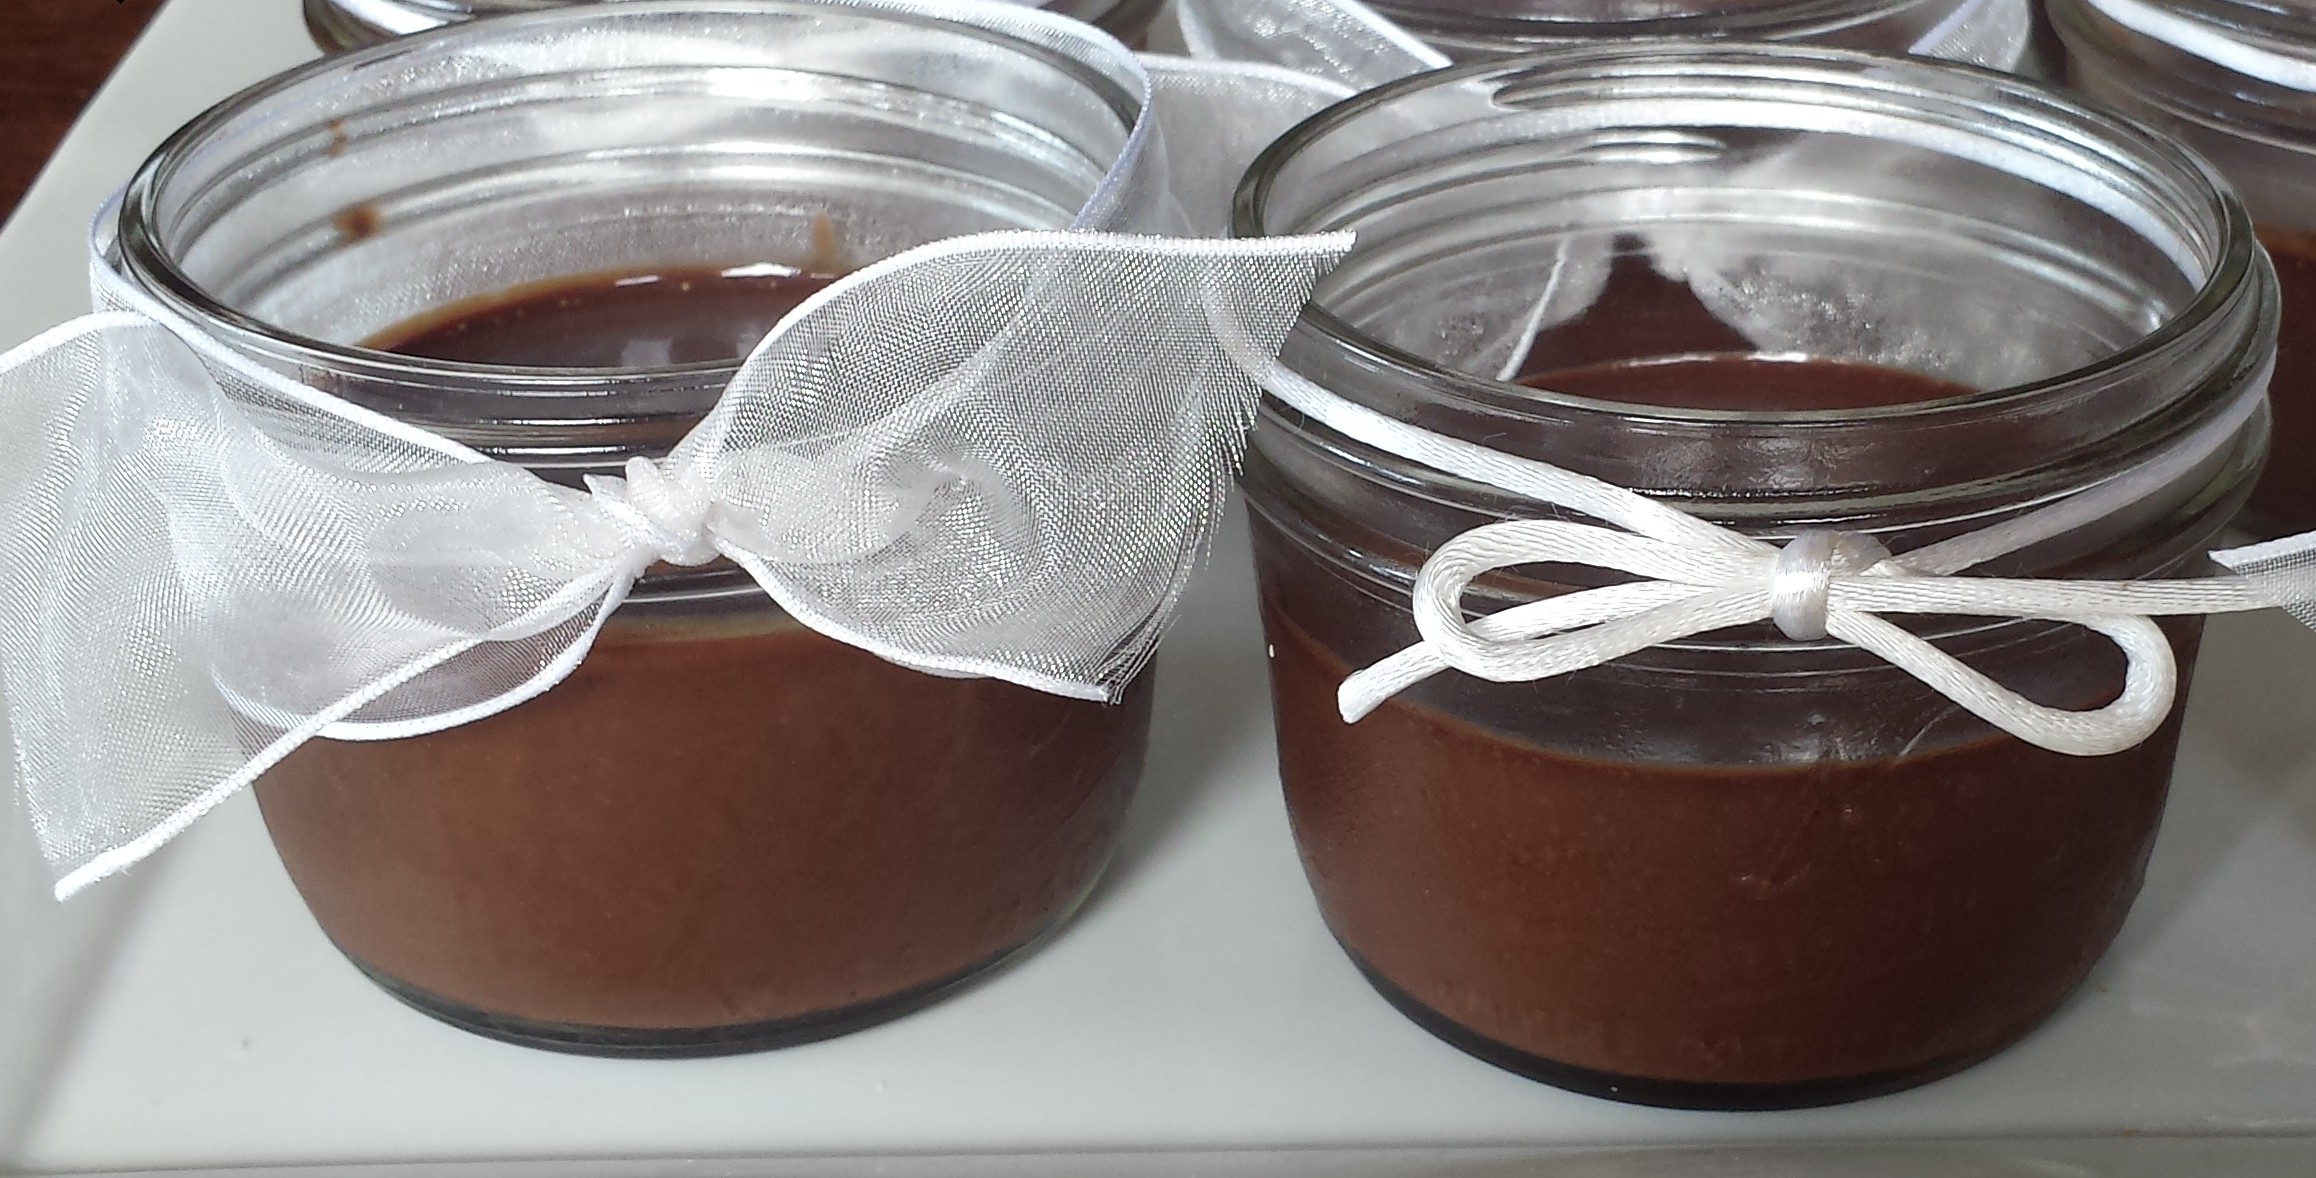
This was for a bridal shower so I went with White Tie and Bridal Veil Bow, using white satin cording and wired organdy ribbon, but it’s very easy to adapt for any holiday.  The ribbon you choose really sets the theme. Or you can leave the glass jars plain for a rustic look.

Chocolate Mousse18

  •  Candy cane ribbon for Christmas.  Blue snowflakes for Hanukah.

Chocolate Mousse17

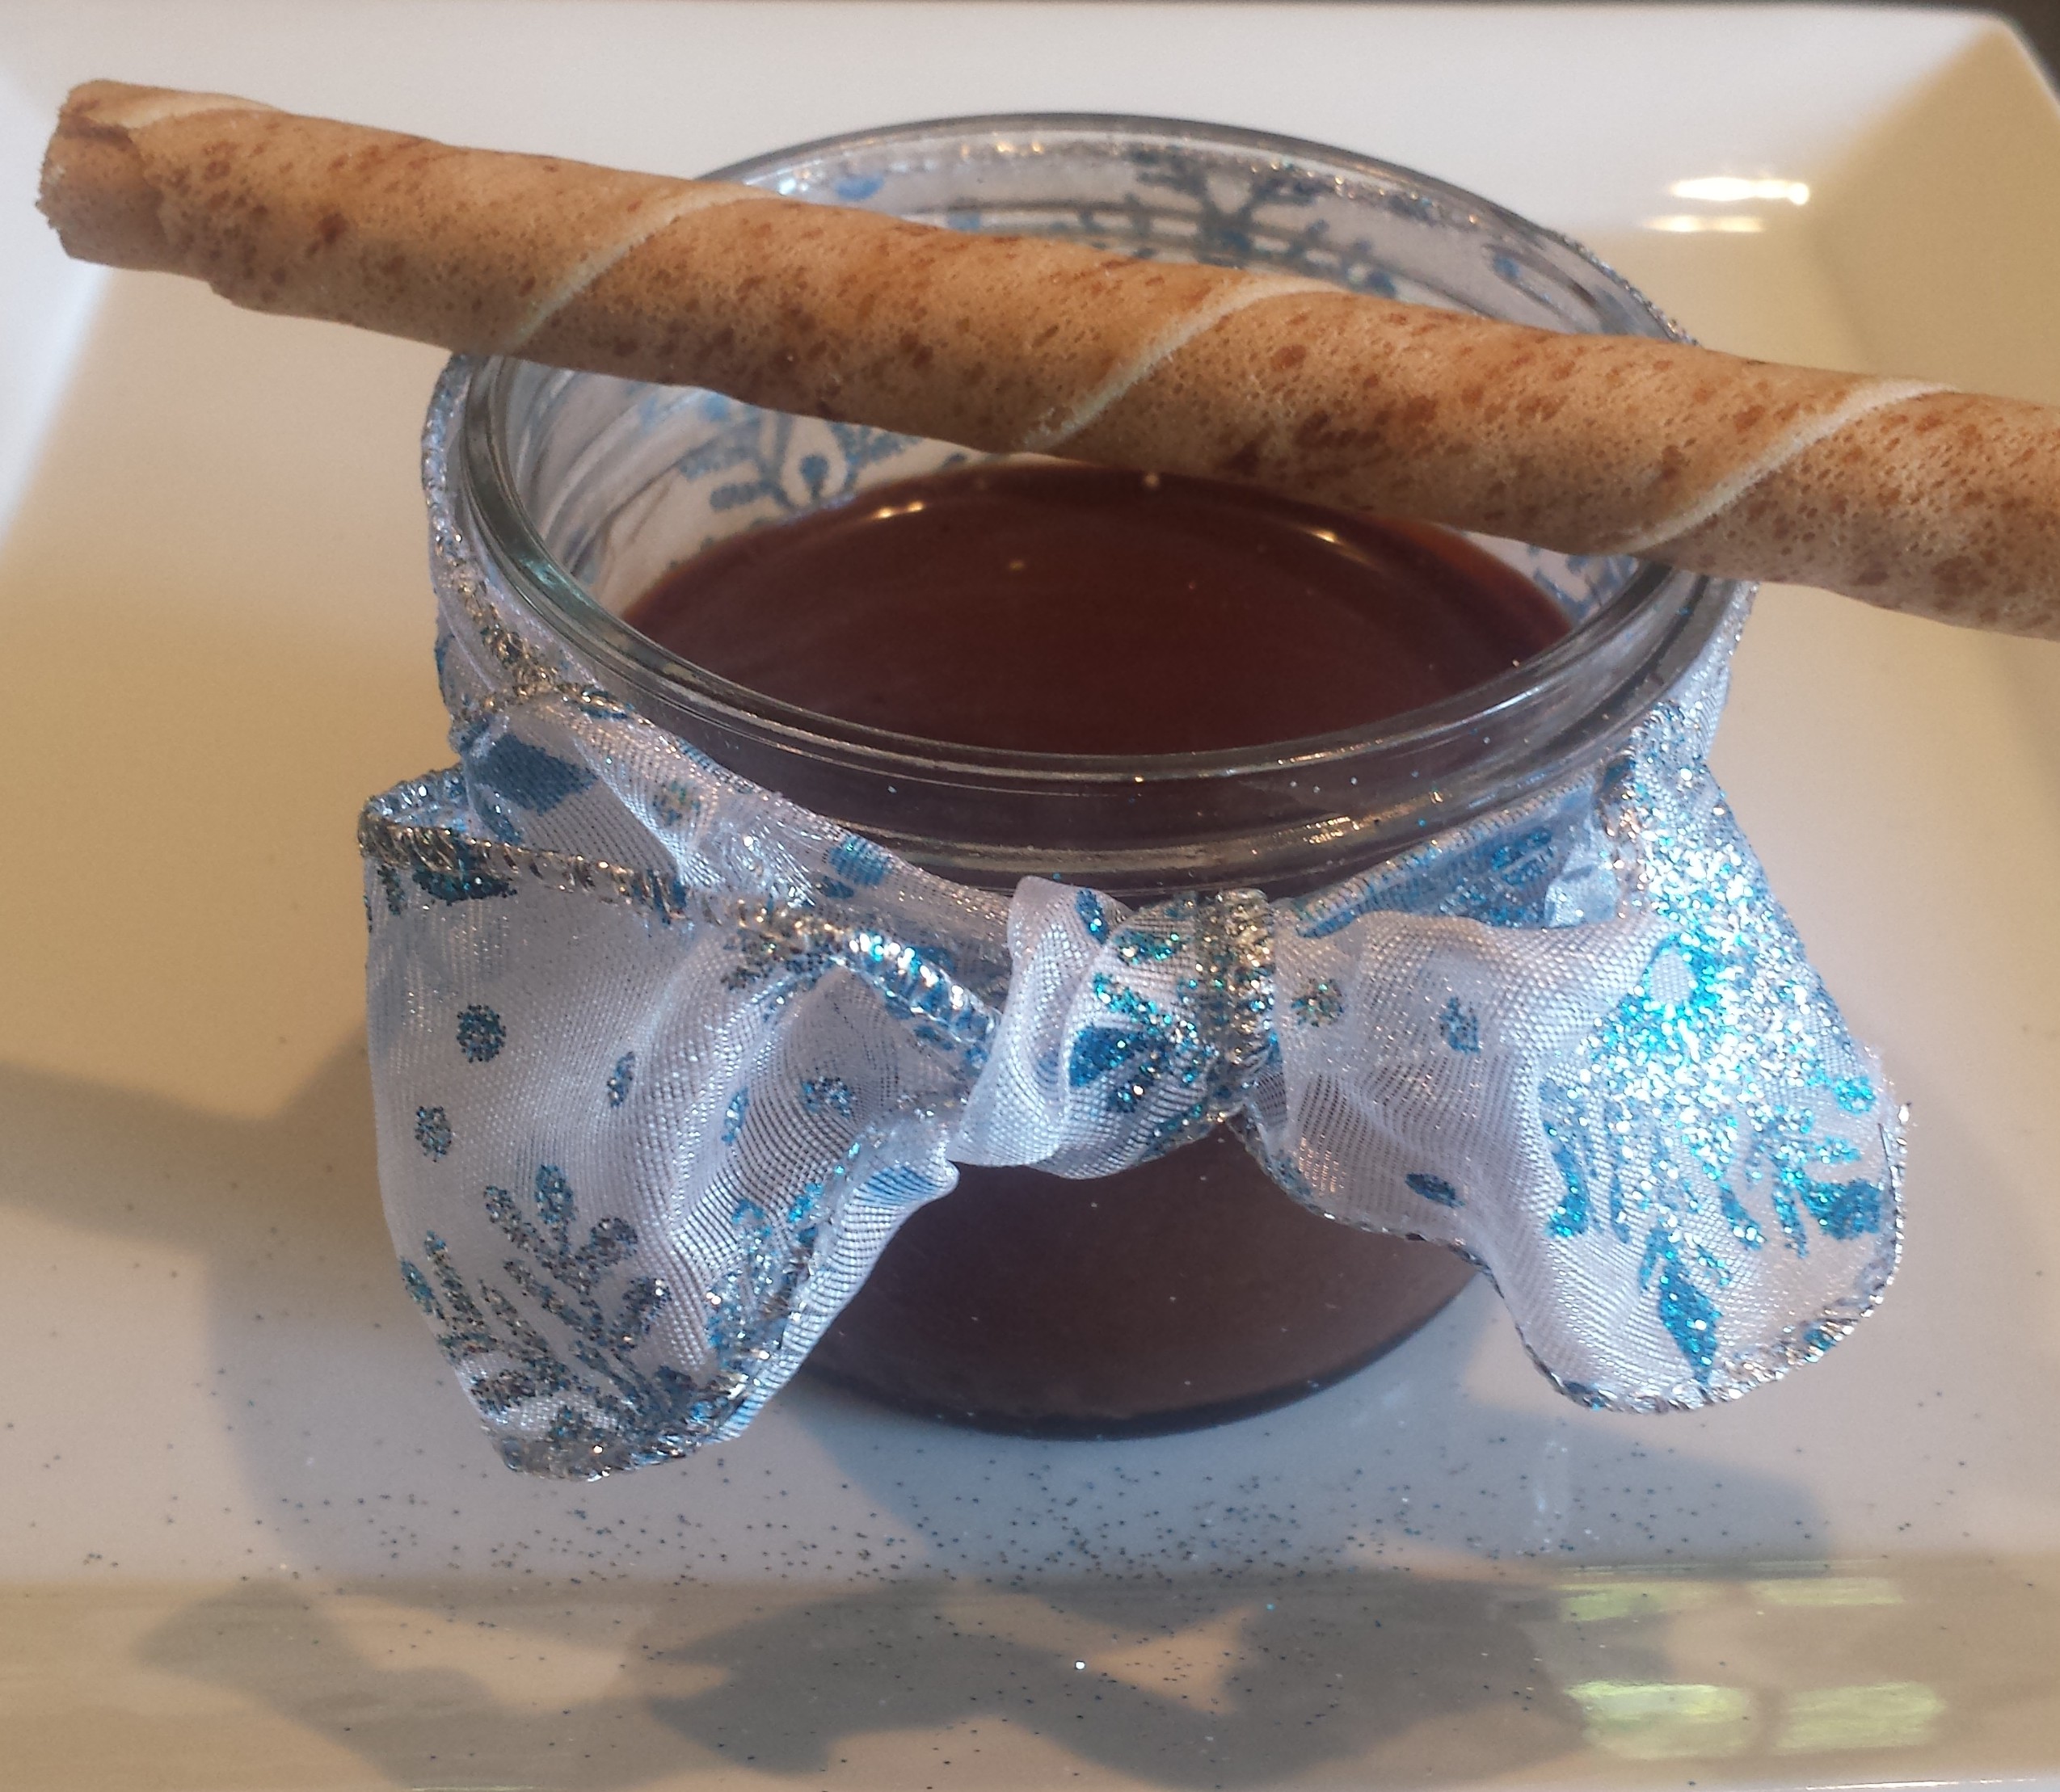
  •  Be creative and tuck small spoons or candycanes into the ribbon or lay a pirouette cookie across the top for fun.

Chocolate Mousse19

  • Celebratet Halloween with Trick or Treat ribbon and a dollop of whipped cream.

Chocolate Mousse12

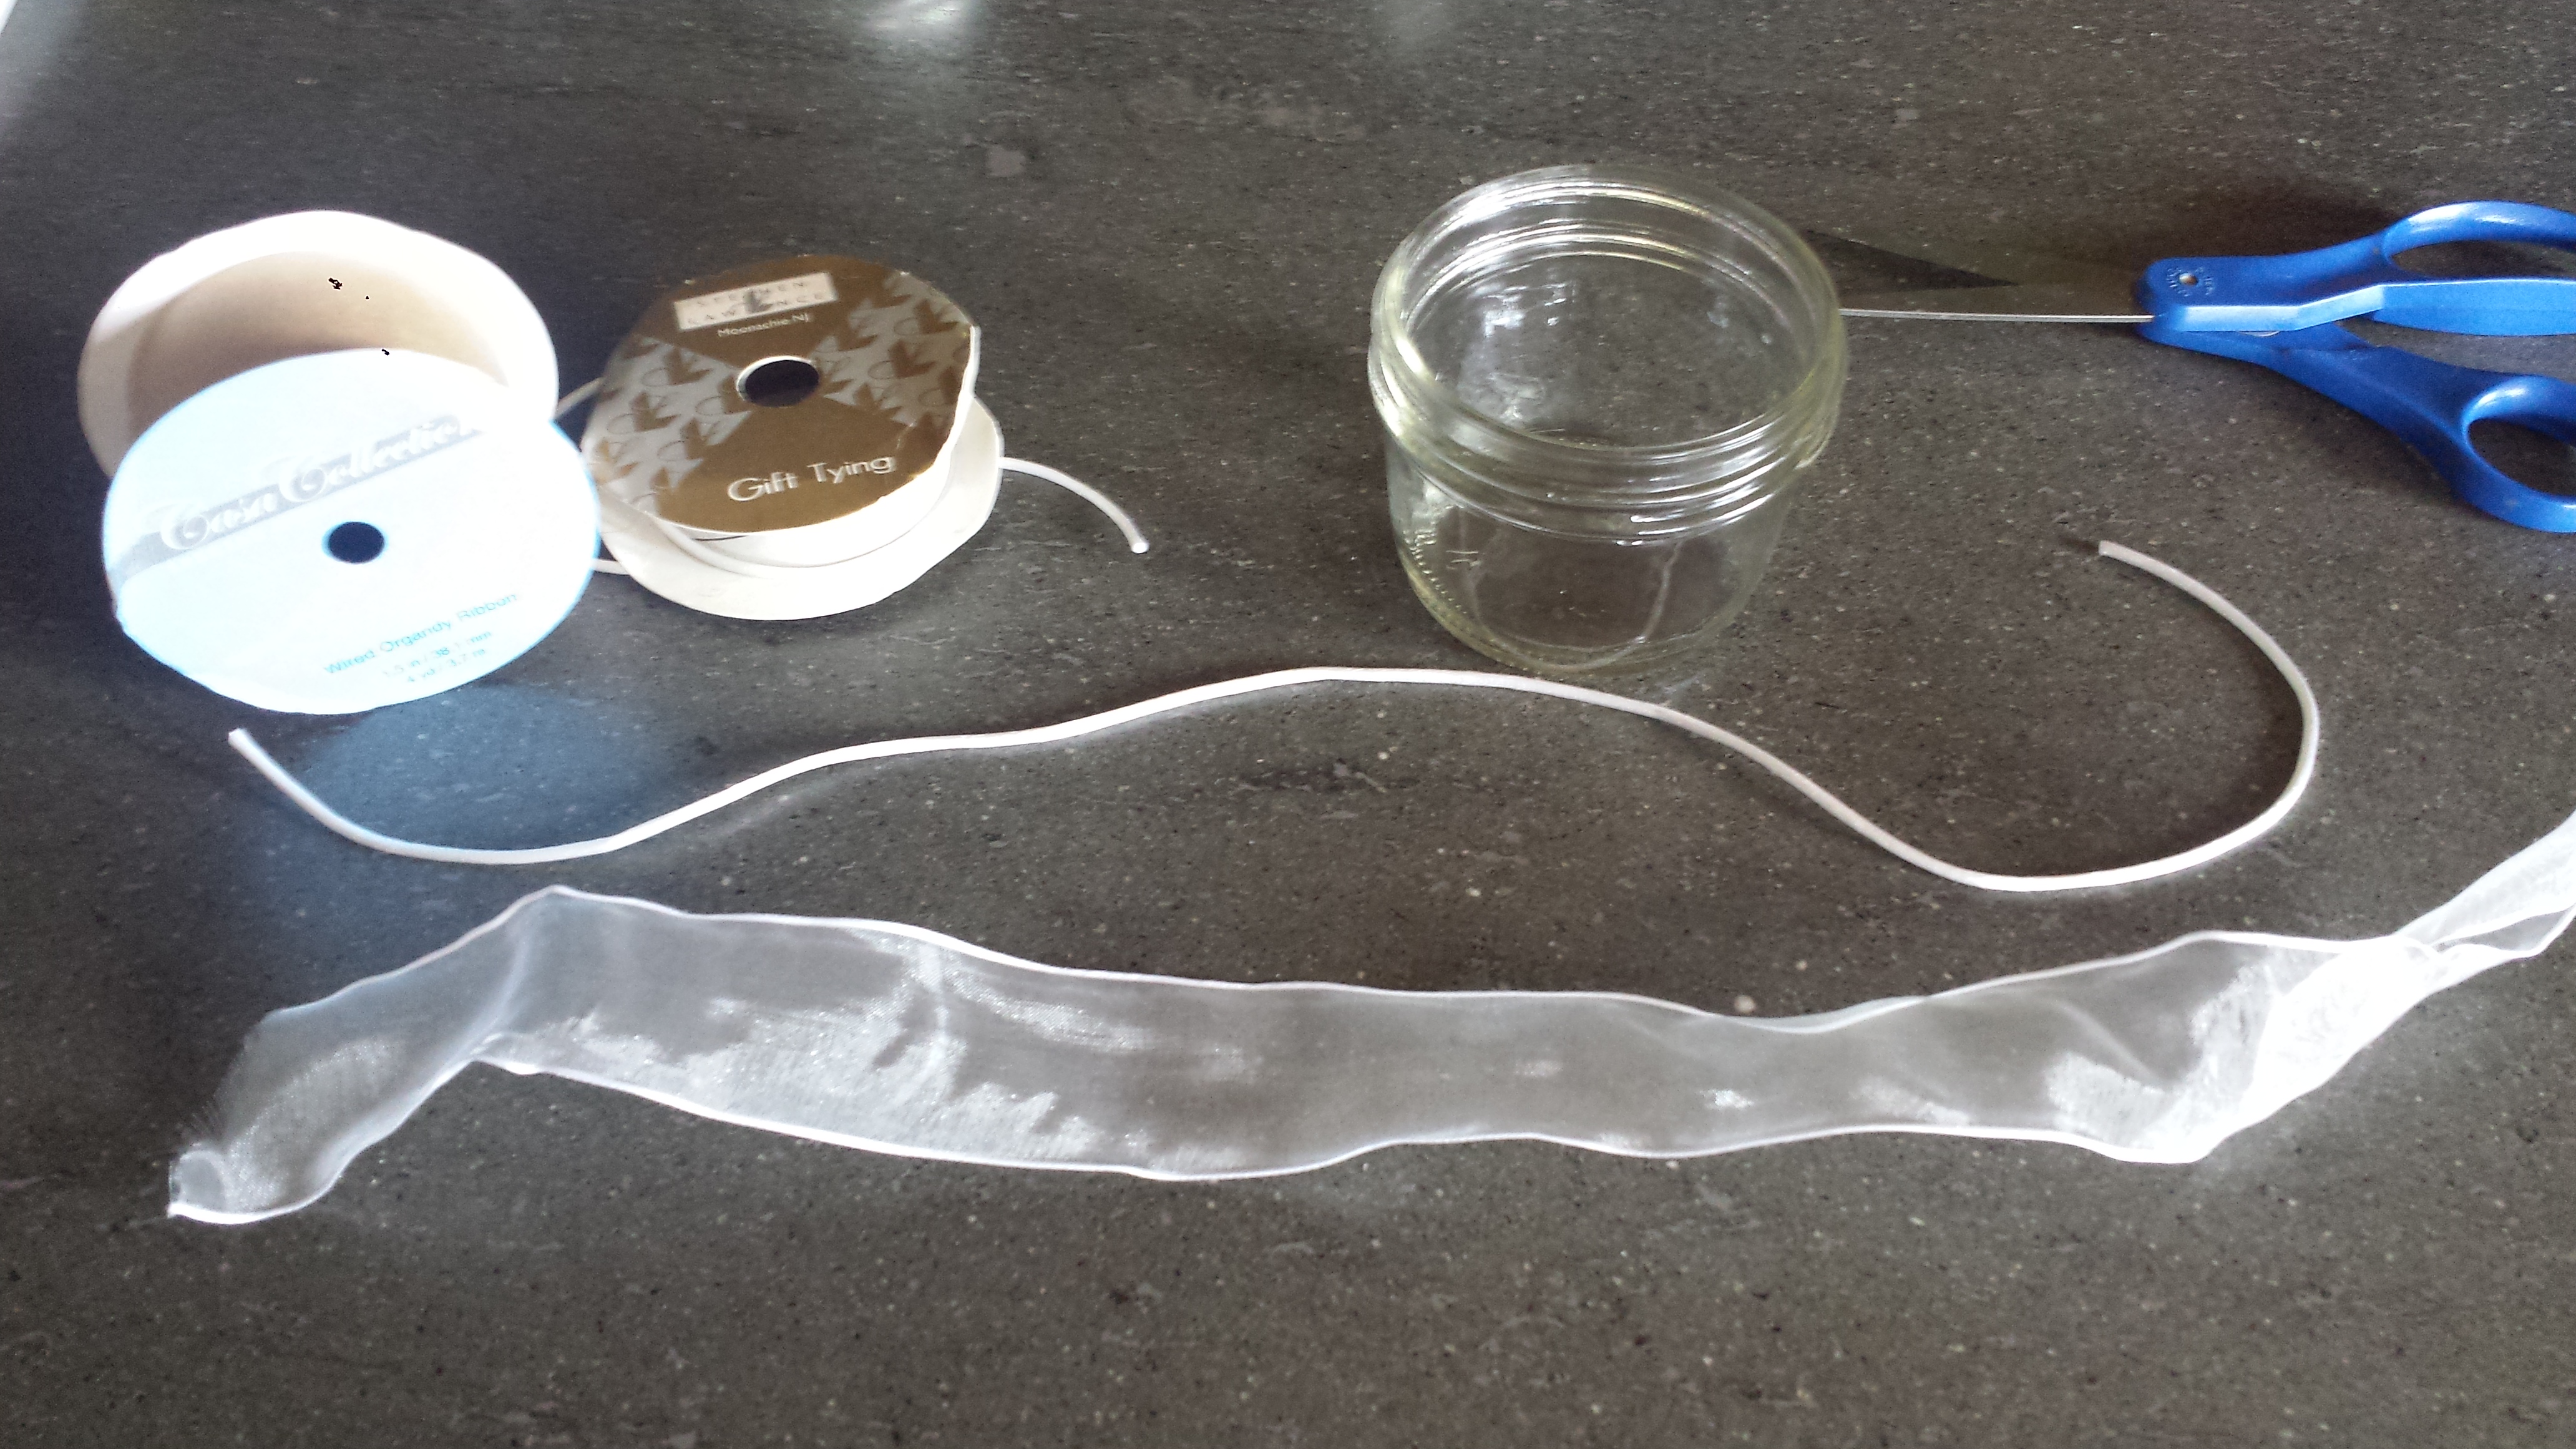
What You Need: 12 half pint wide mouth glass jars, 12 strips of ribbon and sharp scissors.  Do a trial run on one jar, then remove it and measure the length of the ribbon necessary and pre-cut the other 11.  Don’t tie them until after the mousse has been poured to prevent staining from drips.  Better yet, tie the ribbons just before serving if time permits.

Chocolate Mousse1

Bittersweet Chocolate Mousse

8 Tbsn sugar
4 1/2 Tbsn unsweetened baking cocoa
8 tsp powdered instant coffee or espresso
3 cups semisweet chocolate pieces or dark chocolate bar, chopped
2 cups boiling water
2 tsp pure vanilla extract
8 eggs

strawberries, raspberries or whipped cream for garnish (optional)
pirouette cookies (optional)
  •  Pre-measure everything and have sitting out at room temperature, including the eggs.  Get a several cups of water boiling
  • In this order, place sugar, cocoa, coffee powder and chocolate pieces in blender or food processor.  Flick motor on and off until ingredients are completely powdered

Chocolate Mousse5

  • Turn motor on, then pour boiling water through opening in cover and process until it shows no solid bits

Chocolate Mousse6

  • Turn on motor again and add vanilla and eggs.  Process about 15 seconds.Pour mousse mixture into 4 individual glass dessert cups. or jelly jars  Place on a tray (I used the box the jars came in) Cool, then chill about 3 hours or until firm.

Chocolate Mousse16

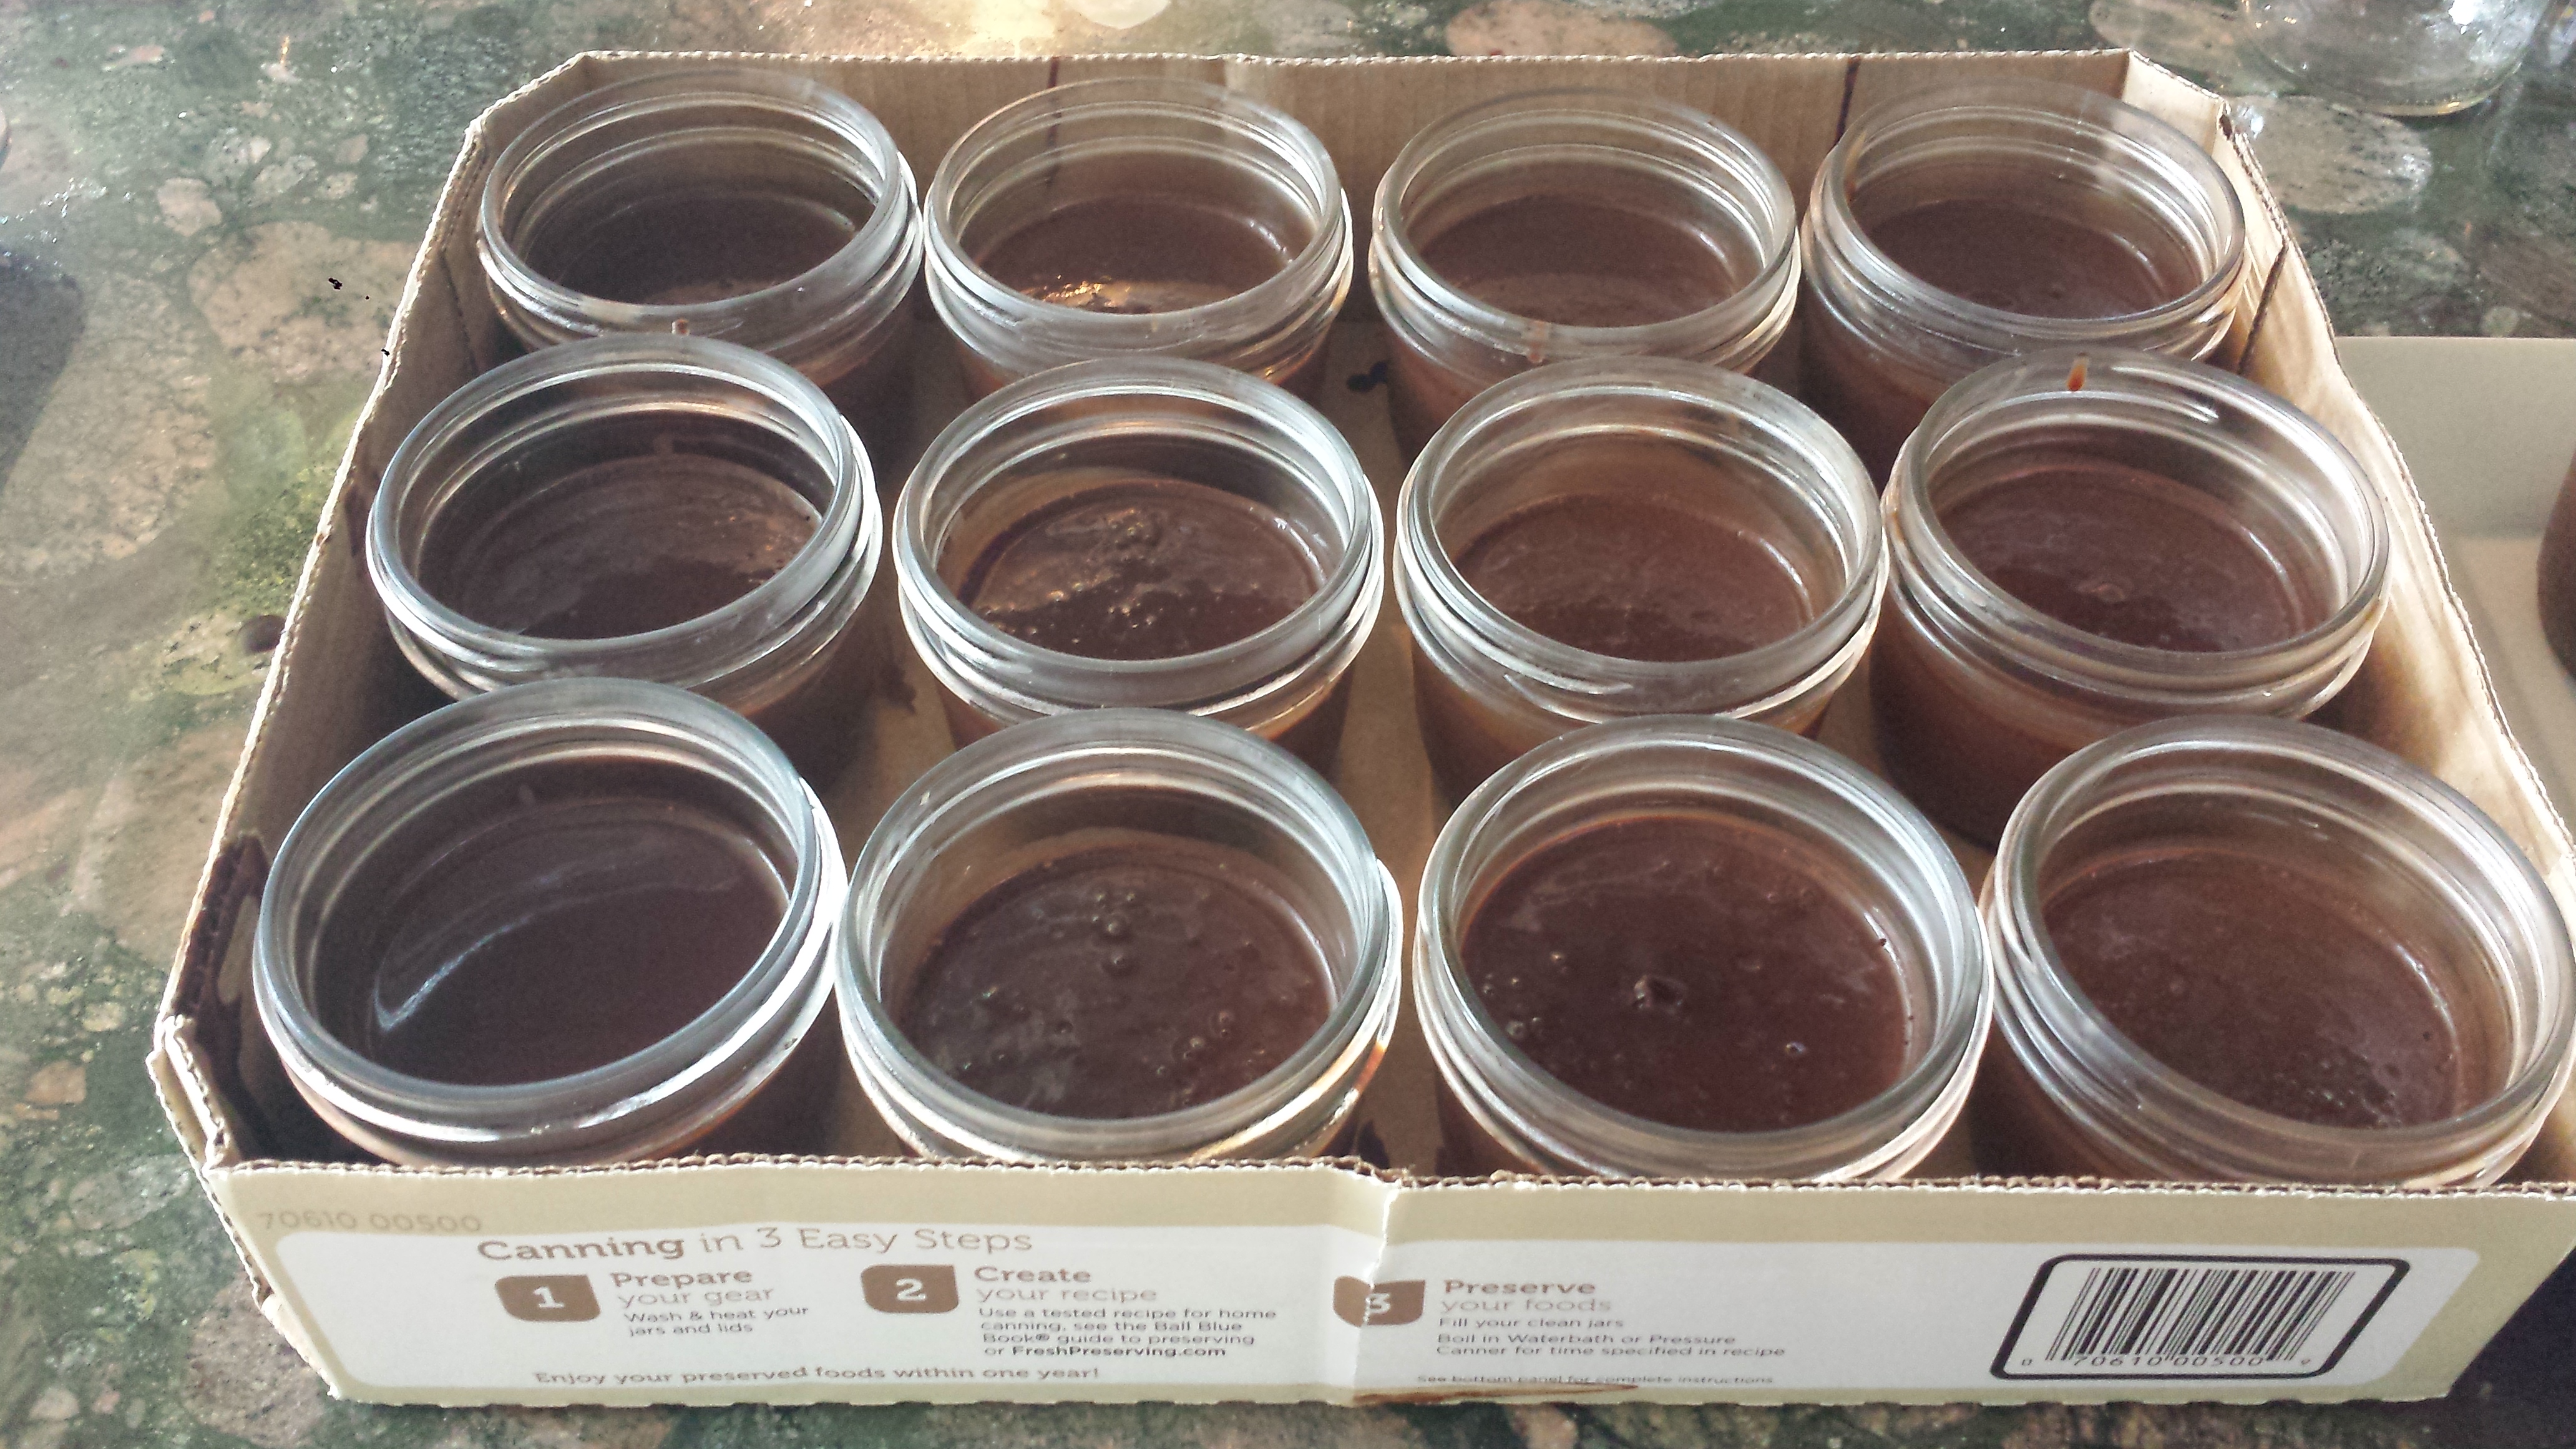
  • Before serving, tie ribbon around the neck of each jar for decoration.
  • If using strawberries, wash and dry keeping the stem intact.  Turn it on it’s stem and make three slices, vertically, not cutting all the way through the stem.  Gently spread into a ‘flower’ shape.

Chocolate Mousse8

Bittersweet Chocolate Mousse

  • Servings: 12-14 small
  • Difficulty: easy
  • Print

Chocolate Mousse13

 8 Tbsn sugar
4 1/2 Tbsn unsweetened baking cocoa
8 tsp powdered instant coffee or espresso
3 cups semisweet chocolate pieces or dark chocolate bar, chopped
2 cups boiling water
2 tsp pure vanilla extract
8 eggs
strawberries or raspberries for garnish (optional)
pirouette cookies (optional)
  •  Pre-measure everything and have sitting out at room temperature, including the eggs.  Get a several cups of water boiling
  • In this order, place sugar, cocoa, coffee powder and chocolate pieces in blender or food processor.  Flick motor on and off until ingredients are completely powdered
  • Turn motor on, then pour boiling water through opening in cover and process until it shows no solid bits
  • Turn on motor again and add vanilla and eggs.  Process about 15 seconds.Pour mousse mixture into 4 individual glass jelly jars.  Cool, then chill about 3 hours or until firm.
  • Before serving, tie a ribbon around the mouth of each jar to decorate
  • If using strawberries, wash and dry keeping the stem intact.  Turn it on it’s stem and make three slices, vertically, not cutting all the way through the stem.  Gently spread into a ‘flower’ shape.
  • To serve, garnish with berries or whipped cream and a pirouette cookie, if desired.

Wheatless Wednesday – Roasted Maple Glazed Acorn Squash, Apples and Pecans over Rainbow Quinoa

0

Roasted Acorn Squash1

The time when you find the perfect balance between savory with a touch of sweet… By George, this is it!  Now if I could just find the same balance in my life all would be good, although we are trending in the right direction.  Next week my youngest turns 20, signaling the end of thirteen years of the ‘terrible teens’ which were both better and worse than I expected. Teenagers are actually pretty wonderful, young people (most of the time), they just happen to come with loads of friends (and friends of friends) with enormous appetites, and they use a lot of towels.   Alas, time marches on and we are finding our new balance, a lot of sweet and a bit of savory. Life is good…

Roasted Acorn Squash3

I loved this acorn squash way more than I was expecting and I didn’t even have the urge to add cheese.  This is a vegan dish that you will love and it will love you back by providing loads of healthy plant based  protein, vitamins and minerals! I got the inspiration from a recipe by Edible Perspective and added more savories like ‘sweet’ onion, fresh sage, elephant garlic and whole pecans. Somehow all the flavors come together.  I wouldn’t change a thing.  I have always loved the shape of acorn squash.  When cut into circles they remind me of cartoon flowers.  This dish can also be made super casual with everything chopped and cooked jumbled together in a baking dish (I often do this).  The flavors are still wonderful, but it’s less of a presentation.  I really love the visual of the circles and wedges. It’s kind of like a cross between serving halved squash and a vegetable medley.  The slices are certainly less of a commitment to eat than an entire half and since they are uniform in size, they take less time for that perfect cook.  You can also chop the apples, onions, garlic, sage and pecans and stuff the slices for an impressive presentation, although you may need to add an egg to keep the filling together .  I’m sure I will give that a whirl sometime soon, perhaps for Thanksgiving. Stay tuned!

.Roasted Acorn Squash12


Ingredients:
1 cup quinoa (rainbow or plain)
2 cups vegetable broth
2 medium acorn squash
2 large cloves elephant garlic (optional)
2 large sweet onions
small bunch fresh sage
2 apples
3 Tbsn olive or coconut oil
1 1/2 tablespoons pure maple syrup
1/8-1/4 teaspoon cayenne pepper (optional)
salt + pepper

Vinaigrette:

1 garlic clove, minced
1/4 cup fresh lemon juice
2 Tbsn olive oil
2-3 teaspoons pure maple syrup
1/2 teaspoon lemon zest (optional)
salt + pepper to taste

Roasted Acorn Squash2

  • Preheat your oven to 425* F.  Rinse and cook quinoa, if making, in vegetable broth according to instructions. Cover and set aside.

Roasted Acorn Squash10

  • Cut acorn squash in half crosswise and scoop out seeds.

Roasted Acorn Squash9

  • Slice into 1/2 inch rings

Roasted Acorn Squash8

  • Cut elephant garlic into slices.

Roasted Acorn Squash7

  • Cut the dried roots off the onions leaving the  core intact (you want the slices to stay together).  Slice into thin wedges.

Roasted Acorn Squash6

Roasted Acorn Squash5

  • Combine the oil, maple syrup and cayenne (if using) in a small bowl. Place squash, garlic and onions in a large lightly oiled baking dish and sprinkle/brush with oil misture to cover. Bake for 10 to 15 minutes. Place as many squash as possible in a single layer on the bottom of the pan for proper browning, even if you have to use two pans.
  • Roughly chop sage. Core and thinly slice apples.  Spritz with lemon juice if not using right away to prevent browning.

Roasted Acorn Squash4

  • Remove pan from oven. Turn vegetables. Add the apples, pecans and sage.  Bake another 10 to 15 minutes or until golden.  You can broil the last five minutes but watch the pecans because they can burn.

Roasted Acorn Squash3

  • Serve over quinoa and sprinkle with vinaigrette.

Roasted Acorn Squash13

Roasted Acorn Squash, Apples and Pecans over Rainbow Quinoa

  • Servings: 4-6
  • Difficulty: easy
  • Print

Roasted Acorn Squash1

Ingredients:
1 cup quinoa (rainbow or plain)
2 cups vegetable broth
2 medium acorn squash
2-3 large cloves elephant garlic (optional)
2 large sweet onions
small bunch fresh sage
2 apples
3 Tbsn olive or coconut oil
1 1/2 tablespoons pure maple syrup
1/8-1/4 teaspoon cayenne pepper (optional)
salt + pepper

Vinaigrette:

1 garlic clove, minced
1/4 cup fresh lemon juice
2 Tbsn olive oil
2-3 teaspoons pure maple syrup
1/2 teaspoon lemon zest (optional)
salt + pepper to taste

  • Preheat your oven to 425* F.  Rinse and cook quinoa, if making, in vegetable broth according to instructions. Cover and set aside.
  • Cut acorn squash in half crosswise and scoop out seeds.
  • Slice into 1/2 inch rings
  • Slice elephant garlic into slices.
  • Cut the dried roots off the onions leaving the  core intact (you want the slices to stay together).  Slice into thin wedges.
  • Combine the oil, maple syrup and cayenne (if using) in a small bowl
  • Place squash, garlic and onions in a large baking dish and sprinkle/brush with oil misture to cover.  Place as many squash as possible in a single layer on the bottom of the pan for proper browning, even if you have to use two pans. Bake for 10 to 15 minutes.
  • Roughly chop sage. Core and thinly slice apples.  Spritz with lemon juice if not using right away to prevent browning.
  • Remove pan from oven. Turn vegetables. Add the apples, pecans and sage.  Bake another 10 to 15 minutes or until golden.  You can broil the last five minutes but watch the pecans as they can burn.
  • Serve over quinoa and sprinkle with vinaigrette

Meatless Monday – Black and Wild Rice Salad with Roasted Squash and Pomegranate (Re-Do)

0

Black Rice Dish

Pomegranates are back!  I have been waiting for pomegranates to come back into season just so I can make this dish again. People often ask for recommendations.  Here it is people –    one of my top five favorite dishes so far!  This is a Wow! dish. The photo does not do it justice. It’s proof though that I’m a little better with my camera than I was back then.  Goodmotherdiet was only 2 months old.  Just a baby! I can remember feeling it was a major accomplishment just to get a photo onto the blog. But I digress… Black and wild rice, roasted squash, pumpkin seeds, pomegranate and microgreens, all topped with a yummy honey vinaigrette, just in time for Thanksgiving!  I have made this dish out of season with dried cranberries or cherries with good results but nothing compares to the zing and pop that you only get from pomegranate seeds.

A weekend filled with fabulous parties and friends was great fun but it means that I spent little time in my kitchen.  I have been working my way through my old posts though and reformatting them so the recipes can be printed onto one page instead of many. (Thanks Barbara and Jane for the suggestion!) So in case you missed Black and Wild Rice the first time, here it is again.  You won’t be sorry! I have already bought my pomegranate and I am definitely making this soon, although not tonight since it’s hubby’s 55th and we’re going to celebrate in “The City”.  The party continues… Happy Birthday Jeff!

PS:  If anyone makes this, please send me a photo.  It will definitely be better than mine…


CLICK HERE FOR THE RECIPE

Pan Roasted Halibut with Meyer Lemon Beurre Blanc

0

Halibut1

You know when you’re at a restaurant and have just polished off a dish with a sauce so delicious that you come darn close to licking your plate?  Well this is that sauce.  Meyer Lemon Beurre Blanc is buttery and slightly creamy with the perfect lemon tang and carmelly wine finish.  Yum!   I could pretty much eat it on anything (or even by itself standing by the stove on the pretense of testing it, but don’t tell).  I paired it with a mild halibut which I pan roasted and then quick sautéed power greens in the same pan to pick up any remaining flavors.  I added orange and grapefruit segments to the greens and topped them with the pan roasted fish, then drizzled the whole thing with the lovely Meyer Lemon Beurre Blanc.  Mmmm…

Halibut10

Fish is delicious, especially when cooked to perfection with a light golden crust and the perfect flake, but this recipe is really all about the beurre blanc.  The recipe, which I adapted from Better Homes and Gardens, August, 2014 Good & Fresh magazine, doesn’t use loads of heavy cream like so many recipes, just one tablespoon of cream or yogurt, wine, shallots and butter, which we now know is a healthy fat, not the enemy as we have been told all these years.  So whisk away!  This sauce is definitely worth the ten or fifteen minutes it takes.  The only problem is you’ll be trying to figure out what else you can put it on…

Halibut12

When you’re at the market choosing which fish to buy, be aware that not all fish is raised naturally and without added chemicals.  If you are eating fish as a healthy alternative, this is something to think about.  I am a big believer in voting with my pocketbook.  I prefer to buy ‘live caught’ fish to support local fisherman rather than the factory farming industry.  The farm raised fish industry, in some countries, is very questionable with the fish being fed unmentionables along with  antibioltics and other things to counter the crowded horrible conditions. The best choice is to buy Sustainable Seafood which includes caught or farmed fish that whose purveyors take into account the health of the species and the oceans.  If you aren’t sure you can check out Seafood Watch which has a website and an app that tells you if the fish you are going to buy is a good choice or not.

Halibut11

  • Prepare your fruits and vegetables before you start cooking.

Halibut6

  • Then make the Meyer Lemon Beurre Blanc (recipe below) and set aside covered to keep warm.

Halibut4

  • Heat the oil in a heavy skillet over medium high heat. Season the fish on both sides with salt and pepper and add to the pan.  Cook until the fish is golden and turn to cook the other side, 6 to 8 minutes per side, or until the fish flakes easily with a fork. Remove the fish to a plate and cover loosely with foil.

Halibut3

  • Add another Tablespoon oil to the pan if necessary and toss in half the scallions. the vinegar and the greens.  Saute about a  minute just until they start to wilt.

Halibut2

  • Remove skillet from heat and add grapefruit and orange segments.  Divide among four plates and top each with a piece of fish. Briefly reheat the beurre blanc, if necessary, and drizzle over the top of each plate. Garnish with remaining scallions and lemon zest. Serve immediately.

Halibut13


Pan Roasted Halibut with Meyer Lemon Beurre Blanc

  • Servings: 4
  • Difficulty: easy
  • Print

Halibut1

4 5 oz skinless halibut, cod or sea bass filets
2 Tbsn olive oil
salt and pepper
1 Tbsn cup white wine vinegar
4 cups mixed greens (baby kale, chard, arugula or spinach)
1 orange, peeled and sectioned
1 pink grapefruit, peeled and sectioned
1/4 cup scallions, sliced into thin julienne, or snipped chives
1 Tbsn lemon zest (optional)

  • Prepare your fruits and vegetables before you start cooking.  Then make the Meyer Lemon Beurre Blanc (recipe below) and set aside covered to keep warm.
  • Heat the oil in a heavy skillet over medium high heat. Season the fish on both sides with salt and pepper and add to the pan.  Cook until the fish is golden and turn to cook the other side, 6 to 8 minutes per side, or until the fish flakes easily with a fork.
  • Remove the fish to a plate and cover loosely with foil.
  • Add another Tablespoon oil to the pan if necessary and toss in half the scallions, the vinegar and the greens.  Saute about a minute just until they start to wilt.
  • Remove skillet from heat and add grapefruit and orange segments.  Divide among four plates and top each with a piece of fish.
  • Briefly reheat the beurre blanc, if necessary, and drizzle over the top of each plate. Garnish with remaining scallions and lemon zest. Serve immediately.

Meyer Lemon Beurre Blanc

  • Servings: 4
  • Difficulty: easy
  • Print

Meyer Lemon Beurre Blanc
1 cup white wine (Sauvignon Blanc or Chardonnay, not sweet)
1/4 cup lemon juice (Meyer lemon preferably)
2 large shallots, minced
1 Tbsn cream or yogurt
12 Tbsn cold butter, cubed

  • To make Meyer Lemon Beurre Blanc, combine shallots, wine and lemon juice in a medium saucepan and bring to a boil. Simmer uncovered until the liquid is reduced to 2 tablespoons. Stir in cream or yogurt and turn heat to low. Whisk in butter one cube at a time until a rich sauce forms. Remove from heat and set aside.


Roasted Butternut Squash, New Potatoes, Artichoke Hearts and Wilted Tomatoes

2

Roasted Vegetables8

Fall officially begins tomorrow so time to start thinking about sweaters and boots.  Here in California we are literally just thinking about it but soon cold weather will be a reality, and with it hopefully some much needed rain.  Along with cooler temperatures comes more lovely squashes, root vegetables and the last of the tomatoes from the garden.  I absolutely love a colorful plate and make an effort to Eat the Rainbow which is not only gorgeous but also more nutritious in that a colorful variety provides a wider range of nutrients.  Go bold!  The brighter the color the bigger the bounty. For those of you with picky eaters at home there is even a downloadable game Eat the Rainbow Challenge which might encourage your kids to go beyond carrot sticks and apple slices.  Here is the rundown from Every Day Health of just what that beautiful color can do for you.

Roasted Vegetables4
Red. In fruits and vegetables, red is usually a sign of vitamin A (beta carotene) and vitamin C. Typically, red produce are also high in manganese and fiber. Choose red bell peppers, tomatoes, cherries, cranberries, raspberries, rhubarb, pomegranates, and beets. Red apples also contain quercetin, a compound that seems to fight colds, the flu, and allergies. Tomatoes, watermelon, and red grapefruit are loaded with lycopene, a compound that appears to have cancer-fighting properties

Yellow. Banana is probably the first yellow fruit that comes to mind — and it delivers potassium and fiber. You will also find potassium and fiber plus manganese, vitamin A, and magnesium in other yellow produce, such as spaghetti squash, summer squash, and yellow bell peppers.

Black Rice Squash cut raw

Orange. Just a shade away from red, orange in fruits and vegetables signifies a similar vitamin and mineral profile. You’ll get vitamins C, A, and B6, potassium, and fiber in choices such as butternut squash, carrots, sweet potatoes, cantaloupes, oranges, pumpkins, orange peppers, nectarines, and peaches.

Green. Dark leafy greens are packed with nutrients — this group offers far more vitamins and minerals than iceberg lettuce. A favorite dark leafy green is spinach because of its rich lutein content, which aids eyesight, and folate, which supports cell reproduction. Broccoli and asparagus also contain these compounds.

Roasted Vegetables6

Blue. Think blue, and you’re most likely picturing a bowl of blueberries, one of nature’s most powerful antioxidants. They are also loaded with fiber and make an incredibly versatile addition to your diet

Purple. This group includes vegetables like red onions and eggplant, and fruits such as blackberries, Concord grapes, currants, and plums. Purple indicates the presence of anthocyanins, powerful antioxidants that protect blood vessels and preserve healthy skin. You can also find vitamin A and flavonoids in purple vegetables like radicchio, purple cabbage, purple potatoes, and purple carrots.

White. White may not be much of a color, but white vegetables, such as cauliflower, rutabagas, and parsnips, still shine with vitamins and minerals like vitamins C, K, and folate, and they contain fiber. Don’t forget onions and garlic, which have a compound called allicin that seems to protect the heart and blood vessels from damage.
Roasted Vegetables5

For Meatless Monday this week, I roasted butternut squash, purple, pink and white baby potatoes, artichoke hearts and assorted small tomatoes from my garden.  This is a really easy and quick dinner to prepare, ready in a half hour, and almost any root vegetable, like carrots, turnips or parsnips that you might have on hand can be added.  I happen to really love the small purple potatoes.  They add an interesting color and their flavor is more defined than a white potato.  Just slice the butternut squash in half lengthwise and scoop out seeds and pulp.  Remove the peel and dice into medium cubes. Cut potatoes in half (or quarters if larger). Place potatoes and squash in a large baking dish and toss with oil and bake at 400 degrees for 10 minutes.

Roasted Vegetables3

Remove from the oven and add artichoke hearts, tomatoes and fresh herbs and bake another 10 minutes or until squash and potatoes are fork tender and the tomatoes are ‘wilted’. Splash a bit of balsamic vinegar over the top of the cooked vegetables, if desired, and gently stir to combine.

Roasted Vegetables2

Serve topped with crumbled feta, if desired, or cool and serve warm or cold over a bed of fresh mixed lettuce drizzled with balsamic vinaigrette.

Roasted Vegetables9

Roasted Vegetables10

  • Servings: 4
  • Difficulty: easy
  • Print

Roasted Vegetables1

2-3 cups new potatoes
1 small butternut squash (2-3 cups cubed)
1/4 cup olive oil
1-2 cups artichoke hearts packed in water, drained
1-2 cups assorted small and/or cherry tomatoes
1/4 cup fresh herbs, thyme or oregano
1 tsp cumin (or more to taste)
1 tsp salt
1/2 tsp pepper
1 Tbsn balsamic vinegar (optional)
1/2 cup feta (optional)

  • Cut butternut squash in half, lengthwise and scoop out seeds and pulp.  Remove the peel and dice into medium cubes.
  • Cut potatoes in half (or quarters if larger)
  • Place potatoes and squash in a large baking dish and toss with oil
  • Bake at 400 degrees for 10 minutes
  • Remove from the oven and add artichoke hearts, tomatoes and fresh herbs and bake another 10 minutes or until squash and potatoes are fork tender.  Add balsamic vinegar, if desired, and gently stir to combine.
  • Serve warm topped with crumbled feta, if desired, or cool and serve over a bed of fresh mixed lettuce drizzled with balsamic vinaigrette.


Wheatless Wednesday – Peach Berry Almond Crisp

0

Peach Crisp14

I’ve been home on my own for the past week and have succumbed to the temptation to eat dessert for breakfast.  I mean who wouldn’t, given the choice of a regular breakfast or a lovely fruit crisp warm from the oven?  My husband and three sons are scattered to the edges of the country.  One son is beginning law school, another taking an experiential year and the third, recently engaged and ensconced in the working world.  So my job is done NOT , rather my day to day job as a Mom has greatly diminished. My day began with a kitchen that smells like heaven.  When I walked out to the street with my dog to get  my newspapers and then walked back into the house, mmmm!  Even if I didn’t eat a bite – worth it.

This is a super easy recipe.  You can use any fruit you have on hand.  If its sour just add a bit more sugar.  If its really ripe add a bit less.  I used peaches, raspberries and blackberries because that is what I had. The beauty of a crisp is that there is no bottom crust to add calories and carbs.  It’s really all about the fruit.   I topped the fruit with a sweet crunchy oat almond topping but pecans and walnuts are also good options.  For a more streusel-like topping use  half flour, half oats.

Peach Crisp1

TIP:  The quantities listed below are for a large rectangular glass baking dish.  The quantities can be reduced to accommodate the size of the pan or use what fruit is available.  Just roughly estimate adjustments..  If it’s not perfect just top warm dessert with cinnamon or vanilla ice cream and all is forgiven.

Peach Berry Almond Crisp

  • Servings: 6
  • Difficulty: easy
  • Print

Filling
6 cups peeled sliced fresh peaches (2 -3 peaches)
2 cups mixed berries
1/2 cup sugar or 1/3 cup packed brown sugar
3 Tbsn oat or other non-gluten flour, 2 Tbsn wheat flour or 2 Tbsn corn starch (as thickener)
2 tsp cinnamon

Topping
1 cup rolled oats (or 1/2 cup oats and 1/2 cup any kind of flour)
1 tsp cinnamon
1/2 cup brown sugar, packed
6 Tbs butter
1/2 cup sliced or slivered almonds (optional)

Peach Crisp2

  • Peel, pit and slice peaches and place in a large bowl

Peach Crisp4

  •  Add the flour, sugar and cinnamon to the peaches.

Peach Crisp5

  •  Mix to coat all slices.

Peach Crisp6

  •  Add berries and gently fold into the peach  mixture.

Peach Crisp7

  • Pour fruit mixture into baking dish or casserole pan.

Peach Crisp9

  •  To prepare topping, cut cold butter into small pieces.

Peach Crisp10

  •  Using a fork mix oats, cinnamon, sugar and butter into a crumbly mixture.

Peach Crisp12

  • Bake at 400 degrees for about 45 minutes or until the fruit is bubbly and the top golden.  Deeper casseroles may take longer to cook.

Peach Crisp14

  • Serve with ice cream or whipped cream.   It’s a yummy  bowl of summer…


Wheatless Wednesday – Roasted Cauliflower & Chickpeas with Tomatoes and Olives

2

Cauliflower and Garbanzo13
“A journey of a thousand miles must begin with a single step.” — Lao Tzu

Yesterday was a travel day for me (a 3000 mile journey from Maine to California), starting with a three hour drive to Boston Logan, then an almost seven hour flight to SFO into headwinds.  I got home feeling tired but blessed.  No matter how long the day, any flight that lands is a good flight in my book.  I hate flying these days.  It used to be that we only had to worry about the plane breaking mid-flight but now we have much more to worry about every time we get on a plane.  It didn’t help that the ‘Safe Travels” bracelet that my friend, Stephanie, brought me back from Israel was found on the floor, (meaning the threads broke) a few days ago.  I don’t consider myself very superstitious but this kind of freaked me out.  What if it’s an omen? I mean that bracelet has done a good job of keeping the plane in the air for more than a year!  So in desperation true form  I re-tied the strings into a makeshift, albeit awkward, bracelet and put it on my wrist.  I’m now in California so it must have worked, Whew!  So why am I telling you this?  In deciding what to make for Wheatless Wednesday, I took stock of what I had on hand which wasn’t much since I haven’t been home in weeks.  I had done a quick trip to the market for essentials and picked up a small head of cauliflower so I knew that was going to be my feature.  Then I went out to my garden and harvested a few large heirloom tomatoes, a lime, fresh herbs, a couple of red chili peppers and a handful of Sun Gold cherry tomatoes.

Cauliflower and Garbanzo7

A quick check in my pantry yielded a can of garbanzo beans, so I was set.  I had remembered that Gwyneth Paltrow had a recipe for Roasted Cauliflower and Chickpeas with Mustard and Parsley.  I had great luck with Gwyneth’s famous White Bean and Swiss Chard Soup which was delicious so went back to her cookbook. “It’s All Good” to check out the recipe.  Since it’s still summer, barely, (The first day of Fall also known as the Autumnal Equinox is on Tuesday, September 23, 2014, less than two weeks from now.) I decided to swap out the mustard for a dressing made with my fresh herbs and chili peppers along with spices, like cumin and chili powder. First I roasted the cauliflower and garbanzos and let them cool slightly. Then I drizzled them with the slightly spicy dressing and tossed it all with halved cherry tomatoes, olives and fresh parsley.  This is a wonderful, ultra-healthy and satisfying main course, just serve with a side salad.  It also makes a great side dish paired with almost anything.

Cauliflower and Garbanzo6

In her book, Gwyneth also recommends using the tough outer leaves which are usually removed and discarded.  I usually throw them in my green bin or give them to the chickens next door but decided to take Gwyneth up on her challenge.  As suggested, I sliced and sautéed them in butter and garlic.  What could be bad?  I could probably eat my shoes if they were sautéed in butter and garlic… And the result?  I sprinkled them with sea salt – Delicious!  Gwyneth was right. They taste a lot like bok choy but slightly firmer.  The best part is that you get a second dish, two for the price of one!

Cauliflower and Garbanzo11

TIP:  I made this dish more summery by  using fresh herbs and spices in the dressing instead of mustard and I also included red chili peppers, cherry tomatoes and olives for a more salady feel.  If you would like to make Gwyneth’s original dish, omit the spices, tomatoes and olives.  For the dressing, add 1/4 cup olive oil, salt and pepper and 1 tablespoon each, Dijon mustard and seeded mustard.

Roasted Cauliflower and Chickpeas with Tomatoes and Olives

  • Servings: 4
  • Difficulty: easy
  • Print

Cauliflower and Garbanzo12

14-ounce can chickpeas (garbanzo beans), or 2 cups cooked
1 head of cauliflower
Extra virgin olive oil
Coarse sea salt
1/2 cup cherry tomatoes
1/2 cup olives (any type)
1/4 cup chopped Italian Parsley
Dressing:
3 Tbsn olive oil
1 tablespoon white wine or apple cider vinegar
1 tsp lime juice (or more to taste)
1 tsp cumin (or more to taste)
1 tsp chili powder (or more to taste)
1 tbsn chopped red chilis (optional)
Freshly ground black pepper
Cauliflower and Garbanzo8

  • Drain chickpeas and let dry, or dry with towels.

Cauliflower and Garbanzo5

  • Remove the outer leaves from the head of cauliflower, core and cut into bite-sized florets.  Since garbanzos are small, I like to cut the florets pretty small too.

Cauliflower and Garbanzo4

  •  Toss the chickpeas and cauliflower together in a large roasting pan with 3 Tablespoons of olive oil and a big pinch of salt.  Roast at 400 degrees for about 45 minutes.

Cauliflower and Garbanzo9

  •  Remove from the heat and let cool, slightly, while you make the dressing.  Whisk together the oil, vinegar and spices. Add salt and pepper to taste.

Cauliflower and Garbanzo 10

  •  Add tomatoes, olives and parsley.  Drizzle with dressing and gently combine. Serve warm or at room temperature.

Cauliflower and Garbanzo13


Meatless Monday – Char-Roasted Eggplant and Bell Peppers with Olives, Tomatoes and Goat Cheese

2

Eggplant Salad2

The end of summer means Back to School, Last Little Get Aways and Glorious Sunsets which herald more sunny days ahead. I have always loved this time of year, which has always seemed like the ‘real’ new year to me.   The beginning of each school year has always been filled with excitement and the anticipation of something new and better.  When I was young I was always sure that this was going to be the year I made the team and got straight A’s as well as the cute boy, ever the optimist. Fall also serves as a marker for where we are in our lives, sort of a  growth chart in time.  When my boys were young I  met each new school year with the disbelief that they were one grade older, each new grade a momentous step, coupled with an almost giddy joy that they were going back to school and I could finally get something done-call it a guilty pleasure.  Now that I am less married to the school calendar, since my kids are in college and beyond, I am still reminded of the season by my garden which is  abundantly rich with bounty but showing some signs that summer is ending.  It’s almost time to prepare for the cold of winter, but not quite yet…still many beautiful days ahead.

Garden June7
This lovely salad started with a Martha Stewart Living recipe for Blistered Eggplant with Tomatoes, Olives and Feta which I stumbled upon while thumbing through the September, 2014 issue.  I was immediately drawn to the colorful assortment of some of my favorite vegetables and decided to give it a try but, as they say on American Idol, ‘make it my own’. Those of you that know me well, understand that, unless I’m baking, I consider recipes to be merely suggestions and I tend to cook a bit on the fly with what I have on hand.  The original recipe calls for only a drizzle of olive oil with salt and pepper but I opted to let garlic and fresh herbs rest in the olive oil with a splash of balsamic vinegar while I prepared and roasted the vegetables.  I also roasted red and yellow bell peppers because I thought they would enhance the other flavors with their natural sweetness. The combination of charred eggplant and peppers with sweet, ripe tomatoes, tangy olives, fresh herbs and creamy goat cheese is a wonderful taste sensation. The goat cheese is optional, in fact my husband doesn’t care for it so I placed the goat cheese in a corner  of the tray so vegans or non-goat cheese lovers don’t have to pick through the salad for something ‘safe’.  Sprinkle some freshly chopped basil for a final fresh garnish.

Eggplant Salad3

TIP:  Eggplant is usually sliced and then salted (a process called ‘degorging’) before cooking to remove any bitterness and to help draw out the extra water which prevents the eggplant from acting like a sponge and absorbing great quantities of oil or marinade or releasing unwanted water into the dish.  However, with this method of cooking, sometimes called blistering or charring (i.e. dry roasting), salting is not as necessary if the eggplant is fresh, as the high heat of the broiler dries the slices out enough.  Older, tougher eggplants will really benefit from salting though.  So if you have fresh eggplant and don’t have time, skip the salting process.  Adding the oil after roasting gives the eggplant a nice texture and enhances the slightly smoky, charred flavor.

eggplant salad20

For those eggplant lovers, you might want to try some of my other eggplant favorites.  Just click on the photo for the recipe.

Eggplant Parm5

Eggplant Parm Minis

Eggplant Tart1

Summer Vegetable Tart

Eggplant1

Roasted Eggplant with Goat Cheese and Pine Nuts

Roasted Eggplant and Bell Pepper Salad with Tomatoes, Olives and Goat Cheese

  • Servings: 4
  • Difficulty: easy
  • Print

1 large globe eggplant
2 bell peppers, any color
1-2 lbs mixed tomatoes
1/2 cup mixed olives
6 oz goat cheese (optional)
1/2 cup olive oil
1/4 cup balsamic vinegar
1 Tbsn fresh thyme leaves
1/4 cup fresh basil, chopped
salt and pepper to taste

Eggplant Salad17

  • Slice eggplant into thin rounds.  If you have time, spread the slices on paper towels and sprinkle with salt and let rest for 10 to 15 minutes.  Wipe moisture off the slices before roasting.

Eggplant Salad16

  • Combine olive oil, garlic and thyme in a small bowl. Set aside.

Eggplant Salad15

  • Halve bell peppers and remove core and seeds.

Eggplant Salad14

  • Preheat broiler and place rack 6 inches from the heat source.  Broil eggplant and peppers until they are blistered and deep brown on the top, about 10 minutes.

Eggplant Salad12


  •  Turn and repeat on the other side.

Eggplant Salad11

  • Immediately transfer eggplant to a large bowl, slice the peppers into wide strips and add to eggplant.  Toss with half the oil to coat all slices.

Eggplant Salad10

  • Cover with a plate and let stand until softened, about 10 minutes.

Eggplant Salad9

  • Slice larger tomatoes into thin rounds and cherry tomatoes in half.

Eggplant Salad8

  • Arrange eggplant and peppers on a platter.

Eggplant Salad7

  • Add tomatoes and olives and drizzle with remaining dressing.

Eggplant Salad3

  • If using, sprinkle with goat cheese or serve in the corner of the platter or on the side. Top with fresh basil and salt and pepper to taste.

Eggplant Salad1

  • Serve family style or prepare individual plates.


Wheatless Wednesday – Grilled Romaine & Tomato with Gorgonzola

0

Grilled Romaine3
I have never been a big fan of romaine lettuce, until now!  This time of year, pretty much everything ends up on the grill, perhaps in an effort to keep the kitchen cool.  It sounds odd to grill lettuce and I was skeptical the first time but this is now my favorite way to serve romaine.  Charring fruits and vegetables, even lettuce, enhances their natural flavors and transforms them into a delicacy.  Just split fresh romaine head down the middle, leaving the core intact, brush with olive oil and place face down on a hot grill.  Top grilled romaine with a balsamic vinaigrette and sprinkle with gorgonzola or parmesan, or just serve on its own.  This is not the prettiest of salads  but you won’t believe how delicious it is.  I also threw some tomatoes on the grill and topped them with gorgonzola and fresh basil.

Grilled Romaine6

Here are some surprising nutrition facts about Romaine lettuce that you may not know:

1 – Protein. Believe it or not, romaine lettuce is 17% protein with 7.7 grams per head. It is also contains all 9 essential amino acids, 9% RDA of some and up to 26% RDA of others.

2 – Calcium. One head of romaine has 206 milligrams (mg) of calcium (about 21% RDA). Blend it with calcium rich fruits like papaya and oranges and you’ll get more calcium than a glass of milk!

3 – Omega-3s. One head of romaine lettuce contains 44% RDA of Omega-3 essential fats. Forget the tainted fish oils, reach for some leafy greens instead!

4 – More Vitamin A Than An Carrot. One head of romaine contains 182% RDA of vitamin A (as beta-carotene) while a large carrot contains only 40%.

5 – Iron. One head of romaine contains 6mg of iron, which ads a significant source of iron to the diets of vegetarians and vegans.

6 – Romaine Lettuce is Rich in B-vitamins: Thiamine (B1) – 38% RDA, Riboflavin (B2) – 32% RDA, Niacin (B3) – 12% RDA, Pantothenic Acid (B5) – 18%, Pyridoxine (B6) – 36 %, Folate (B9) – 213%!

7 – Water. One head of romaine provides 16% of your daily water needs with about 20 ounces of water per head!

8 – Rich Source of vitamin K. As with most leafy greens, romaine is super rich vitamin K with 535% RDA in one head.

9 – Low Levels of Oxalic Acid. If you have problems with calcium oxalate kidney stones, romaine lettuce might be a good choice for leafy greens since it is very low in this anti-nutrient.

10 – Mineral-Rich. Don’t let the lighter color of romaine lettuce fool you. This not-so-dark leafy green is rich in minerals. One head contains copper (33% RDA), magnesium (22% RDA), manganese (42% RDA), phosphorus (27% RDA), potassium (33%), selenium (5% RDA) and zinc (13% RDA).

Makes me a believer!

Grilled Romaine5

Grilled Romaine and Tomato

  • Servings: 6
  • Difficulty: easy
  • Print

3 heads romaine lettuce (1 for every 2 people)
3 ripe but firm tomatoes (optional)
4 Tbsn olive oil, divided
2 Tbsn balsamic vinegar
1 Tbsn apple cider vinegar or red wine vinegar
1 tsp fresh thyme, minced
1/4-1/2 cup crumbled gorgonzola or grated parmesan
salt and pepper

  • Remove any old looking, leafy outer leaves of each head of romaine. Slice each head down the center lengthwise keeping the core intact. Rinse thoroughly with cold water and drain. Slice tomatoes in half, if using.

Grilled Romaine6

  • Brush both sides of romaine (and tomatoes) with 2 Tablespoons olive oil and sprinkle with salt and black pepper.

Grilled Romaine7

  • Preheat the grill and make the  dressing while waiting for the grill to get very hot. Combine remaining olive oil, vinegar and thyme in a small bowl and set aside.

Grilled Romaine8

  • Place the romaine and tomatoes flat side down on the hot grill

Grilled Romaine11

  • Grill 2 to 3 minutes or until charred.  Turn romaine a 1/3 turn and char one side of the curved side

Grilled Romaine10

  • Rotate to char the final side (tomatoes only need to be turned once and then removed to a serving platter) Remove romaine from heat and place on a serving platter.

Grilled Romaine13

  • Drizzle with dressing.

Grilled Romaine2

  •  Sprinkle with parmesan or gorgonzola, if desired.  Top tomato with fresh basil.

Grilled Romaine3


Wheatless Wednesday – Root Vegetable Slaw with Burrata

0

Root Vegetable Slaw13

Roots don’t get the respect that they deserve.  Don’t be fooled by the outward appearance of  most root vegetables with their tough, hairy rough exteriors which only serve to protect the lovely jewels inside.  Their gorgeous interior colors indicate their rich nutrient value with each root containing it’s own set of health benefits. This raw root salad is the epitome of Eat the Rainbow with it’s vibrant red, pink, orange, yellow and green. Roots are packed with a high concentration of antioxidants, Vitamins C, B, A, and Iron. Roots, which grow under ground, absorb vitamins and minerals from the soil and are the energy store house for the plants. Their complex carbohydrates and fiber makes us feel full and satiated, hopefully satisfying our cravings for junk food. Summer is a great time to eat root vegetables fresh when you can eat them raw and get the most health benefits.
Jerusalem

This Root Vegetable Slaw is from the “Jerusalem” cookbook which I received as a very thoughtful birthday gift from a good friend.  “Jerusalem: A Cookbook” was written by Yotam Ottolenghi and Sami Tamimi, chefs who grew up on opposite sides of Jerusalem; Mr. Tamimi in the Arab East and Mr. Ottolenghi in the Jewish West, although they didn’t know each other. They left Israel more than 20 years ago and met in London where they became close friends and business partners.  This is more than just a cookbook.  It’s a gorgeous collection of photos, recipes, history and stories about Jerusalem.  The authors describe it as “a self-indulgent, nostalgic trip into our pasts.”

Root Vegetable Slaw8

I loved this salad!  At first I wasn’t sure about the combination of raw vegetables and soft cheese but the combination of crispy fresh with creamy soft is really nice.  The recipe calls for Labneh, which is really common in the Mediterranean.  It’s not as easy to find here so I substituted Burrata which is a fresh Italian cheese made from mozzarella and cream. It’s softer and creamier than fresh mozzarella.  Burrata means “buttered” in Italian which seems very appropriate.  “Jerusalem” includes a recipe to make your own Labneh if you are so inclined, or maybe you will find it in a market near you.

Root Vegetable Slaw with Burrata

  • Servings: 6
  • Difficulty: easy
  • Print

Root Vegetable Slaw1

3 medium beets
2 medium carrots
1/2 celery root
1 medium kohlrabi (optional)
4 Tbsn lemon juice
4 Tbsn olive oil
3 Tbsn sherry vinegar (or mirin)
2 tsp sugar
3/4 cup cilantro, coarsely chopped
2/3 cup flat leaf parsley, coarsely chopped
3/4 cup mint, ribboned or chopped
1/2 Tbsn lemon zest
salt and pepper
1 cup burrata or labneh (optional)

Root Vegetable Slaw5

  • Peel vegetables and slice then thinly into matchsticks (julienne).

Root Vegetable Slaw3

  • You can use a mandolin or food processor.  To do it by hand, stack a few slices at a time on top of one another and cut them into thin strips.

Root Vegetable Slaw4

  • For carrots, slice off ends and cut into halves or thirds, depending on the size of the carrots.  Mine were small so I used four.

Root Vegetable Slaw10


  • Try to cut all vegetables into the same sized matchsticks.

Root Vegetable Slaw17

  • Place all strips in a large bowl and cover with cold water.  Set aside while you make the dressing.

Root Vegetable Slaw14

  • Wash and dry a lemon.  Zest the lemon first, then halve and squeeze the juice.

Root Vegetable Slaw19

  • Place the lemon juice, olive oil, vinegar, sugar and 1 teaspoon salt in a small saucepan.  Bring to a gentle simmer and stir until the sugar and salt have dissolved.  Remove from heat.

Root Vegetable Slaw16

  • Drain the vegetable strips and transfer to a paper towel to dry well.  Dry the bowl and replace the vegetables.  Pour the hot dressing over the vegetables, mix well and let cool.  Place in the refrigerator for at least 45 minutes.

Root Vegetable Slaw9

  • Slice mint into ribbons and chop herbs, if you haven’t already done so.

Root Vegetable Slaw12

When ready to serve, add the herbs, lemon zest and 1 tsp black pepper to the salad.  Toss well, taste, and add more salt if needed.

Root Vegetable Slaw11

  • Serve with burrata or labneh on the side, if desired.


100th Post – Cauliflower “Mac” and Cheese

1

100

Wow, this is my 100th post! I’ve certainly learned a lot since publishing my first recipe, Green Curry Tofu, on November 25, 2013. I had never even been on a blog before starting Goodmotherdiet, so it has been quite a learning curve.  I got a domaine name on WordPress and suddenly, I was a blogger!  Every new techie thing I have learned, has been a major victory, like successfully uploading photos and then figuring out how to make them larger than a thumbnail; or adding links that work and making my recipes printable. I’m even writing code! What? Six months ago I didn’t even know what that was!  My thought processes and food choices have also evolved. It’s been over a year since I’ve eaten meat, other than the occasional free range chicken, and I feel good about the evolution, but I promised myself not to make any permanent changes, or edits to my About Page, until GMD turns one in November.  There will definitely be some edits since I now have a different and stronger perspective than when I started.  It’s interesting how just a simple change in diet can also change your way of thinking.  Anyway, thanks for joining me on this journey.  I hope you’re enjoying the ride…  You can follow me via email by clicking the Follow Me button or you can Like the Goodmotherdiet Facebook Page, both top left of the screen.

be-the-change
Deciding what to feature for my 100th post which happens to fall on a Wheatless Wednesday, was a challenge until I came across a recipe for Cauliflower ‘Mac’ and Cheese  on Tabitha’s Gluten Free Dishes, which is a great blog that I follow.  What is more iconic or American than Macaroni and Cheese? Nothing is quite so comforting as a big bowl of yummy, creamy cheesiness!   How about a Mac and Cheese that has no actual pasta but still satisfies that craving?  Many versions of Cauliflower Mac and Cheese are available including those by Dr Oz and Rachel Ray. Most recipes include heavy cream and cream cheese.  I have opted to make a ‘skinny’ version using non-fat milk and yogurt instead of heavy cream.  Cauliflower is a good stand in for pasta and many other things as it is extremely versatile and good at absorbing flavors while adding a variety of good nutrients and fiber but little fat and no cholesterol.  I have already posted recipes for Cauliflower Crust Pizza  and Cauliflower Buffalo ‘Wings’ and Cauliflower Puree instead of mashed potatoes, all with great success. So here goes…

Cauliflower Mac Cheese15

TIP:  You can use any kind of cheese that you like but a sharp cheddar gives you more bang for your buck than mild, in that it’s stronger flavor allows you to use less cheese (hense fewer calories and fat).  Another way to cut fat and calories is to use 2 cups non-fat milk and increase the butter and flour to 3 Tablespoons each,  or 1 1/2 cups low or non fat milk and 1/2 cup full fat milk or cream.  If you like extra creamy, you can use all heavy cream and even add 2 tablespoons of cream cheese.  To make this vegan, use coconut oil, almond milk and vegan cheese.  I used 1 1/2 cups non-fat milk and 1/2 cup non-fat yogurt with good results.  Several recipes I looked at called for adding cayenne pepper, onion powder, sautéed onions or fresh scallions before cooking, so think about those as options.

Cauliflower Mac and Cheese

  • Servings: 4
  • Difficulty: easy
  • Print

Cauliflower Mac Cheese13

1 head cauliflower
2  cups mild or sharp cheddar (gruyere, Swiss or your favorite melty cheese)
1/4 cup shredded parmesan (optional)
2 Tbsn butter
2 Tbsn flour (rice, oat or quinoa flour work well in lieu of wheat flour)
1 1/2 cups non or low fat milk  (see Tip above for other options)
1/2 cup yogurt
1 tsp Dijon mustard
1/4 tsp salt
1/4 tsp pepper


  • Pre-heat the oven to 375F
  • Spray a baking dish with cooking spray and set aside.

Cauliflower Mac Cheese2

  • Cut core out of cauliflower and break or cut into small florets.

Cauliflower Mac Cheese3

  • Bring a pot of water to a boil and par boil the cauliflower florets for 5 minutes. Rinse in cold water, drain well and pat between several layers of paper towels to dry. Transfer the cauliflower to the baking dish and set aside.

Cauliflower Mac Cheese4

  • Melt butter in a medium skillet over medium heat. Stir in flour and cook for 1 minute.


Cauliflower Mac Cheese6

  • Pour milk in slowly, whisking to combine.  Add yogurt one tablespoon at a time,  if using, and whisk into a creamy sauce.

Cauliflower Mac Cheese8

  • Stir in salt, pepper and 1 1/2 cups cheese. Stir over medium-low heat for 5 minutes.

Cauliflower Mac Cheese10

  • Pour the cheese sauce over the top and stir to combine.

Cauliflower Mac Cheese11

  • Top with remaining cheese, plus parmesan, if using.

Cauliflower Mac Cheese12

  • Cook for 15 minutes or so until the cheese turns golden and begins to bubble. Broil last few minutes to brown the top, if desired.

Cauliflower Mac Cheese16

  • Sprinkle with red pepper flakes for an added kick, if desired.


100 Photo Credit: Sonandoconparis.blogspot.com


Wheatless Wednesday – Egg in a Basket

2

Egg Basket13

Can you think of a happier breakfast than eggs Sunnyside Up? Think sunshine and smiley faces. How about stretching the cuteness factor by cooking them inside colorful bell pepper rings?

Egg Basket15

I found this new twist on the traditional Egg in a Hole (also called Egg in a Basket, Toad in a Hole, Turtle in a Shell, One Eyed Jack or Pirate’s Eye) on Natashas Kitchen.  In the traditional dish you cut out a circle from a slice of bread, fry it in some melted butter and cook the egg inside the hole.  In this new and improved version (which is originally a Martha Stewart brainchild), you use slices of bell pepper instead of bread to contain the egg while it cooks which adds a shock of color as well as flavor.  Its also a good way to get people to eat their veggies in the morning.  As an alternative, this can also be done with scrambled eggs.  Just whisk the eggs with salt and pepper, and divide the mixture between each pepper slice.  Eat plain if you’re a purist or top with cheese, avocado and fresh tomato for a more filling breakfast.  Serve with fruit and you’ve got a delicious and nutritious start to the day and it takes only about five minutes to prepare.

Egg Basket1

Eggs got a bad rap for a while and we were  advised for years to avoid eggs or limit our consumption of them due to their high cholesterol content.  It is now recognized that, for most people, cholesterol in food we eat doesn’t increase cholesterol in our bodies.  The real culprit is refined foods like white flour and sugar or polyunsaturated oils that cause inflammation in our bodies, resulting in heart disease and other health issues. In reality eggs are loaded with protein, vitamins and minerals, most of which are in the yolk.  For a good article on why the egg is considered the perfect food read The Truth About Food.  All eggs are not considered equal, however.  95 to 98% of eggs come from factory farms where conditions are inhumane and create food safety problems (for starters.)  The List of Reasons to Boycott Factory Farms is almost endless, the least of which is from a nutritional standpoint.  Factory Farmed eggs are less expensive but you get what you pay for.  Eggs from factory farms are nutritionally inferior to eggs from hens raised on pasture. According to Mother Earth News,  real free-range eggs contain:

• 1/3 less cholesterol
• 1/4 less saturated fat
• 2/3 more vitamin A
• 2 times more omega-3 fatty acids
• 3 times more vitamin E
• 7 times more beta carotene
• 50 percent more folic acid
• 70 percent more vitamin B12

OLYMPUS DIGITAL CAMERA

TIP:  I buy organic, free-range or pasture-raised, Certified Humanely Raised eggs (from an actual farm not a factory).  If I’m lucky, I get eggs raised in the backyard next door in exchange for the extra produce from my garden.   I also buy organic produce whenever possible.  I think it’s worth the added expense and I like to support the farmers that do it the ‘right’ way.  Sometimes its hard to know if your produce is organic or not, if it’s not labeled. I learned a handy tip from Dr. Oz (yes, on TV).  In supermarkets check the sticker with the barcode.  If the barcode starts with a 9 it’s organic.  For example, the green pepper I just bought has a barcode of #94065, which makes it organic.  A conventional green pepper would be labeled #4065.  Check it out next time you go shopping!

Egg Basket24

Egg in a Basket

  • Servings: 4
  • Difficulty: easy
  • Print

Egg Basket23

1 bell pepper (any color)
1/2 avocado
1 medium sized tomato
4 large eggs
Salt
Pepper
¼ cup grated cheese (any combination of parmesan, mozzarella, reggiano, fontina, etc.)
1 Tbsn any fresh herbs, minced (parsley, cilantro, basil, etc)
1 Tbsp olive, coconut oil or butter

Egg  Basket16

  • Cut pepper into 1/2″ rings and remove the seeds and centers.

Egg Basket16

  • For more color use a variety of bell peppers.

Egg Basket18

  • Cut avocado in half vertically, remove pit and slice into rings. Slice tomatoes horizontally into rings.

Egg Basket19

  • In a large, non-stick skillet, heat  oil over medium/high heat.   Place sliced peppers into the pan and let them saute for a minute.

Egg Basket20

  • Turn the peppers over and crack one egg into the center of each bell pepper slice. Pour the egg in slowly; it prevents the egg from leaking and forms a nice seal.  If some egg leaks out just use a spatula to push it back under. It might help to press firmly down on the pepper slices while you pour in the egg. Cook 2 to 3 minutes or until the whites are set and the yolk is runny.  Top with cheese, if desired, and serve.

Egg Basket21

  • For overeasy, turn over and top with cheese, if desired, salt and pepper.  Cook another minute, two for over hard.

Egg Basket22

  • Cover to melt cheese, if desired.

Egg Basket14

  • Top with avocado and tomato, if desired.  Sprinkle with salt and pepper and/or fresh herbs.

Egg Basket25


Meatless Monday – Chili Lime Grilled Tofu with Avocado &Mango Salsa

5

Chili Lime Tofu13

Chili Lime Grilled Tofu is my favorite tofu recipe so far.  It’s taken a few tries but I have finally nailed it. I made this last week and thought it needed something, so this time I topped it with an Avocado Mango salsa with red onions, lime and jalapenos which is a great combination of sweet, savory and spicy.   I also let the tofu marinate overnight which allows the flavors of the marinade to be fully absorbed before cooking.  I just served this dinner to my new future daughter in law (I love saying that) and one of my sons, who I thought wouldn’t even try tofu. Much to my surprise the tofu was a big hit.  I’m just happy there is a bit left for lunch tomorrow…

Chili Lime Tofu10

The Avocado Mango Salsa is a delight of flavors and would also be great on top of grilled or roasted fish or chicken. I know you’ve heard that Avocados are nutrient dense and a healthy fat but did you know that they also act as a ‘nutrient booster’ by helping the body absorb the nutrients from foods eaten along with it?  Furthermore, Mango is so nutritionally rich it is considered the “King of Fruit”.   Lastly,  Jalapeno Peppers add more than just spice. They are high in nutrients that may help you boost weight loss efforts, improve immunity, promote heart health and fight free radicals from environmental and dietary pollutants.  This recipe calls for one jalapeno pepper without the seeds.  If you like spicy, add another jalapeno or include the seeds, but beware, the seeds are really hot.  If you don’t like spicy, don’t use the jalapeno.  So feel free to load up on this salsa.  It might be the best thing you’ve done for your body today!

TIP:  I served this tofu with brown basmati rice which I cooked in vegetable broth.  A great way to add more flavor to rice is to add 1/2 to 1 teaspoon ginger paste or a one inch piece of peeled ginger root to the broth while cooking.  Just remove the root before serving.

For other tofu recipes, check out:

Crispy Glazed Tofu and Bok Choy

Tofu and Bok Choy1

Green Curry Tofu

Thai Green Curry Tofu


Chili Lime Grilled Tofu with Avocado Mango Salsa

  • Servings: 4
  • Difficulty: easy
  • Print

Chili Lime Tofu15
TOFU:
1 (14 ounce) package extra firm tofu
1/4 cup lime juice
1 tablespoon olive oil
5 tablespoons chopped fresh cilantro
2 cloves garlic, minced
2 teaspoons chili powder
1/4 teaspoon cayenne pepper
salt and black pepper to taste

SALSA:
1 avocado, diced
1/2 cup mango, diced
1/4 cup red onion, minced
1 jalapeno, seeded and minced (optional)
1 Tbsn lime juice (or more to taste)
1 Tbsn cilantro, chopped
1-2 Tbsn olive or avocado oil
1/2 tsp salt (optional)
Chili Lime Tofu17

  • Slice the tofu in 1/2 inch slices and place on double papertowels.  You can leave them rectangular or cut into triangle shapes.

Chili Lime Tofu16

  • Cover with papertowels and put a heavy pan on top to help press out excess water. Should take 20 to 30 minutes.  Don’t skip this step or the tofu won’t absorb the marinade.

Chili Lime Tofu12

  • Combine all other ingredients and marinate tofu in the refrigerator several hours or overnight.

Chili Lime Tofu3

  • To make the salsa, slice the mango about a third of the way (avoiding the rather large pit inside).

Chili Lime Tofu4

  • Using a sharp knife, cut rows horizontally through the flesh but not all the way through the skin.

Chili Lime Tofu5

  • Turn mango and cut crosswise

Chili Lime tofu6

  • Flip the mango slice inside out and slice off chunks.  Place in a bowl.

Chili Lime Tofu7

  • Cut avocado in half, pit and dice.  Place into bowl with mango.

Chili Lime Tofu8

  • Using gloves or a papertowel to protect your hands from the pepper oils, seed and mince the jalapeno.  Add to mango mixture.

Chili Lime Tofu2

  • Chop red onion and add to bowl.

Chili Lime Tofu9

  • Add chopped cilantro, lime juice and salt.  Gently combine and set aside.

Chili Lime Tofu10

  • Brush or spray oil on the grill and let it preheat.  Grill tofu several minutes until you see nice grill marks.  Turn and grill the other side.  Remove to a serving platter or individual plates.

Chili Lime Tofu14

  • Top with salsa mixture.

Chili Lime Tofu13

  • Serve with rice or some other grain for a well rounded meal.


  • Lobster Risotto

    1

    Lobster Risotto

    What happens when Maine meets Italiano meets Mexico?  Lobster Risotto, of course!  My new friend, Claudia, an Italian who lives in Mexico, was recently visiting my Maine neighbor, Lydia.  We were sitting at the lake one afternoon, enjoying the sunshine and the view, when the conversation turned to food, as it often does (occupational hazard).  Summers in Maine often involve Lobster Bakes and the inevitable leftover lobsters which the next day become lobster rolls, lobster salad or lobster fra diavlo.  Claudia makes a wonderful lobster risotto whenever she is in Maine visiting Lydia and graciously offered to share her recipe as a Guest Chef on Goodmotherdiet.
    Lobster Risotto8

    Lobster Risotto is a great way to use extra lobster but it is delicious enough on it’s own to buy lobster just to make this dish. It’s also a good way to get two lobsters to feed 4 or 5 people. Claudia likes to make a homemade lobster broth by simmering the lobster shells with fresh herbs for 20 minutes to an hour which infuses the broth with lobster flavor and gives it a richness that really makes the dish.  She also recommends using Albariño white wine but sauvignon blanc or pinot grigio are good substitutes.  Risotto is usually made with Arborio rice which is an Italian short-grain rice, named after the town of Arborio, in Italy, where it is grown. When cooked, the rounded grains are firm, creamy, and chewy, due to its higher starch content; but blends well with other flavors.  Carnaroli rice, grown in Northern Italy, is a medium grained high starch rice which is also great for risotto.  (Long grain rice doesn’t work quite as well.)  The resulting dish is very flavorful with a rich and creamy consistency.  For such a simple dish, Lobster Risotto is quite elegant. Thank you Claudia!

    Lobster Risotto2

    Lobster Risotto

    • Servings: 4
    • Difficulty: easy
    • Print

    1 cup Arborio rice
    1 glass Albariño white wine (or sauvignon blanc or pinot grigio)

    2  1 pound and half soft shell Maine lobsters, cooked
    8 cups home made lobster broth (directions below)
    pinch of Salt
    1/2 cup Butter
    1/4 cup Parsley, minced
    1/4 cup Basil, minced
    pinch of Saffron
    1 zucchini, diced
    3 tablespoons of extra virgin Olive oil
    1 medium red onion, diced
    Lobster Risotto16

    Lobster Risotto15

    • Place the shells, a few sprigs of parsley and basil in a stockpot, cover with water and simmer for at least an hour.  Remove shells, strain and keep broth hot.

    Lobster Risotto14

    • Saute the onion and zucchini in butter until soft.

    Lobster Risotto12

    • Add rice and sauté for several minutes.

    Lobster Risotto11

    • Add wine and saffron and let simmer for about five minutes.

    Lobster Risotto7

    • Add stock to the rice one cup at a time and reduce, stirring often until the liquid is absorbed.

    Lobster Risotto5

    •  Repeat until the stock is gone and the risotto is soft and creamy but slightly al dente. Salt to taste.

    Lobster Risotto6

    • Heat the lobster meat in a couple of tablespoons of butter in a small pan.

    Lobster Risotto

    • Arrange the lobster meat on the risotto, sprinkle with parsley and serve hot.

    Lobster Risotto3


    Wheatless Wednesday – Grilled Corn on the Cob with Herb Butter

    0

    Grilled Corn3

    Nothing says summer like fresh sweet corn.  Add herbs, spices and butter, then grill corn right in it’s own husk for a delicious treat!  Corn is an interesting crop in that it is considered both a vegetable (when you eat it as corn) or a grain (when it is popped as popcorn) so it deserves props for diversity as well as providing nutrition and lots of much needed fiber.  Corn is flavorful on its own, especially while it is in the peak of its season.  This is the time of year when it has the best flavor, is the least expensive and locally grown varieties are widely available. Since much of the corn produced today is genetically modified (GMO), purchase organically grown corn to avoid GMO corn. If you want to know what is wrong with GMO foods, click here.

    Grilled Corn7

    Grilling corn is easy and fun.  You can just throw them whole on the grill or you can season them first with a yummy herb butter.  Pull the husks down, without removing them from the cob, and remove the silky threads.  Then soak the cobs in cold water to keep the husks from completely burning and to provide enough moisture for the corn to steam.  Without the soaking, the corn will be chewier but still tasty.  Then liberally spread the corn kernels with butter, herbs and spices and close the husks back up.  Tying the husks closed is optional.  If you like charring, then leave the husks slightly open.  Grill for 15 minutes or so, turning every 5 minutes until all sides are charred.  Pull back the husks and enjoy!

    Grilled Corn on the Cob

    • Servings: 8
    • Difficulty: easy
    • Print

    8 ears fresh corn on the cob (unshucked)
    2 sticks butter, softened
    4 cloves garlic, minced
    1/2 cup fresh herbs (cilantro, basil, oregano or parsley), chopped
    1 tsp creole seasoning (or 1 tsp salt plus a dash of chili powder)
    1/4 tsp cayenne (optional)

    Grilled Corn10

    • Pull the outer husks down the ear to the base. Strip away the silk from each ear of corn by hand. Fold husks back into place, and place the ears of corn in a large container of cold water (or kitchen sink filled with cold water) for 20 minutes to an hour.  This step provides extra moisture to steam the corn and keep the husks from completely burning.
    • Combine butter, garlic, herbs and spices in a small bowl. Set Aside.

    grilled corn11

    •  Remove corn from water and shake off excess.  Pull husks back down and spread corn kernels liberally with herb butter.
    • Pull husks back into place and tie closed with a string (optional).

    Grilled Corn8

    • If you don’t have string you can tie with a long piece of husk or just grill without tying.

    Grilled Corn6

    • Place the corn on the grill, close the cover and grill for 15 to 20 minutes, turning every 5 minutes.

    Grilled Corn5

    • Remove the husks and eat on the cob or remove the kernels. Serve with any remaining herb butter.

    Grilled Corn6